Example for Configuring an FTPS Client
Networking Requirements
The FTP server function does not provide security mechanisms. Because data is transmitted in plain text, the network is susceptible to man-in-the-middle attacks and MAC/IP address spoofing. To address this issue and ensure secure file transfer, configure the SSL policy, data encryption, user identity authentication, and message integrity check mechanisms on the FTPS server. SSL ensures secure connection based on the FTP server function.
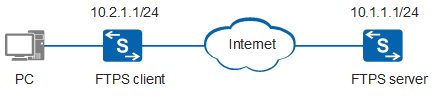
As shown in Figure 1, routes between the FTPS server and the device functioning as the FTPS client are reachable. The FTPS client can securely connect to the FTPS server to remotely manage files.
- On the FTPS client, configure the SSL policy and load the CA certificate to check the owner's identity.
- On the FTPS server, configure the SSL policy, load the digital certificate to check the owner's identity, and enable the FTPS server function.
Obtain required certificates for the FTPS client and server from the CA. In this example, Huawei device functions as the FTPS server.
Configuration Roadmap
The configuration roadmap is as follows:
Upload the certificates.
- Upload the digital certificate and private key to the root directory on the FTPS server.
- Upload the CA certificate to the root directory on the FTPS client.
Load the certificates and configure SSL policies.
- On the FTPS server, copy the digital certificate to the security directory, configure the SSL policy, and load the digital certificate.
- On the FTPS client, copy the CA certificate to the security directory, configure the SSL policy, and load the digital certificate.
Enable the FTPS server function and configure the local FTP user.
Run FTP commands to connect to the FTPS server and remotely manage files.
Procedure
- Upload the certificates.
Configure the FTP function on the client and server and upload the certificates to the client and server. For details, see Managing Files When the Device Functions as an FTP Server.
# Run the dir command on the FTPS server to check that the digital certificate and private key have been uploaded successfully.
<HUAWEI> system-view
[HUAWEI] sysname FTPS_Server
[FTPS_Server] quit
<FTPS_Server> dir
Directory of flash:/

  Idx  Attr     Size(Byte)  Date        Time       FileName
    0  drw-              -  May 10 2011 05:05:40   src
    1  -rw-        524,575  May 10 2011 05:05:53   private-data.txt
    2  -rw-            446  May 10 2011 05:05:51   vrpcfg.zip
    3  -rw-          1,302  Mar 13 2012 18:23:28   4_servercert_der_dsa.der
    4  -rw-            951  Mar 13 2012 18:30:20   4_serverkey_der_dsa.der
...

65,233 KB total (7,289 KB free)
# Run the dir command on the client to check that the CA certificate has been uploaded successfully.
<HUAWEI> system-view
[HUAWEI] sysname FTPS_Client
[FTPS_Client] quit
<FTPS_Client> dir
Directory of flash:/

  Idx  Attr     Size(Byte)  Date        Time       FileName
    0  -rw-        524,558  May 10 2011 04:50:39   private-data.txt
    1  -rw-          1,237  Mar 14 2012 07:46:24   cacert.der
    2  -rw-          1,241  Mar 14 2012 07:46:20   rootcert.der
    3  drw-              -  Apr 09 2011 19:46:14   src
    4  -rw-            421  Apr 09 2011 19:46:14   vrpcfg.zip
    5  -rw-      1,308,478  Apr 14 2011 19:22:45   we1.zip
    6  drw-              -  Apr 10 2011 01:35:54   logfile
    7  -rw-              4  Apr 19 2011 04:24:28   snmpnotilog.txt
    8  drw-              -  Apr 13 2011 11:37:40   lam
...

65,233 KB total (17,489 KB free)
- Configure an SSL policy and load certificates.
Perform the following operations on the FTPS server.
# Create the security directory and move the digital certificate to the security directory.<FTPS_Server> mkdir security/ <FTPS_Server> move 4_servercert_der_dsa.der security/ <FTPS_Server> move 4_serverkey_der_dsa.der security/
# Run the dir command in the security directory to check that the digital certificate and private key have been moved successfully.<FTPS_Server> cd security/ <FTPS_Server> dir Directory of flash:/security/ Idx Attr Size(Byte) Date Time FileName 0 -rw- 1,302 Mar 13 2012 18:23:28 4_servercert_der_dsa.der 1 -rw- 951 Mar 13 2012 18:30:20 4_serverkey_der_dsa.der 65,233 KB total (7,289 KB free)
# Configure the SSL policy and load the digital certificate in the ASN1 format.<FTPS_Server> system-view [FTPS_Server] ssl policy ftp_server [FTPS_Server-ssl-policy-ftp_server] certificate load asn1-cert 4_servercert_der_dsa.der key-pair dsa key-file 4_serverkey_der_dsa.der [FTPS_Server-ssl-policy-ftp_server] quit
# Run the display ssl policy command on the FTPS server to view information about the SSL policy.
[FTPS_Server] display ssl policy

       SSL Policy Name: ftp_server
     Policy Applicants:
         Key-pair Type: DSA
 Certificate File Type: ASN1
      Certificate Type: certificate
  Certificate Filename: 4_servercert_der_dsa.der
     Key-file Filename: 4_serverkey_der_dsa.der
             Auth-code:
                   MAC:
              CRL File:
       Trusted-CA File:
           Issuer Name:
   Validity Not Before:
    Validity Not After:
Perform the following operations on the FTPS client:
# Create the security directory and move the CA certificate to the security directory.
<FTPS_Client> mkdir security/
<FTPS_Client> move cacert.der security/
<FTPS_Client> move rootcert.der security/
# Run the dir command in the security directory to check that the CA certificate has been moved successfully.
<FTPS_Client> cd security/
<FTPS_Client> dir
Directory of flash:/security/

  Idx  Attr     Size(Byte)  Date        Time       FileName
    0  -rw-          1,237  Mar 14 2012 07:46:24   cacert.der
    1  -rw-          1,241  Mar 14 2012 07:46:20   rootcert.der

65,233 KB total (17,489 KB free)
# Configure the SSL policy and load the CA certificate.
<FTPS_Client> system-view
[FTPS_Client] ssl policy ftp_client
[FTPS_Client-ssl-policy-ftp_client] trusted-ca load asn1-ca cacert.der
[FTPS_Client-ssl-policy-ftp_client] trusted-ca load asn1-ca rootcert.der
[FTPS_Client-ssl-policy-ftp_client] quit
# Run the display ssl policy command on the FTPS client to view information about the SSL policy.
[FTPS_Client] display ssl policy

       SSL Policy Name: ftp_client
     Policy Applicants:
         Key-pair Type:
 Certificate File Type:
      Certificate Type:
  Certificate Filename:
     Key-file Filename:
             Auth-code:
                   MAC:
              CRL File:
       Trusted-CA File:
     Trusted-CA File 1: Format = ASN1, Filename = cacert.der
     Trusted-CA File 2: Format = ASN1, Filename = rootcert.der
- Enable the FTPS server function and configure the local FTP user.
# Enable the FTPS server function.

Disable the FTP server function before enabling the FTPS server function.
[FTPS_Server] undo ftp server
[FTPS_Server] ftp secure-server ssl-policy ftp_server
[FTPS_Server] ftp secure-server enable
# Configure the local FTP user.
[FTPS_Server] aaa
[FTPS_Server-aaa] local-user admin password irreversible-cipher Helloworld@6789
[FTPS_Server-aaa] local-user admin service-type ftp
[FTPS_Server-aaa] local-user admin privilege level 3
[FTPS_Server-aaa] local-user admin ftp-directory flash:
[FTPS_Server-aaa] quit
Alternatively, you can use the same user who uploaded the certificates in Step 1 or create a user.
- On the FTPS client, run FTP commands to connect to the FTPS server and remotely manage files.
[FTPS_Client] ftp ssl-policy ftp_client 10.1.1.1
Trying 10.1.1.1 ...
Press CTRL+K to abort
Connected to 10.1.1.1.
220 FTP service ready.
234 AUTH command successfully, Security mechanism accepted.
200 PBSZ is ok.
200 Data channel security level is changed to private.
User(10.1.1.1:(none)):admin
331 Password required for admin.
Enter password:
230 User logged in.

[ftp]
To connect to the FTPS server, enter the correct user name and password.
- Verify the configuration.
# Run the display ftp-server command on the FTPS server to view the SSL policy name and the FTPS server status.
[FTPS_Server] display ftp-server
   FTP server is stopped
   Max user number                 5
   User count                      1
   Timeout value(in minute)        30
   Listening port                  21
   Acl number                      0
   FTP server's source address     0.0.0.0
   FTP SSL policy                  ftp_server
   FTP Secure-server is running
Manage files remotely on the FTPS client.
Configuration File
FTPS_Server configuration file
#
sysname FTPS_Server
#
FTP secure-server enable
ftp secure-server ssl-policy ftp_server
#
aaa
 local-user admin password irreversible-cipher $1a$P2m&M5d"'JHR7b~SrcHF\Z\,2R"t&6V|zOLh9y$>M\bjG$D>%@Ug/<3I$+=Y$
 local-user admin privilege level 3
 local-user admin ftp-directory flash:
 local-user admin service-type ftp
#
ssl policy ftp_server
 certificate load asn1-cert 4_servercert_der_dsa.der key-pair dsa key-file 4_serverkey_der_dsa.der
#
return
FTPS_Client configuration file
#
sysname FTPS_Client
#
ssl policy ftp_client
 trusted-ca load asn1-ca cacert.der
 trusted-ca load asn1-ca rootcert.der
#
return