Example for Configuring Built-in Portal Authentication
Networking Requirements
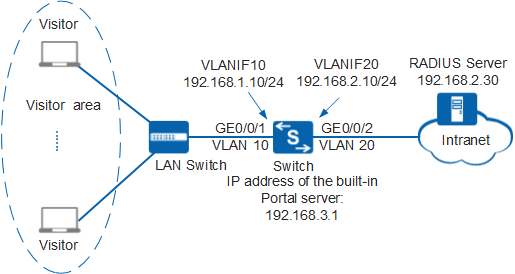
As shown in Figure 1, terminals in a company's visitor area are connected to the company's internal network through the Switch. Unauthorized access to the internal network can damage the company's service system and cause leakage of key information. Therefore, the administrator requires that the Switch should control users' network access rights to ensure internal network security.
Because visitors move frequently and costs need to be saved, Portal authentication is configured and the RADIUS server is used to authenticate user identities.
Procedure
- Configure AAA.
# Create and configure the RADIUS server template rd1.
[Switch] radius-server template rd1
[Switch-radius-rd1] radius-server authentication 192.168.2.30 1812
[Switch-radius-rd1] radius-server shared-key cipher Huawei@2012
[Switch-radius-rd1] quit
# Create the AAA authentication scheme abc and set the authentication mode to RADIUS.
[Switch] aaa
[Switch-aaa] authentication-scheme abc
[Switch-aaa-authen-abc] authentication-mode radius
[Switch-aaa-authen-abc] quit
# Create the authentication domain huawei.com, and bind the AAA authentication scheme abc and RADIUS server template rd1 to the domain.
[Switch-aaa] domain huawei.com
[Switch-aaa-domain-huawei.com] authentication-scheme abc
[Switch-aaa-domain-huawei.com] radius-server rd1
[Switch-aaa-domain-huawei.com] quit
[Switch-aaa] quit
# Check whether a user can pass RADIUS authentication. The test user test and password Huawei2012 have been configured on the RADIUS server.
[Switch] test-aaa test Huawei2012 radius-template rd1
Info: Account test succeeded.
- Configure Portal authentication.# Set the NAC mode to unified.

By default, the unified mode is enabled. After the NAC mode is changed, the device automatically restarts.
[Switch] authentication unified-mode
# Configured the IP address for the built-in Portal server.
[Switch] interface loopback 10
[Switch-LoopBack10] ip address 192.168.3.1 32
[Switch-LoopBack10] quit
[Switch] portal local-server ip 192.168.3.1
# Configure the SSL policy loaded on the built-in Portal authentication page.
[Switch] ssl policy huawei
[Switch-ssl-policy-huawei] certificate load asn1-cert servercert.der key-pair dsa key-file serverkey.der
[Switch-ssl-policy-huawei] quit
[Switch] portal local-server https ssl-policy huawei
Before loading a certificate for the SSL policy, ensure that the certificate file and key pair file have been stored on the device; otherwise, the certificate fails to be loaded. In addition, the certificate file and key pair file must be saved in the security subdirectory of the system root directory. If the security subdirectory does not exist, create it.
Apply to a trusted certificate authority for the certificate that needs to be loaded for the SSL policy.
# Configure the Portal access profile web1 and enable built-in Portal authentication.[Switch] portal-access-profile name web1 [Switch-portal-acces-profile-web1] portal local-server enable [Switch-portal-acces-profile-web1] quit
# Configure the authentication profile p1, bind the Portal access profile web1 to the authentication profile, specify the domain huawei.com as the forcible authentication domain in the authentication profile, set the user access mode to multi-authen, and set the maximum number of access users to 100.
[Switch] authentication-profile name p1
[Switch-authen-profile-p1] portal-access-profile web1
[Switch-authen-profile-p1] access-domain huawei.com force
[Switch-authen-profile-p1] authentication mode multi-authen max-user 100
[Switch-authen-profile-p1] quit
In this example, users use static IP addresses. If users obtain IP addresses using DHCP and the DHCP server is on the upstream network of the switch, configure an authentication-free rule to allow packets from the network segment of the DHCP server to pass through. For details on how to configure an authentication-free rule, see (Optional) Configuring Authentication-Free Authorization Information for Users.
# Bind the authentication profile p1 to GE1/0/1 and enable Portal authentication on the interface.
[Switch] interface gigabitethernet 0/0/1
[Switch-GigabitEthernet0/0/1] authentication-profile p1
[Switch-GigabitEthernet0/0/1] quit
- Verify the configuration.
- After a user opens the browser and enters any website address, the user is redirected to the Portal authentication page. The user then can enter the user name and password for authentication.
- If the user name and password are correct, an authentication success message is displayed on the Portal authentication page. The user can access the network.
- After users go online, you can run the display access-user access-type portal command on the device to view information about online Portal authentication users.