Example for Configuring a Switch to Communicate with iMaster NCE-Campus
Networking Requirements
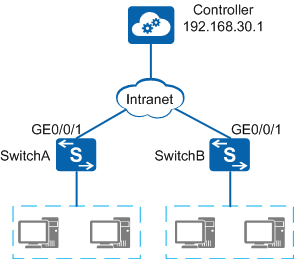
On an enterprise network shown in Figure 1, the Huawei iMaster NCE-Campus is used by the administrator to configure and manage switches, improving network configuration and maintenance efficiency.
Configuration Roadmap
Configure NETCONF connections between iMaster NCE-Campus and switches, so that the administrator can configure and manage the switches using NETCONF. The following uses SwitchA as an example. The configurations of SwitchB are similar to those of SwitchA, and are not mentioned here.
- Configure interfaces and VLANs. Ensure that reachable routes are available between switches and iMaster NCE-Campus. The configuration procedure is not provided here.
- Configure NETCONF on switches.
- Configure iMaster NCE-Campus.
Procedure
- Configure interfaces and VLANs.
<HUAWEI> system-view
[HUAWEI] sysname SwitchA
[SwitchA] vlan batch 10
[SwitchA] interface gigabitethernet 0/0/1
[SwitchA-GigabitEthernet0/0/1] port link-type trunk
[SwitchA-GigabitEthernet0/0/1] port trunk allow-pass vlan 10
[SwitchA-GigabitEthernet0/0/1] quit
[SwitchA] interface Vlanif10
[SwitchA-Vlanif10] ip address 192.168.10.1 24
[SwitchA-Vlanif10] quit
- Configure NETCONF on SwitchA.
[SwitchA] netconf [SwitchA-netconf] source ip 192.168.10.1 [SwitchA-netconf] callhome controller [SwitchA-netconf-callhome-controller] ip address 192.168.30.1 port 10020 //The port number must be the same as that used by iMaster NCE-Campus. [SwitchA-netconf-callhome-controller] return - Configure iMaster NCE-Campus.
- Choose , click Add Device, configure Device name and Device ESN, and click OK. SwitchA is added.


- Choose , click Add Device, configure Device name and Device ESN, and click OK. SwitchA is added.
Configuration Files
- SwitchA configuration file
# sysname SwitchA # vlan batch 10 # interface Vlanif10 ip address 192.168.10.1 255.255.255.0 # interface GigabitEthernet0/0/1 port link-type trunk port trunk allow-pass vlan 10 # netconf callhome controller ip address 192.168.30.1 port 10020 source ip 192.168.10.1 # return - SwitchB configuration file
#
sysname SwitchB
#
vlan batch 20
#
interface Vlanif20
 ip address 192.168.20.1 255.255.255.0
#
interface GigabitEthernet0/0/1
 port link-type trunk
 port trunk allow-pass vlan 20
#
netconf
 callhome controller
  ip address 192.168.30.1 port 10020
 source ip 192.168.20.1
#
return