Example for Applying ACLs to SNMP to Filter NMSs
ACL Overview
An Access Control List (ACL) consists of one rule or a set of rules that describe the packet matching conditions. These conditions include source addresses, destination addresses, and port numbers of packets.
An ACL filters packets based on rules. A device with an ACL configured matches packets based on the rules to obtain the packets of a certain type, and then decides to forward or discard these packets according to the policies used by the service module to which the ACL is applied.
Depending on the rule definition methods, ACLs include basic ACL, advanced ACL, and Layer 2 ACL. A basic ACL defines rules to filter IPv4 packets based on information such as source IP addresses, fragment information, and time ranges. If you only need to filter packets based on source IP addresses, you can configure a basic ACL.
In this example, a basic ACL is applied to the SNMP module so that only the specified NMS can access the switch. This improves switch security.
Configuration Notes
This example applies to all versions of all S series switches.

The following commands and output information are obtained from S7712 running V200R007C00.
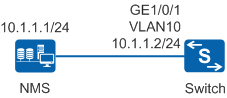
Networking Requirements
As shown in Figure 1, a new switch on the same network segment as the NMS is added to an enterprise's network, and uses SNMPv1 to communicate with the NMS. To improve switch security, the switch can only be managed by the existing NMS on the network.
Configuration Roadmap
The configuration roadmap is as follows:
Configure SNMPv1 on the switch so that the NMS running SNMPv1 can manage the switch.
Configure access control so that only the NMS with the specified IP address can perform read/write operations on the specified MIB objects of the switch.
Configure a community name based on which the switch permits access of the NMS.
Configure a trap host and enable the switch to automatically send traps to the NMS.
Add the switch to the NMS. The community name configured on the switch must be the same as that used by the NMS; otherwise, the NMS cannot manage the switch.
Procedure
- Configure SNMPv1 on the switch so that the NMS running SNMPv1 can manage the switch.
<HUAWEI> system-view
[HUAWEI] sysname Switch
[Switch] snmp-agent sys-info version v1   //By default, SNMPv3 is supported.
- Configure access control so that only the NMS with the specified IP address can perform read/write operations on the specified MIB objects of the switch.
# Configure an ACL to permit only the NMS 10.1.1.1 to access the switch.
[Switch] acl 2001
[Switch-acl-basic-2001] rule permit source 10.1.1.1 0
[Switch-acl-basic-2001] rule deny
[Switch-acl-basic-2001] quit
# Configure the MIB view to specify the MIB objects that can be accessed by the NMS.
[Switch] snmp-agent mib-view included isoview01 system   //Configure the MIB view isoview01 to access the system subtree.
[Switch] snmp-agent mib-view included isoview02 interfaces   //Configure the MIB view isoview02 to access the interfaces subtree.
- Configure a community name based on which the switch permits access of the NMS, apply the ACL to make the access control function take effect.
[Switch] snmp-agent community read adminnms01 mib-view isoview01 acl 2001   //Grant adminnms01 the read-only permission on the system subtree.
[Switch] snmp-agent community write adminnms02 mib-view isoview02 acl 2001   //Grant adminnms02 the read-write permission on the interface subtree.
- Configure a trap host and enable the switch to automatically send traps to the NMS.
[Switch] snmp-agent trap enable Warning: All switches of SNMP trap/notification will be open. Continue? [Y/N]:y //Enable all trap functions on the switch. By default, only some trap functions are enabled. You can run the display snmp-agent trap all command to check trap status. [Switch] snmp-agent target-host trap address udp-domain 10.1.1.1 params securityname adminnms01 v1 - Add the switch to the NMS.
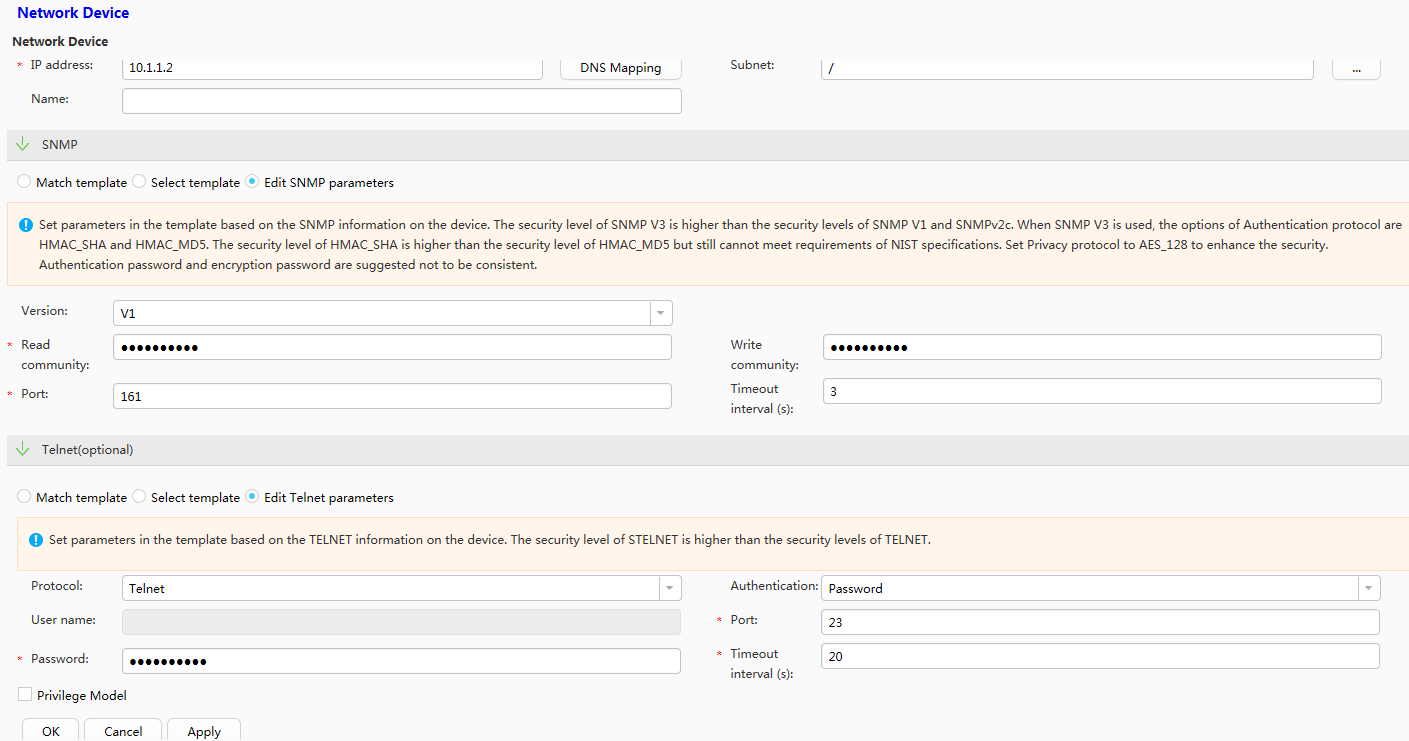
# Log in to eSight and choose . Set SNMP parameters based on Table 1 and click OK. A switch is added to and can be managed by eSight. The switch will proactively send trap messages to eSight.
Table 1 SNMP parameters Parameter
Setting
Select discovery protocol
SNMP
IP address
10.1.1.2
SNMP
Edit SNMP parameters
Version
V1
Read community
adminnms01
Write community
adminnms02
Port
161
The parameter settings on the NMS and switch must be the same; otherwise, the switch cannot be added to the NMS.
If authentication is required for remote logins to the switch, Telnet parameters need to be set so that the NMS can manage the switch. In this example, administrators can remotely log in to the switch using Telnet, password authentication is used, and the password is huawei2012.
Configuration Files
Configuration file of the switch
#
sysname Switch
#
acl number 2001
 rule 5 permit source 10.1.1.1 0
 rule 10 deny
#
snmp-agent
snmp-agent local-engineid 800007DB03360102101100
snmp-agent community read cipher %^%#Pqp'RXi))/y\KgEtwP9A3x2z5_FgxG1v'D/8>=G,D9<yMC^RAM_YB:F0BZlF="bHXg%lH*L"Jq'lea`S%^%# mib-view isoview01 acl 2001
snmp-agent community write cipher %^%#.T|&Whvyf$<Gd"I,wXi5SP_6~Nakk6<<+3H:N-h@aJ6d,l0md%HCeAY8~>X=>xV\JKNAL=124r839v<*%^%# mib-view isoview02 acl 2001
snmp-agent sys-info version v1 v3
snmp-agent target-host trap address udp-domain 10.1.1.1 params securityname cipher %^%#uq/!YZfvW4*vf[~C|.:Cl}UqS(vXd#wwqR~5M(rU%%^%#
snmp-agent mib-view included isoview01 system
snmp-agent mib-view included isoview02 interfaces
snmp-agent trap enable
#
return