Understanding Mesh
Concepts
A WMN includes the following devices: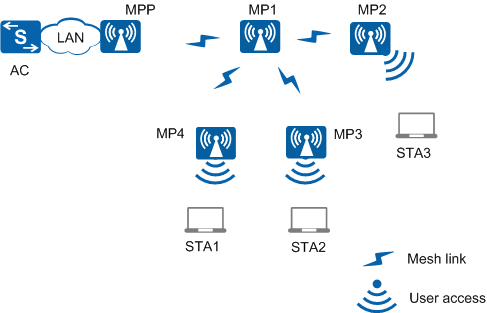
- Mesh point (MP): a mesh-capable node that uses IEEE 802.11 MAC and physical layer protocols for wireless communication. This node supports automatic topology discovery, automatic route discovery, and data packet forwarding. MPs can provide both mesh service and user access service.
- Mesh point portal (MPP): an MP that connects to a WMN or another type of network. This node has the portal function and enables mesh nodes to communicate with external networks.
- Neighboring MP: an MP that directly communicates with another MP or MPP. For example, in Figure 1, MP2 is the neighbor of MP1.
- Candidate MP: a neighboring MP with which an MP prepares to establish a mesh link.
- Peer MP: a neighboring MP that has established a mesh connection with an MP.
Implementation
The establishment of a mesh link includes mesh neighbor discovery and mesh connection management.
Mesh Neighbor Discovery
Discover a mesh neighbor.
Before constructing a WMN, an MP needs to discover neighboring MPs. On Mesh networks, each MP obtains neighboring MP information through passive scanning.
- Passive scanning: To obtain neighboring MP information, an MP listens on the Mesh Beacon frames sent from neighboring MPs in each channel. A Beacon frame contains information, including the Mesh ID.
Update the neighbor relationship table.
Each MP has a neighbor relationship table that contains information about four types of neighboring nodes: common AP neighbors, nodes of other WMNs, candidate MPs, and peer MPs.
- In passive scanning, if the MP finds that the Mesh ID in the Mesh Beacon frame is the same as the local Mesh ID, the MP records the neighboring MP as a candidate MP in the neighbor relationship table.
Mesh Connection Management
Mesh connection management involves two phases: mesh connection establishment and mesh connection teardown. The two phases are implemented using three types of Mesh Action frames: Mesh Peering Open, Mesh Peering Confirm, and Mesh Peering Close frames.
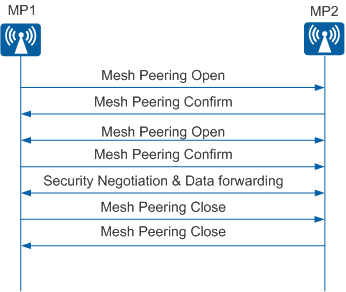
Mesh connection establishment
An MP can initiate a mesh connection with a candidate MP. The two MPs are peers and exchange Mesh Peering Open and Mesh Peering Confirm frames to establish a mesh connection.
After the two MPs establish a mesh connection, they start the key negotiation phase. The two MPs can forward mesh data only after key negotiation succeeds.
Mesh connection teardown
Either of the two MPs that establish a mesh connection can send a Mesh Peering Close frame to the other MP to tear down the mesh connection. After receiving the Mesh Peering Close frame, the other MP needs to respond with a Mesh Peering Close frame.
Mesh Routing
On a WMN, multiple mesh links are available between any source and destination, and the transmission quality of these mesh links varies according to the surrounding environment. Therefore, routing protocols are required on the WMN. The Hybrid Wireless Mesh Protocol (HWMP) defined in the 802.11s standard can address routing issues.
- Root Announcement (RANN) frame: used to announce the presence
of an MPP.
- An MPP periodically broadcasts a RANN frame.
- After an MP receives a RANN frame, the MP reduces the time to live (TTL) of the frame by 1, updates the path metric, and broadcasts the frame. After an MP reads a RANN frame, the MP checks whether the gateway specified in the RANN frame exists in the local gateway list. If the gateway exists in the local gateway list, the MP updates the gateway information in the gateway list according to the information in the RANN frame. Otherwise, the MP adds gateway information to the gateway list.
- Path Request (PREQ) and Path Reply (PREP) frames: In on-demand routing mode, the source node broadcasts a PREQ frame to establish a route to the destination node. After an MP receives the PREQ frame, the MP responds with a PREP frame.
- On-demand routing: The source node broadcasts a PREQ frame to establish a route to the destination node. After receiving the PREQ frame, a transit node checks the frame. If the PREQ frame contains a sequence number greater than or equal to the sequence number of the previous frame but has a lower metric, the transit node creates and updates the route to the source node. If the transit node has no route to the destination route, the transit node continues forwarding the PREQ frame.
- Proactive routing: A root node periodically broadcasts a RANN frame. When a mesh node receives a RANN frame and needs to create or update the route to the root node, the mesh node unicasts a PREP frame to the root node and broadcasts the RANN frame. Then, the root node creates a reverse path from the root node to the source node, and the mesh node creates a forwarding path from the root node to the source node.
HWMP combines on-demand routing and proactive routing to ensure that data frames are always transmitted on mesh links with the best transmission quality.
- Reduces the number of times frames are forwarded during the wireless link establishment.
- Constructs the forwarding topology based on the path with only a few hops from the source node to the destination node.
Zero Touch Configuration
On a WMN that uses the centralized WLAN architecture (AC+Fit AP), you only need to perform a few AP management configurations on the AC without having to log in to APs. APs can then connect to the AC. This function facilitates the deployment of a large number of APs. Figure 3 shows how zero touch configuration is implemented.
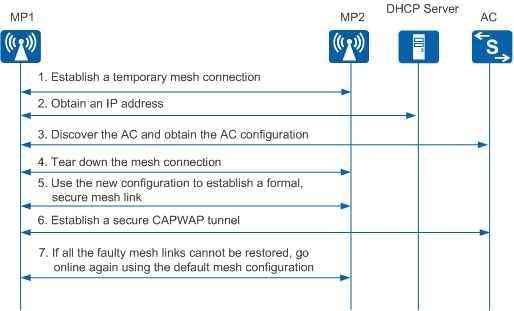
- After MP1 is powered on, it exchanges Mesh Peering Open and Mesh Peering Confirm frames with MP2, which has associated with the AC using information including the default Mesh ID and pre-shared key. MP1 establishes a temporary insecure mesh connection with MP2 and establishes a route to the MPP.
- MP1 obtains an IP address and the IP address of the AC from the DHCP server through the mesh connection.
- MP1 discovers and associates with the AC through the mesh connection and establishes a temporary CAPWAP tunnel to obtain the configuration from the AC.
- After MP1 obtains the new configuration, it sends a Mesh Peering Close frame to tear down the temporary insecure mesh connection.
- MP1 exchanges Mesh Peering Open and Mesh Peering Confirm frames with MP2 using the new mesh configuration for key negotiation. After MP1 and MP2 negotiate the key for communication, the two MPs establish a formal secure mesh link.
- MP1 re-establishes a secure CAPWAP tunnel with the AC using the new configuration.
- When MP1 cannot establish a mesh link with MP2 within a long period of time, the default configuration is restored. The whole process starts from step 1 until MP1 establishes a secure CAPWAP tunnel with the AC using the new configuration.