Example for Configuring Default Domain-based User Management
Domain and Default Domain Overview
The device manages access users based on domains. Each access user belongs to a domain.
The authentication, authorization, and accounting schemes can be bound to domain views. The device manages the access users in the same domain in the same manner, for example, using the same authentication, authorization, and accounting scheme.
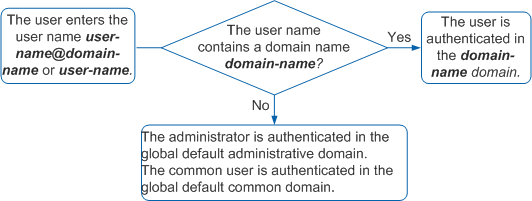
As shown in Figure 1, the users are authenticated in the specified domain when entered user names contain domain names or in the default domain when entered user names do not contain domain names. If a user name contains a domain name, the user belongs to this domain; otherwise, the user belongs to the default domain. If most users on a network belong to the same domain, you can configure this domain as the default domain so that these users do not need to enter the domain name when logging in to the device.
Default domains fall into default administrative domain and default common domain.
The administrator (logging in through Telnet, SSH, FTP, HTTP, or Terminal) is authenticated in the default administrative domain.
By default, the default administrative domain is default_admin.
The common users (logging in through MAC, Portal, or 802.1X authentication, or PPP authentication in V200R005) are authenticated in the default common domain.
By default, the default common domain is default.

You can modify the configuration of the default domains by default, but cannot delete the default domains by default.
Networking Requirements
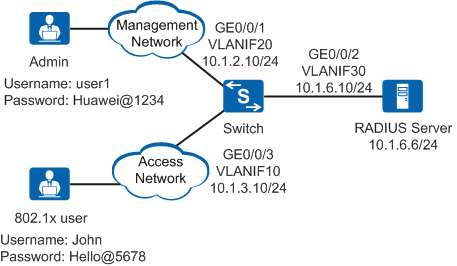
As shown in Figure 2, the administrator Telnets to the device and remotely manages the device after passing AAA local authentication, and 802.1X users log in to the device through 802.1X clients after passing RADIUS authentication. Therefore, both AAA local authentication and RADIUS authentication need to be configured on the device.
- The administrator must enter correct user name and password to Telnet to the device. After logging in to the device, the administrator can run all the commands at levels 0-15.
- 802.1X users must enter correct user names and passwords to log in to the device.
- The administrator and 802.1X users do not need to enter domain names when logging in.
Configuration Roadmap
- Allow the administrator to Telnet to the device.
- Enable the Telnet service.
- Set the authentication method for Telnet login users to AAA.
- Configure AAA local authentication, including creating a local user, setting the user access type to Telnet, and setting the user level to 15.
- Allow 802.1X users to log in to the device through RADIUS authentication.
- Enable 802.1X authentication on the interface.
- Configure RADIUS authentication, including creating a RADIUS server template, an AAA authentication scheme, and a service scheme, and applying the schemes to the default common domain.
This example only provides the configurations on the device. Ensure that the required parameters have been set on the RADIUS server, for example, device's IP address, shared key, and the creating user.
Procedure
- Configure interfaces and assign IP addresses.
<HUAWEI> system-view
[HUAWEI] sysname Switch
[Switch] vlan batch 10 20 30
[Switch] interface vlanif 10
[Switch-Vlanif10] ip address 10.1.3.10 24
[Switch-Vlanif10] quit
[Switch] interface vlanif 20
[Switch-Vlanif20] ip address 10.1.2.10 24
[Switch-Vlanif20] quit
[Switch] interface vlanif 30
[Switch-Vlanif30] ip address 10.1.6.10 24
[Switch-Vlanif30] quit
[Switch] interface gigabitethernet0/0/1
[Switch-GigabitEthernet0/0/1] port link-type access
[Switch-GigabitEthernet0/0/1] port default vlan 20
[Switch-GigabitEthernet0/0/1] quit
[Switch] interface gigabitethernet0/0/2
[Switch-GigabitEthernet0/0/2] port link-type access
[Switch-GigabitEthernet0/0/2] port default vlan 30
[Switch-GigabitEthernet0/0/2] quit
[Switch] interface gigabitethernet0/0/3
[Switch-GigabitEthernet0/0/3] port link-type access
[Switch-GigabitEthernet0/0/3] port default vlan 10
[Switch-GigabitEthernet0/0/3] quit
- Configure AAA local authentication for the administrator to Telnet to the device.
# Enable the Telnet server.
[Switch] telnet server enable# Set the authentication method for the VTY user interface to AAA.
[Switch] user-interface maximum-vty 15  //Set the maximum number of VTY login uses to 15 (The value range varies according to product versions and models). By default, the maximum number of Telnet users is 5.
[Switch] user-interface vty 0 14  //Enter the VTY 0-14 user view.
[Switch-ui-vty0-14] authentication-mode aaa  //Set the authentication method for the VTY user view to AAA.
[Switch-ui-vty0-14] protocol inbound telnet  //Configure the VTY user interface to support Telnet. By default, switches in V200R006 and earlier versions support Telnet, and switches in V200R007 and later versions support SSH.
[Switch-ui-vty0-14] quit
# Configure AAA local authentication.
[Switch] aaa
[Switch-aaa] local-user user1 password irreversible-cipher Huawei@1234  //Create local user user1 and set the password. The password is displayed in cipher text in the configuration file, so remember the password. If you forget the password, run this command again to reconfigure the password (the command is local-user user-name password cipher password in V200R002 and earlier versions).
[Switch-aaa] local-user user1 service-type telnet  //Set the access type of user1 to Telnet. The user can log in through only Telnet (by default, users can log in through any method in versions earlier than V200R007 and cannot log in through any method in V200R007 and later versions).
[Switch-aaa] local-user user1 privilege level 15  //Set the user level of user1 to 15. The user can use the commands of level 3 and lower levels.
Warning: This operation may affect online users, are you sure to change the user privilege level ?[Y/N] y
[Switch-aaa] quit
When the entered user name does not contain a domain name, the device authenticates the user using the default administrative domain default_admin. By default, the default administrative domain uses the authentication scheme default and accounting scheme default.
- Authentication scheme default: local authentication
- Accounting scheme default: non-accounting
- Configure RADIUS authentication for 802.1X users to log in to the device.
# Configure the RADIUS server template to implement communication between the device and the RADIUS server.
[Switch] radius-server template 1
[Switch-radius-1] radius-server authentication 10.1.6.6 1812  //Specify the IP address and port number of the RADIUS authentication server.
[Switch-radius-1] radius-server shared-key cipher Hello@1234  //Specify the shared key of the RADIUS server, which must be the same as that configured on the RADIUS server.
[Switch-radius-1] quit
If the RADIUS server does not accept the user names containing domain names, run the undo radius-server user-name domain-included command on the device so that the packets sent from the device to the RADIUS server do not contain domain names.
# Configure an AAA authentication scheme and set the authentication mode to RADIUS.
[Switch] aaa
[Switch-aaa] authentication-scheme sch1
[Switch-aaa-authen-sch1] authentication-mode radius
[Switch-aaa-authen-sch1] quit
# Configure a service scheme and set the user level to 15.
[Switch-aaa] service-scheme sch1
[Switch-aaa-service-sch1] admin-user privilege level 15
[Switch-aaa-service-sch1] quit
# Apply the AAA authentication scheme, RADIUS server template, and service scheme to the default common domain.
[Switch-aaa] domain default
[Switch-aaa-domain-default] authentication-scheme sch1
[Switch-aaa-domain-default] service-scheme sch1
[Switch-aaa-domain-default] radius-server 1
[Switch-aaa-domain-default] quit
[Switch-aaa] quit
# Set the NAC mode to unified (this step is required in V200R005 and later versions).
[Switch] authentication unified-mode After the common mode is changed to unified mode, the device automatically restarts. By default, the unified mode is used.
# Enable 802.1X authentication on the interface.
In the versions earlier than V200R009:
[Switch] interface gigabitethernet0/0/3
[Switch-GigabitEthernet0/0/3] authentication dot1x
[Switch-GigabitEthernet0/0/3] quit
In V200R009 and later versions:
[Switch] dot1x-access-profile name d1
[Switch-dot1x-access-profile-d1] quit
[Switch] authentication-profile name p1
[Switch-authen-profile-p1] dot1x-access-profile d1
[Switch-authen-profile-p1] authentication mode multi-authen max-user 100
[Switch-authen-profile-p1] quit
[Switch] interface gigabitethernet0/0/3
[Switch-GigabitEthernet0/0/3] port link-type access
[Switch-GigabitEthernet0/0/3] port default vlan 10
[Switch-GigabitEthernet0/0/3] authentication-profile p1
[Switch-GigabitEthernet0/0/3] quit
- Verify the configuration.
# Choose Start > Run on your computer running Windows operating system and enter cmd to open the cmd window. Run the telnet command and enter the user name user1 and password Huawei@1234 to log in to the device through Telnet.
C:\Documents and Settings\Administrator> telnet 10.1.2.10
Username:user1
Password:***********
<Switch>//The administrator successfully logs in.
# Run the test-aaa command to test whether an 802.1X user can pass the authentication.
[Switch] test-aaa liming Hello@5678 radius-template 1# A user starts the 802.1X client on a terminal, and enters the user name liming and password Hello@5678 for authentication. If the user name and password are correct, an authentication success message is displayed on the client page. The user can access the network.
# After the user goes online, you can run the display access-user access-type dot1x command to check online 802.1X user information.
Configuration Files
Configuration file of the Switch
#
sysname Switch
#
vlan batch 10 20 30
#
telnet server enable
#
authentication-profile name p1   //Available only in V200R009 and later versions
 dot1x-access-profile d1
 authentication mode multi-authen max-user 100
#
radius-server template 1
 radius-server shared-key cipher %^%#9nP3;sDW-AN0f@H@S*l&\f{V=V_auKe|^YXy7}bU%^%#
 radius-server authentication 10.1.6.6 1812 weight 80
#
aaa
 authentication-scheme sch1
  authentication-mode radius
 service-scheme sch1
  admin-user privilege level 15
 domain default
  authentication-scheme sch1
  service-scheme sch1
  radius-server 1
 local-user user1 password irreversible-cipher $1a$BKfS8Ml4qP$1\a5RWc)oTIuB0'wN;p090;>{APtaL8/x/T.$
 local-user user1 privilege level 15
 local-user user1 service-type telnet
#
interface Vlanif10
 ip address 10.1.3.10 255.255.255.0
#
interface Vlanif20
 ip address 10.1.2.10 255.255.255.0
#
interface Vlanif30
 ip address 10.1.6.10 255.255.255.0
#
interface GigabitEthernet0/0/1
 port link-type access
 port default vlan 20
#
interface GigabitEthernet0/0/2
 port link-type access
 port default vlan 30
#
interface GigabitEthernet0/0/3
 port link-type access
 port default vlan 10
 authentication dot1x   //Available only in the versions earlier than V200R009
 authentication-profile p1   //Available only in V200R009 and later versions
#
user-interface maximum-vty 15
user-interface vty 0 14
 authentication-mode aaa
 protocol inbound telnet
#
dot1x-access-profile name d1   //Available only in V200R009 and later versions
#
return