Example for Configuring Switch Login Through the Web System (V200R001)
Overview
The web system uses the built-in web server on a switch to provide a GUI through which users can perform switch management and maintenance. Users can log in to the web system from terminals using HTTPS.
Configuration Notes
This example applies to V200R001 of all S series switches.

The following uses the command lines and outputs of the S5700-EI running V200R001C00 as an example.
Networking Requirements
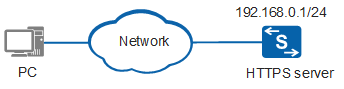
As shown in Figure 1, a switch functions as the HTTPS server. The user wants to log in to the web system using HTTPS to manage and maintain the switch. The user has obtained the server digital certificate 1_servercert_pem_dsa.pem and private key file 1_serverkey_pem_dsa.pem from the CA.
Configuration Roadmap
The configuration roadmap is as follows:
Configure a management IP address for remotely transferring files and logging in to the switch through the web system.
Upload the required files to the HTTPS server through FTP, including the web page file, server digital certificate, and private key file.
Load the web page file and digital certificate.
Bind an SSL policy and enable the HTTPS service.
- Configure a web user and enter the web system login page.

FTP is an insecure protocol. Using SFTP V2, SCP, or FTPS is recommended.
Procedure
- Obtain the web page file.The following methods are available:
- Obtain the web page file from a Huawei agent.
Download the web page file from the Huawei enterprise technical support website (http://support.huawei.com/enterprise). In V200R001, the web page file is named in the format of product name-software version.web page file version.web.zip.
Check whether the size of the obtained web page file is the same as the file size displayed on the website. If not, an exception may occur during file download. Download the file again.
- Configure a management IP address.
<HUAWEI> system-view
[HUAWEI] sysname HTTPS_Server
[HTTPS_Server] vlan 10
[HTTPS_Server-vlan10] quit
[HTTPS_Server] interface vlanif 10   //Configure VLANIF 10 as the management interface.
[HTTPS_Server-Vlanif10] ip address 192.168.0.1 24   //Configure the IP address and deploy the route based on the network plan to ensure reachability between the PC and switch.
[HTTPS_Server-Vlanif10] quit
[HTTPS_Server] interface gigabitethernet 0/0/10   //In this example, GE0/0/10 is the physical interface used for logging in to the switch through the web system on a PC. Select an interface based on actual networking requirements.
[HTTPS_Server-GigabitEthernet0/0/10] port link-type access   //Set the interface type to access.
[HTTPS_Server-GigabitEthernet0/0/10] port default vlan 10   //Add the interface to VLAN 10.
[HTTPS_Server-GigabitEthernet0/0/10] quit
- Upload the web page file and digital certificate to the HTTPS server through FTP.
# Configure VTY user interfaces on the HTTPS server.
[HTTPS_Server] user-interface vty 0 14   //Enter VTY user interfaces 0 to 14.
[HTTPS_Server-ui-vty0-14] authentication-mode aaa   //Set the authentication mode of users in VTY user interfaces 0 to 14 to AAA.
[HTTPS_Server-ui-vty0-14] quit
# Configure the FTP function for the switch and information about an FTP user, including the password, user level, service type, and authorized directory.
[HTTPS_Server] ftp server enable   //Enable the FTP server function.
[HTTPS_Server] aaa
[HTTPS_Server-aaa] local-user client001 password cipher Helloworld@6789   //Set the login password to Helloworld@6789.
[HTTPS_Server-aaa] local-user client001 privilege level 15   //Set the user level to 15.
[HTTPS_Server-aaa] local-user client001 service-type ftp   //Set the user service type to FTP.
[HTTPS_Server-aaa] local-user client001 ftp-directory flash:/   //Set the FTP authorized directory to flash:/.
[HTTPS_Server-aaa] quit
[HTTPS_Server] quit
# Log in to the HTTPS server from the PC through FTP and upload the web page file and digital certificate to the HTTPS server.
Connect the PC to the switch using FTP. Enter the user name client001 and password Helloworld@6789 and set the file transfer mode to binary.
The following example assumes that the PC runs the Windows XP operating system.
C:\Documents and Settings\Administrator> ftp 192.168.0.1
Connected to 192.168.0.1.
220 FTP service ready.
User (192.168.0.1:(none)): client001
331 Password required for client001.
Password:
230 User logged in.
ftp> binary   //Set the file transfer mode to binary. By default, files are transferred in ASCII mode.
200 Type set to I.
ftp>
Upload the web page file and digital certificate to the HTTPS server from the PC.
ftp> put web.zip    //Upload the web page file. The web.zip file is used as an example here.
200 Port command okay.
150 Opening BINARY mode data connection for web.zip
226 Transfer complete.
ftp: 1308478 bytes sent in 11 Seconds 4.6Kbytes/sec.
ftp> put 1_servercert_pem_dsa.pem 200 Port command okay. 150 Opening BINARY mode data connection for 1_servercert_pem_dsa.pem 226 Transfer complete. ftp: 1302 bytes sent in 2 Seconds 4.6Kbytes/sec.
ftp> put 1_serverkey_pem_dsa.pem
200 Port command okay.
150 Opening BINARY mode data connection for 1_serverkey_pem_dsa.pem
226 Transfer complete.
ftp: 951 bytes sent in 1 Second 4.6Kbytes/sec.
# Run the dir command on the Switch to check whether the web page file and digital certificate exist in the current storage directory. If the sizes of the web page file and digital certificate in the current storage directory on the switch is different from those on the PC, an exception may occur during file transfer. Upload the files again.
# Create the subdirectory security on the HTTPS server and copy the digital certificate and private key file to the subdirectory.
<HTTPS_Server> mkdir security
<HTTPS_Server> copy 1_servercert_pem_dsa.pem security
Copy flash:/1_servercert_pem_dsa.pem to flash:/security/1_servercert_pem_dsa.pem?[Y/N]:y
100%  complete
Info: Copied file flash:/1_servercert_pem_dsa.pem to flash:/security/1_servercert_pem_dsa.pem...Done.
<HTTPS_Server> copy 1_serverkey_pem_dsa.pem security
Copy flash:/1_serverkey_pem_dsa.pem to flash:/security/1_serverkey_pem_dsa.pem?[Y/N]:y
100%  complete
Info: Copied file flash:/1_serverkey_pem_dsa.pem to flash:/security/1_serverkey_pem_dsa.pem...Done.
# Run the dir command in the security subdirectory to check the digital certificate.
<HTTPS_Server> cd security <HTTPS_Server> dir Directory of flash:/security/ Idx Attr Size(Byte) Date Time FileName 0 -rw- 1,200 Sep 26 2013 22:35:37 1_servercert_pem_dsa.pem 1 -rw- 736 Sep 26 2013 22:36:11 1_serverkey_pem_dsa.pem 30,008 KB total (348 KB free) - Load the web page file and digital certificate.
# Load the web page file.
<HTTPS_Server> system-view
[HTTPS_Server] http server load web.zip
# Create an SSL policy and load the PEM digital certificate.
[HTTPS_Server] ssl policy http_server
[HTTPS_Server-ssl-policy-http_server] certificate load pem-cert 1_servercert_pem_dsa.pem key-pair dsa key-file 1_serverkey_pem_dsa.pem auth-code 123456
[HTTPS_Server-ssl-policy-http_server] quit
# After the preceding configurations are complete, run the display ssl policy command on the HTTPS server to check detailed information about the loaded digital certificate.
[HTTPS_Server] display ssl policy SSL Policy Name: http_server Policy Applicants: Key-pair Type: DSA Certificate File Type: PEM Certificate Type: certificate Certificate Filename: 1_servercert_pem_dsa.pem Key-file Filename: 1_serverkey_pem_dsa.pem Auth-code: 123456 MAC: CRL File: Trusted-CA File: - Bind an SSL policy and enable the HTTPS service.
Disable the HTTP service before enabling the HTTPS service.
[HTTPS_Server] undo http server enable   //Disable the HTTP service.
[HTTPS_Server] http secure-server ssl-policy http_server   //Bind an SSL policy named http_server to the HTTP server.
[HTTPS_Server] http secure-server enable   //Enable the HTTPS service.
- Configure a web user and enter the web system login page.
# Configure a web user.
[HTTPS_Server] aaa
[HTTPS_Server-aaa] local-user admin password cipher Helloworld@6789   //Create a local user named admin and set its password to Helloworld@6789.
[HTTPS_Server-aaa] local-user admin privilege level 15   //Set the user level to 15.
[HTTPS_Server-aaa] local-user admin service-type http   //Set the access type to http, that is, web user.
[HTTPS_Server-aaa] quit
# Enter the web system login page.
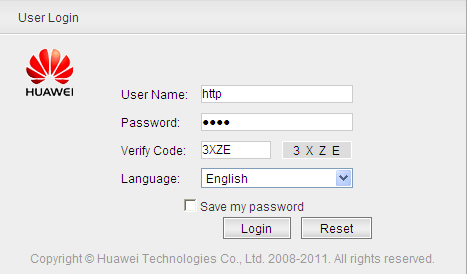
Open the web browser on the PC, type https://192.168.0.1 in the address box, and press Enter. The web system login page is displayed, as shown in Figure 2.
You can log in to the web system using the Internet Explorer (6.0 or 8.0) or Firefox (3.5) browsers. If the browser version or browser patch version is not within the preceding ranges, the web page may be displayed incorrectly. Additionally, the web browser used to log in to the web system must support JavaScript.
Enter the user name, password, and verification code. Click Login. The web system home page is displayed.
- Verify the configuration.
Log in to the switch through the web system. The login succeeds.
Run the display http server command to view the SSL policy name and the HTTPS server status.
[HTTPS_Server] display http server
   HTTP Server Status              : disabled
   HTTP Server Port                : 80(80)
   HTTP Timeout Interval           : 20
   Current Online Users            : 0
   Maximum Users Allowed           : 5
   HTTP Secure-server Status       : enabled
   HTTP Secure-server Port         : 443(443)
   HTTP SSL Policy                 : http_server
Configuration Files
HTTPS_Server configuration file
#
sysname HTTPS_Server
#
FTP server enable
#
vlan batch 10
#
undo http server enable
http server load web.zip
http secure-server ssl-policy http_server
http secure-server enable
#
aaa
 local-user admin password cipher %$%$_h,hW_!nJ!2gXkH9v$X)+,#w%$%$
 local-user admin privilege level 15
 local-user admin service-type http
 local-user client001 password cipher %$%$jD,QKAhe{Yd9kD9Fqi#I+QH~%$%$
 local-user client001 privilege level 15
 local-user client001 ftp-directory flash:/
 local-user client001 service-type ftp
#
interface Vlanif10
 ip address 192.168.0.1 255.255.255.0
#
interface GigabitEthernet0/0/10
 port link-type access
 port default vlan 10
#
user-interface vty 0 14
 authentication-mode aaa
#
ssl policy http_server
 certificate load pem-cert 1_servercert_pem_dsa.pem key-pair dsa key-file 1_serverkey_pem_dsa.pem auth-code 123456
#
return