Example for Configuring SVF (S7700 as the Parent)
Precautions
The Super Virtual Fabric (SVF) function on a parent is license controlled. The license only enables the SVF function but does not control SVF service specifications and only needs to be loaded on the parent.
After the SVF function is enabled, switches do not support the In-Service Software Upgrade (ISSU) function.
- When the parent version is earlier than V200R011C10, the AS version must be the same as the parent version. Otherwise, this AS cannot go online. For example, if the parent version is V200R010C00, the AS version must also be V200R010C00.
- When the parent version is V200R011C10 or later, the parent version and AS version can be different, but the parent version must be higher than or the same as the AS version and the AS version must also be V200R011C10 or later.
When GE optical interfaces are connected to XGE optical interfaces to connect level-1 ASs to the parent or connect level-2 ASs to level-1 ASs, these interfaces must use GE instead of XGE optical modules.
All member ports of the Eth-Trunk bound to the fabric port that connects the parent to an AS must be located on X series cards or on non-X series cards. Otherwise, an access point (AP) cannot connect to the SVF system.
If an AS is a stack set up using service ports, the AS must join an SVF system after having the stacking function configured. This limitation does not apply to an AS that is a stack set up using stack cards.
- When a cluster switch system (CSS) functioning as the parent is faulty:
- If one member switch in the CSS is faulty, the SVF function is not affected.
- If the CSS splits but two member switches are working normally, the SVF function becomes unavailable because ASs do not know which switch is the parent. In this situation, you are advised to configure the dual-active detection (DAD) function.
Networking Requirements
A new campus network has a large number of wired and wireless access devices. The widely distributed access devices complicate management and configuration of the access layer. Unified management and configuration of wired and wireless access devices is required to reduce the management cost.
- Configure the administrator user name and password for access devices.
- Assign VLANs to ports of access devices.
- Set the user access authentication mode to 802.1X authentication.
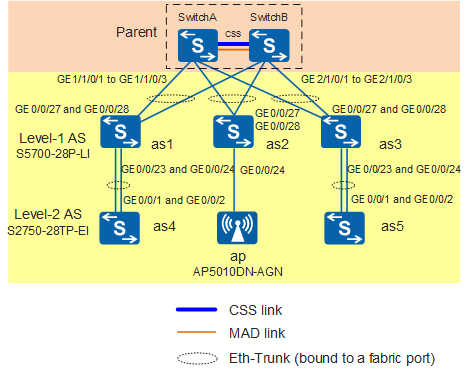
As shown in Figure 1, two aggregation switches (SwitchA and SwitchB) set up a Cluster Switching System (CSS) to improve reliability and function as the parent to connect to multiple ASs and APs. Multiple active detection (MAD) in direct mode must be configured on the parent to avoid conflicts when the CSS splits.
In this example, two S7700s function as the parent, an S5700-28P-PWR-LI functions as a level-1 AS, an S2750-28TP-EI functions as a level-2 AS, and an AP5010DN-AGN functions as an AP.
Data Plan
Item |
Data |
Description |
|---|---|---|
Parent |
CSS of two S7700s (SwitchA and SwitchB) |
Set the CSS connection mode to CSS card. |
Directly connected MAD ports on the parent |
GE1/2/0/1 and GE2/2/0/1 |
– |
Cards that connect the parent to ASs |
1/1 and 2/1 cards: X1E cards of the same type |
– |
MAC addresses of the parent, ASs 1 to 5, and AP |
Parent: 00e0-0001-1100 AS1: 00e0-0001-0011 AS2: 00e0-0001-0022 AS3: 00e0-0001-0033 AS4: 00e0-0001-0044 AS5: 00e0-0001-0055 AP: 00e0-0001-0005 |
– |
SVF management VLAN |
VLAN 11 |
– |
IP address of the management VLANIF interface |
192.168.11.1 |
– |
Ports that connect the parent to AS1 |
GE1/1/0/1 and GE2/1/0/1 |
Add the two ports to Eth-Trunk1 and bind them to Fabric-port 1. |
Ports that connect the parent to AS2 |
GE1/1/0/2 and GE2/1/0/2 |
Add the two ports to Eth-Trunk2 and bind them to Fabric-port 2. |
Ports that connect the parent to AS3 |
GE1/1/0/3 and GE2/1/0/3 |
Add the two ports to Eth-Trunk3 and bind them to Fabric-port 3. |
Ports that connect AS1 to AS4 |
GE0/0/23 and GE0/0/24 |
Add the two ports to Eth-Trunk4 and bind them to Fabric-port 4. |
Ports that connect AS3 to AS5 |
GE0/0/23 and GE0/0/24 |
Add the two ports to Eth-Trunk5 and bind them to Fabric-port 5. |
Port that connects AS2 to the AP |
GE0/0/24 |
Add the port to the AP port group. |
AS authentication mode |
Whitelist authentication |
– |
Service configuration for the AS administrator profile |
Administrator profile: admin_profile, in which you can configure the administrator user name and password AS group: admin_group, which includes all the ASs |
Bind admin_profile to admin_group. |
Service configuration for the AS network basic profile |
Network basic profile: basic_profile_1, in which you can configure default VLAN 10 Network basic profile: basic_profile_2, in which you can configure default VLAN 20 Port group: port_group_1, which includes all AS1 and AS4 ports and all AS2 ports (except GE0/0/24 that directly connects to the AP) Port group: port_group_2, which includes all AS3 and AS5 ports |
Bind basic_profile_1 to port_group_1. Bind basic_profile_2 to port_group_2. |
Service configuration for the AS user access profile |
User access profile: access_profile, in which you can set the user access authentication mode to 802.1X authentication. |
Bind access_profile to port_group_1 and port_group_2. |
Configuration Roadmap
Configure SwitchA and SwitchB in the parent to set up a CSS using CSS cards and configure MAD in direct mode to ensure high reliability of the SVF system.
Enable the SVF function on the parent.
Configure AS access parameters, including AS names (optional), authentication mode, and fabric ports that connect the parent to level-1 ASs and level-1 ASs to level-2 ASs.
Connect level-1 ASs to the parent and level-2 ASs using cables.
Configure service profiles and bind them to ASs.
Configure the downlink port (GE0/0/24) that connects AS2 to the AP, configure AP access parameters, power on the AP, and connect the AP and AS2 using cables to ensure that the AP can connect to the SVF system.
Log in to ASs to check the service configurations of the ASs.
Procedure
- Configure SwitchA and SwitchB in the parent to set up a CSS.
# Set the CSS connection mode, CSS ID, and CSS priority to CSS card connection, 1, and 100 for SwitchA.
<HUAWEI> system-view
[HUAWEI] sysname SwitchA
[SwitchA] set css mode css-card
[SwitchA] set css id 1
[SwitchA] set css priority 100
# Set the CSS connection mode, CSS ID, and CSS priority to CSS card connection, 2, and 10 for SwitchB.
<HUAWEI> system-view
[HUAWEI] sysname SwitchB
[SwitchB] set css mode css-card
[SwitchB] set css id 2
[SwitchB] set css priority 10
# Enable the CSS function on SwitchA and restart SwitchA.
[SwitchA] css enable
# Enable the CSS function on SwitchB and restart SwitchB.
[SwitchB] css enable
# Log in to the CSS and configure MAD in direct mode.
<SwitchA> system-view
[SwitchA] interface gigabitethernet 1/2/0/1
[SwitchA-GigabitEthernet1/2/0/1] mad detect mode direct
[SwitchA-GigabitEthernet1/2/0/1] quit
[SwitchA] interface gigabitethernet 2/2/0/1
[SwitchA-GigabitEthernet2/2/0/1] mad detect mode direct
[SwitchA-GigabitEthernet2/2/0/1] quit
- Configure the management VLAN in the SVF system and enable the SVF function on the parent.
[SwitchA] vlan batch 11
[SwitchA] dhcp enable
[SwitchA] interface vlanif 11
[SwitchA-Vlanif11] ip address 192.168.11.1 24
[SwitchA-Vlanif11] dhcp select interface
[SwitchA-Vlanif11] dhcp server option 43 ip-address 192.168.11.1
[SwitchA-Vlanif11] quit
[SwitchA] capwap source interface vlanif 11
[SwitchA] stp mode rstp
[SwitchA] uni-mng
Warning: This operation will enable the uni-mng mode and disconnect all ASs. STP calculation may be triggered and service traffic will be affected. Continue? [Y/N]:y
- Configure AS access parameters.# (Optional) Configure a name for each AS.

- If you do not perform this step, the system will generate AS device information when ASs connect to the SVF system. An AS name is in the format of system default name-system MAC address.
- If you need to perform this step, ensure that the configured model and mac-address parameters are consistent with the actual AS information. The value of mac-address must be the AS management MAC address or system MAC address. To view the AS management MAC address, run the display as access configuration command on the AS. If the management MAC displays --, the value of mac-address is the system MAC address. If the configured parameters are inconsistent with the actual AS information, the AS cannot go online.
[SwitchA-um] as name as1 model S5700-28P-PWR-LI-AC mac-address 00e0-0001-0011
[SwitchA-um-as-as1] quit
[SwitchA-um] as name as2 model S5700-28P-PWR-LI-AC mac-address 00e0-0001-0022
[SwitchA-um-as-as2] quit
[SwitchA-um] as name as3 model S5700-28P-PWR-LI-AC mac-address 00e0-0001-0033
[SwitchA-um-as-as3] quit
[SwitchA-um] as name as4 model S2750-28TP-EI-AC mac-address 00e0-0001-0044
[SwitchA-um-as-as4] quit
[SwitchA-um] as name as5 model S2750-28TP-EI-AC mac-address 00e0-0001-0055
[SwitchA-um-as-as5] quit
# Configure the fabric port that connects the parent to AS1.
[SwitchA-um] interface fabric-port 1
[SwitchA-um-fabric-port-1] port member-group interface eth-trunk 1
[SwitchA-um-fabric-port-1] quit
[SwitchA-um] quit
[SwitchA] interface gigabitethernet 1/1/0/1
[SwitchA-GigabitEthernet1/1/0/1] eth-trunk 1
[SwitchA-GigabitEthernet1/1/0/1] quit
[SwitchA] interface gigabitethernet 2/1/0/1
[SwitchA-GigabitEthernet2/1/0/1] eth-trunk 1
[SwitchA-GigabitEthernet2/1/0/1] quit
# Configure the fabric port that connects the parent to AS2.
[SwitchA] uni-mng
[SwitchA-um] interface fabric-port 2
[SwitchA-um-fabric-port-2] port member-group interface eth-trunk 2
[SwitchA-um-fabric-port-2] quit
[SwitchA-um] quit
[SwitchA] interface gigabitethernet 1/1/0/2
[SwitchA-GigabitEthernet1/1/0/2] eth-trunk 2
[SwitchA-GigabitEthernet1/1/0/2] quit
[SwitchA] interface gigabitethernet 2/1/0/2
[SwitchA-GigabitEthernet2/1/0/2] eth-trunk 2
[SwitchA-GigabitEthernet2/1/0/2] quit
# Configure the fabric port that connects the parent to AS3.
[SwitchA] uni-mng
[SwitchA-um] interface fabric-port 3
[SwitchA-um-fabric-port-3] port member-group interface eth-trunk 3
[SwitchA-um-fabric-port-3] quit
[SwitchA-um] quit
[SwitchA] interface gigabitethernet 1/1/0/3
[SwitchA-GigabitEthernet1/1/0/3] eth-trunk 3
[SwitchA-GigabitEthernet1/1/0/3] quit
[SwitchA] interface gigabitethernet 2/1/0/3
[SwitchA-GigabitEthernet2/1/0/3] eth-trunk 3
[SwitchA-GigabitEthernet2/1/0/3] quit
# Configure the fabric ports that connect AS1 to AS4 and AS3 to AS5.
[SwitchA] uni-mng
[SwitchA-um] as name as1
[SwitchA-um-as-as1] down-direction fabric-port 4 member-group interface eth-trunk 4
[SwitchA-um-as-as1] port eth-trunk 4 trunkmember interface gigabitethernet 0/0/23 to 0/0/24
[SwitchA-um-as-as1] quit
[SwitchA-um] as name as3
[SwitchA-um-as-as3] down-direction fabric-port 5 member-group interface eth-trunk 5
[SwitchA-um-as-as3] port eth-trunk 5 trunkmember interface gigabitethernet 0/0/23 to 0/0/24
[SwitchA-um-as-as3] quit
[SwitchA-um] quit
# Configure whitelist authentication for ASs to connect to an SVF system.
To view the AS management MAC address, run the display as access configuration command on the AS. If the management MAC displays --, the MAC address configured in the whitelist is the AS system MAC address. Otherwise, the MAC address configured in the whitelist is the AS management MAC address.
[SwitchA] as-auth
[SwitchA-as-auth] undo auth-mode
[SwitchA-as-auth] whitelist mac-address 00e0-0001-0011
[SwitchA-as-auth] whitelist mac-address 00e0-0001-0022
[SwitchA-as-auth] whitelist mac-address 00e0-0001-0033
[SwitchA-as-auth] whitelist mac-address 00e0-0001-0044
[SwitchA-as-auth] whitelist mac-address 00e0-0001-0055
[SwitchA-as-auth] quit
- Run the reset saved-configuration command to clear the configurations of ASs, restart the ASs, and then connect level-1 ASs to the parent and level-2 ASs using cables. Subsequently, an SVF system is set up.
- Before restarting an AS, check whether the port that connects this AS to the parent is a downlink port. You can run the display port connection-type access all command on this AS to view all downlink ports on it. If this port is a downlink port, run the uni-mng up-direction fabric-port command on this AS to configure this port as an uplink port before restarting this AS. Otherwise, this AS cannot go online.
- Before connecting an AS to the parent, ensure that the AS has no configuration file and no input on the console port.
# After connecting cables, run the display as all command to check whether ASs have connected to the SVF system.
[SwitchA] display as all
Total: 5, Normal: 5, Fault: 0, Idle: 0, Version mismatch: 0
--------------------------------------------------------------------------------
No.  Type           MAC            IP              State        Name
--------------------------------------------------------------------------------
0    S5700-P-LI     00e0-0001-0011 192.168.11.254  normal      as1
1    S5700-P-LI     00e0-0001-0022 192.168.11.253  normal      as2
2    S5700-P-LI     00e0-0001-0033 192.168.11.252  normal      as3
3    S2750-EI       00e0-0001-0044 192.168.11.251  normal      as4
4    S2750-EI       00e0-0001-0055 192.168.11.250  normal      as5
--------------------------------------------------------------------------------
When the State field in the command output displays normal for an AS, the AS has connected to the SVF system.
# Run the display uni-mng topology information command to view SVF topology information.
[SwitchA] display uni-mng topology information
The topology information of uni-mng network:
<-->: direct link        <??>: indirect link
T: Trunk ID              *: independent AS
------------------------------------------------------------------------------
 Local MAC       Hop  Local Port      T  ||  T   Peer Port      Peer MAC
------------------------------------------------------------------------------
 00e0-0001-1100  0    GE1/1/0/1       1  <-->0   GE0/0/27       00e0-0001-0011
 00e0-0001-1100  0    GE2/1/0/1       1  <-->0   GE0/0/28       00e0-0001-0011
 00e0-0001-1100  0    GE1/1/0/2       2  <-->0   GE0/0/27       00e0-0001-0022
 00e0-0001-1100  0    GE2/1/0/2       2  <-->0   GE0/0/28       00e0-0001-0022
 00e0-0001-1100  0    GE1/1/0/3       3  <-->0   GE0/0/27       00e0-0001-0033
 00e0-0001-1100  0    GE2/1/0/3       3  <-->0   GE0/0/28       00e0-0001-0033
 00e0-0001-0011  1    GE0/0/23        4  <-->0   GE0/0/1        00e0-0001-0044
 00e0-0001-0011  1    GE0/0/24        4  <-->0   GE0/0/2        00e0-0001-0044
 00e0-0001-0033  1    GE0/0/23        5  <-->0   GE0/0/1        00e0-0001-0055
 00e0-0001-0033  1    GE0/0/24        5  <-->0   GE0/0/2        00e0-0001-0055
------------------------------------------------------------------------------
Total items displayed : 10
# Run the display uni-mng upgrade-info verbose command to view all AS version information.
[SwitchA] display uni-mng upgrade-info verbose
The total number of AS is : 5
----------------------------------------------------------------------------
 AS name                       : as1
 Work status                   : NO-UPGRADE
 Startup system-software       : flash:/s5700-p-li.cc
 Startup version               : V200R008C00
 Startup patch                 : --
 Next startup system-software  : --
 Next startup patch            : --
 Download system-software      : --
 Download version              : --
 Download patch                : --
 Method                        : --
 Upgrading phase               : --
 Last operation result         : --
 Error reason                  : --
 Last operation time           : --
----------------------------------------------------------------------------
 AS name                       : as2
 Work status                   : NO-UPGRADE
 Startup system-software       : flash:/s5700-p-li.cc
 Startup version               : V200R008C00
 Startup patch                 : --
 Next startup system-software  : --
 Next startup patch            : --
 Download system-software      : --
 Download version              : --
 Download patch                : --
 Method                        : --
 Upgrading phase               : --
 Last operation result         : --
 Error reason                  : --
 Last operation time           : --
----------------------------------------------------------------------------
 AS name                       : as3
 Work status                   : NO-UPGRADE
 Startup system-software       : flash:/s5700-p-li.cc
 Startup version               : V200R008C00
 Startup patch                 : --
 Next startup system-software  : --
 Next startup patch            : --
 Download system-software      : --
 Download version              : --
 Download patch                : --
 Method                        : --
 Upgrading phase               : --
 Last operation result         : --
 Error reason                  : --
 Last operation time           : --
----------------------------------------------------------------------------
 AS name                       : as4
 Work status                   : NO-UPGRADE
 Startup system-software       : flash:/s2750-ei.cc
 Startup version               : V200R008C00
 Startup patch                 : --
 Next startup system-software  : --
 Next startup patch            : --
 Download system-software      : --
 Download version              : --
 Download patch                : --
 Method                        : --
 Upgrading phase               : --
 Last operation result         : --
 Error reason                  : --
 Last operation time           : --
----------------------------------------------------------------------------
 AS name                       : as5
 Work status                   : NO-UPGRADE
 Startup system-software       : flash:/s2750-ei.cc
 Startup version               : V200R008C00
 Startup patch                 : --
 Next startup system-software  : --
 Next startup patch            : --
 Download system-software      : --
 Download version              : --
 Download patch                : --
 Method                        : --
 Upgrading phase               : --
 Last operation result         : --
 Error reason                  : --
 Last operation time           : --
----------------------------------------------------------------------------
- Configure service profiles and bind them to ASs.# Configure an AS administrator profile and bind it to all ASs.
[SwitchA] uni-mng
[SwitchA-um] as-admin-profile name admin_profile
[SwitchA-um-as-admin-admin_profile] user asuser password hello@123
[SwitchA-um-as-admin-admin_profile] quit
[SwitchA-um] as-group name admin_group
[SwitchA-um-as-group-admin_group] as name-include as
[SwitchA-um-as-group-admin_group] as-admin-profile admin_profile
[SwitchA-um-as-group-admin_group] quit
# Configure network basic profiles and bind them to AS ports.[SwitchA-um] network-basic-profile name basic_profile_1 [SwitchA-um-net-basic-basic_profile_1] user-vlan 10 [SwitchA-um-net-basic-basic_profile_1] quit [SwitchA-um] network-basic-profile name basic_profile_2 [SwitchA-um-net-basic-basic_profile_2] user-vlan 20 [SwitchA-um-net-basic-basic_profile_2] quit [SwitchA-um] port-group name port_group_1 [SwitchA-um-portgroup-port_group_1] as name as1 interface all [SwitchA-um-portgroup-port_group_1] as name as2 interface gigabitethernet 0/0/1 to 0/0/23 //GigabitEthernet0/0/24 connects AS2 to the AP. [SwitchA-um-portgroup-port_group_1] as name as4 interface all [SwitchA-um-portgroup-port_group_1] network-basic-profile basic_profile_1 [SwitchA-um-portgroup-port_group_1] quit [SwitchA-um] port-group name port_group_2 [SwitchA-um-portgroup-port_group_2] as name as3 interface all [SwitchA-um-portgroup-port_group_2] as name as5 interface all [SwitchA-um-portgroup-port_group_2] network-basic-profile basic_profile_2 [SwitchA-um-portgroup-port_group_2] quit [SwitchA-um] quit# Configure a user access profile and bind it to all AS ports.
If the switch is running V200R007C00 or V200R008C00, run:
[SwitchA] uni-mng
[SwitchA-um] user-access-profile name access_profile
[SwitchA-um-user-access-access_profile] authentication dot1x
[SwitchA-um-user-access-access_profile] quit
[SwitchA-um] port-group name port_group_1
[SwitchA-um-portgroup-port_group_1] user-access-profile access_profile
[SwitchA-um-portgroup-port_group_1] quit
[SwitchA-um] port-group name port_group_2
[SwitchA-um-portgroup-port_group_2] user-access-profile access_profile
[SwitchA-um-portgroup-port_group_2] quit
If the switch is running V200R009C00 or a later version, run:
[SwitchA] dot1x-access-profile name 1
[SwitchA-dot1x-access-profile-1] quit
[SwitchA] authentication-profile name dot1x_auth
[SwitchA-authen-profile-dot1x_auth] dot1x-access-profile 1
[SwitchA-authen-profile-dot1x_auth] quit
[SwitchA] uni-mng
[SwitchA-um] user-access-profile name access_profile
[SwitchA-um-user-access-access_profile] authentication-profile dot1x_auth
[SwitchA-um-user-access-access_profile] quit
[SwitchA-um] port-group name port_group_1
[SwitchA-um-portgroup-port_group_1] user-access-profile access_profile
[SwitchA-um-portgroup-port_group_1] quit
[SwitchA-um] port-group name port_group_2
[SwitchA-um-portgroup-port_group_2] user-access-profile access_profile
[SwitchA-um-portgroup-port_group_2] quit
# Commit the configurations so that the configurations in service profiles can be delivered to ASs.
[SwitchA-um] commit as all
Warning: Committing the configuration will take a long time. Continue?[Y/N]: y
# Run the display uni-mng commit-result profile command to check whether the configurations in service profiles have been delivered to ASs.
[SwitchA-um] display uni-mng commit-result profile
Result of profile:
--------------------------------------------------------------------------------
 AS Name                         Commit Time               Commit/Execute Result
--------------------------------------------------------------------------------
 as1                             2014-08-25 22:29:18       Success/Success
 as2                             2014-08-25 22:29:18       Success/Success
 as3                             2014-08-25 22:29:20       Success/Success
 as4                             2014-08-25 22:29:20       Success/Success
 as5                             2014-08-25 22:29:20       Success/Success
--------------------------------------------------------------------------------
When the Commit/Execute Result field in the command output displays Success/Success for an AS, the configurations in service profiles have been delivered to the AS.
- Connect the AP to AS2.
# Add the port that connects AS2 to the AP to an AP port group.
[SwitchA] uni-mng
[SwitchA-um] port-group connect-ap name ap
[SwitchA-um-portgroup-ap-ap] as name as2 interface gigabitethernet 0/0/24
[SwitchA-um-portgroup-ap-ap] quit
[SwitchA-um] commit as all
Warning: Committing the configuration will take a long time. Continue?[Y/N]: y
[SwitchA-um] quit
# Configure an AP ID.
If the switch is running V200R007C00 or V200R008C00, run:
[SwitchA] wlan
[SwitchA-wlan-view] ap id 1 ap-type ap5010dn-agn mac 00e0-0001-0005
[SwitchA-wlan-ap-1] quit
If the switch is running V200R009C00 or a later version, run:
[SwitchA] wlan
[SwitchA-wlan-view] ap-id 1 ap-type ap5010dn-agn ap-mac 00e0-0001-0005
[SwitchA-wlan-ap-1] ap-name ap-1
[SwitchA-wlan-ap-1] quit
# Configure no authentication for the AP to connect to an SVF system.
If the switch is running V200R007C00 or V200R008C00, run:
[SwitchA-wlan-view] ap-auth-mode no-auth
[SwitchA-wlan-view] quit
If the switch is running V200R009C00 or a later version, run:
[SwitchA-wlan-view] ap auth-mode no-auth
[SwitchA-wlan-view] quit
# Power on the AP and connect the AP to AS2 using cables. Then run the display ap all command to check whether the AP has connected to the SVF system.
In V200R007C00 or V200R008C00, the following information is displayed:
[SwitchA] display ap all
  All AP(s) information:
  Normal[1],Fault[0],Commit-failed[0],Committing[0],Config[0],Download[0]
  Config-failed[0],Standby[0],Type-not-match[0],Ver-mismatch[0]
  ------------------------------------------------------------------------------
  AP    AP               AP              Profile   AP              AP
                                         /Region
  ID    Type             MAC             ID        State           Sysname
  ------------------------------------------------------------------------------
  1     AP5010DN-AGN     00e0-0001-0005    0/0     normal         ap-1
  ------------------------------------------------------------------------------
  Total number: 1,printed: 1
In V200R009C00 or a later version, the following information is displayed:
[SwitchA] display ap all
Total AP information:
nor  : normal          [1]
-----------------------------------------------------------------------------------------
ID   MAC            Name   Group     IP              Type            State STA Uptime
-----------------------------------------------------------------------------------------
1    00e0-0001-0005 ap-1   default   192.168.11.249  AP5010DN-AGN    nor   0   6H:3M:40S
-----------------------------------------------------------------------------------------
Total: 1
- Log in to ASs to check the service configurations of the ASs. The following uses the login to AS1 as example.
# Run the attach as name as-name command on the parent to log in to AS1 and check whether the configured login user name and password are correct.
[SwitchA] uni-mng
[SwitchA-um] attach as name as1
Info: Connecting to the remote AS now. Use the quit command to return to the user view.
Trying 192.168.11.254 ...
Press CTRL+K to abort
Connected to 192.168.11.254 ...

Info: The max number of VTY users is 10, and the number
      of current VTY users on line is 1.
      The current login time is 2014-08-25 22:31:18+00:00.
<HUAWEI>
# Check whether service configurations of AS ports are generated.
To check access authentication configuration of V200R009C00 or a later version, you need to run the display authentication interface interface-type interface-number command on an AS.
<HUAWEI> display current-configuration
......
#
interface Eth-Trunk0
 port link-type hybrid
 port hybrid tagged vlan 1 11
 stp instance 0 cost 200
 traffic-filter outbound acl 4998
 traffic-limit outbound acl 3999 cir 128 pir 128 cbs 16000 pbs 16000
 traffic-statistic outbound acl 3999
 traffic-limit outbound acl 4999 cir 32 pir 32 cbs 4000 pbs 4000
 traffic-statistic outbound acl 4999
 mode lacp
 mad detect mode relay
#
interface GigabitEthernet0/0/1
 stp root-protection
 authentication access-point
 authentication dot1x
#
interface GigabitEthernet0/0/26
 eth-trunk 0
 broadcast-suppression 100
#
......
Configuration Summary
When setting up a CSS for a parent, use the CSS card or service port connection mode according to networking requirements. This example uses the CSS card connection.
You can configure service profiles and bind them to ASs before or after the ASs connect to the SVF system. The AS service configuration mode includes the pre-configured and non-pre-configured modes depending on the time services are configured. Whatever configuration mode you use, you must run the commit as { name as-name | all } command to commit the configuration after completing it.
Pre-configured mode: Before ASs connect to the SVF system, pre-configure service profiles, bind them to the ASs, save the configuration on the parent, and then run the commit as { name as-name | all } command to commit the configuration. When the ASs connect to the SVF system, configurations in the service profiles are automatically delivered to the ASs.
Non-pre-configured mode: After ASs connect to the SVF system, configure service profiles, bind them to the ASs, and then run the commit as { name as-name | all } command to commit the configuration so that configurations in the service profiles can be delivered to the ASs.
- After the SVF function is enabled, the Spanning Tree Protocol (STP) and Link Layer Discovery Protocol (LLDP) functions are enabled globally on the parent. Pay attention to the following points when using the STP and LLDP functions in an SVF system:
You can disable the STP and LLDP functions only on ports, not globally.
Do not disable the LLDP function on member ports of a fabric port, ports connected to APs, and AP uplink ports. Otherwise, the SVF topology will become abnormal.
After the SVF function is enabled, the parent will change STP to Rapid Spanning Tree Protocol (RSTP) and set the priority of instance 0 to 28762 using the stp instance 0 priority 28672 command. Note that the priority of instance 0 cannot be set to a value greater than 28672. After the SVF function is disabled, the default priority of instance 0 is restored. When the SVF function is enabled or disabled, STP recalculates the port roles and changes the port status. Traffic on the ports will be interrupted temporarily.
The MAD relay function is automatically enabled on the Eth-Trunk to which a downlink fabric port is bound, and the MAD function is automatically enabled on the Eth-Trunk to which an uplink fabric port is bound to perform MAD in an AS that is a stack. When the standby switch in the AS is removed, MAD cannot be performed because the standby switch restarts automatically without saving the configuration.
To prevent the SVF function from being affected, do not perform MIB operations to modify the configuration automatically generated in an SVF system, for example, the configuration of STP, LLDP, and Eth-Trunk to which a fabric port is bound.
If an AP has connected to the parent before the SVF function is enabled, the parent cannot collect topology information about the AP after the uni-mng command is used to enable the SVF function. You need to run the commit { all | ap ap-id } command in the WLAN view to commit the AP configuration. Subsequently, the parent can collect topology information about the AP. From V200R011C10, WLAN configurations are automatically delivered, without the need of running the commit all command.
On the parent, there may be a delay in displaying the output of some commands executed on ASs, including the patch delete all and patch load filename all [ active | run ] commands.
In an SVF system, the maximum frame length allowed by ports cannot be configured on an AS. Therefore, the maximum frame length is the default value 9216 (including the CRC field).
Internal attacks of a management VLAN will cause ASs to disconnect from the SVF system. You need to error down the attacked ports or remove the ports from the management VLAN after identifying the attack source.
After an AS disconnects from the SVF system, in versions earlier than V200R012C00, all downlink ports of the AS will be error down. In V200R012C00 and later versions, to ensure that downlink networks of the AS can communicate with each other, downlink ports of the AS will not be error down.
Configured Control and Provisioning of Wireless Access Points (CAPWAP) tunnel parameters apply to the SVF system. To ensure that the CAPWAP tunnel of the SVF system works normally, you are advised to retain the default CAPWAP tunnel parameters.
- When an AS is an S5700-10P-LI, S5700-10P-PWR-LI-AC, S2720-EI (V200R009C00 and V200R010C00) or S2750-EI, and the assign forward-mode ipv4-hardware command has been executed in the system view to enable Layer 3 hardware forwarding for IPv4 packets before the AS connects to the SVF system:
- The AS cannot negotiate to connect to the SVF system if the AS directly connects to the parent.
- Configuring a management VLAN is not allowed if the AS connects to the parent across a network.
You need to start the AS in standalone mode and then run the undo assign forward-mode command in the system view to disable Layer 3 hardware forwarding for IPv4 packets.
- In the SVF system, network access rights available before users pass network admission control (NAC) authentication can be authorized through authentication-free rules instead of a user control list (UCL) group.
- SVF does not support built-in Portal servers.
Parent Configuration File (configuration in V200R008C00 as an example)
#
sysname SwitchA
#
vlan batch 11
#
stp mode rstp
stp instance 0 priority 28672
#
lldp enable
#
dhcp enable
#
interface Vlanif11
 ip address 192.168.11.1 255.255.255.0
 dhcp select interface
 dhcp server option 43 ip-address 192.168.11.1
#
interface Eth-Trunk1
 port link-type hybrid
 port hybrid tagged vlan 1 10 to 11
 stp root-protection
 authentication control-point open
 authentication dot1x
 mode lacp
 loop-detection disable
 mad relay
#
interface Eth-Trunk2
 port link-type hybrid
 port hybrid tagged vlan 1 10 to 11
 stp root-protection
 authentication control-point open
 authentication dot1x
 mode lacp
 loop-detection disable
 mad relay
#
interface Eth-Trunk3
 port link-type hybrid
 port hybrid tagged vlan 1 11 20
 stp root-protection
 authentication control-point open
 authentication dot1x
 mode lacp
 loop-detection disable
 mad relay
#
interface GigabitEthernet1/1/0/1
 eth-trunk 1
#
interface GigabitEthernet1/1/0/2
 eth-trunk 2
#
interface GigabitEthernet1/1/0/3
 eth-trunk 3
#
interface GigabitEthernet1/2/0/1
 mad detect mode direct
#
interface GigabitEthernet2/1/0/1
 eth-trunk 1
#
interface GigabitEthernet2/1/0/2
 eth-trunk 2
#
interface GigabitEthernet2/1/0/3
 eth-trunk 3
#
interface GigabitEthernet2/2/0/1
 mad detect mode direct
#
capwap source interface vlanif11
#
wlan
 wlan ap lldp enable
 ap-auth-mode no-auth
 ap id 1 type-id 30 mac 00e0-0001-0005 sn 2102355547W0E3000316
 wlan work-group default
#
as-auth
 whitelist mac-address 00e0-0001-0011
 whitelist mac-address 00e0-0001-0022
 whitelist mac-address 00e0-0001-0033
 whitelist mac-address 00e0-0001-0044
 whitelist mac-address 00e0-0001-0055
#
uni-mng
 as name as1 model S5700-28P-PWR-LI-AC mac-address 00e0-0001-0011    //Check whether the configurations of ASs and ports connected to ASs are correct.
  down-direction fabric-port 4 member-group interface Eth-Trunk 4
  port Eth-Trunk 4 trunkmember interface GigabitEthernet 0/0/23
  port Eth-Trunk 4 trunkmember interface GigabitEthernet 0/0/24
 as name as2 model S5700-28P-PWR-LI-AC mac-address 00e0-0001-0022
 as name as3 model S5700-28P-PWR-LI-AC mac-address 00e0-0001-0033
  down-direction fabric-port 5 member-group interface Eth-Trunk 5
  port Eth-Trunk 5 trunkmember interface GigabitEthernet 0/0/23
  port Eth-Trunk 5 trunkmember interface GigabitEthernet 0/0/24
 as name as4 model S2750-28TP-EI-AC mac-address 00e0-0001-0044
 as name as5 model S2750-28TP-EI-AC mac-address 00e0-0001-0055
 interface fabric-port 1
  port member-group interface Eth-Trunk 1
 interface fabric-port 2
  port member-group interface Eth-Trunk 2
 interface fabric-port 3
  port member-group interface Eth-Trunk 3
 as-admin-profile name admin_profile                //Check the administrator profile configuration.
  user asuser password %^%#Ky,WNqWh_DZ[(V96yvSEph)VLMc/+U}>]i2:"9n:%^%#
 network-basic-profile name basic_profile_1         //Check the network basic profile configuration.
  user-vlan 10
 network-basic-profile name basic_profile_2
  user-vlan 20
 user-access-profile name access_profile            //Check the user access profile configuration.
  authentication dot1x
 as-group name admin_group                //Check whether an AS group has been created and whether it has been bound to the AS administrator profile.
  as-admin-profile admin_profile
  as name as1
  as name as2
  as name as3
  as name as4
  as name as5
 port-group name port_group_1              //Check whether a port group has been bound to service profiles and whether service ports of ASs have been added to the port group.
  network-basic-profile basic_profile_1
  user-access-profile access_profile
  as name as1 interface GigabitEthernet 0/0/1 to 0/0/24
  as name as2 interface GigabitEthernet 0/0/1 to 0/0/23
  as name as4 interface Ethernet 0/0/1 to 0/0/24
 port-group name port_group_2             //Check whether a port group has been bound to service profiles and whether service ports of ASs have been added to the port group.
  network-basic-profile basic_profile_2
  user-access-profile access_profile
  as name as3 interface GigabitEthernet 0/0/1 to 0/0/24
  as name as5 interface Ethernet 0/0/1 to 0/0/24
 port-group connect-ap name ap
  as name as2 interface GigabitEthernet 0/0/24
#
return
Related Information
Video