Adding a FlexE NE in an Ethernet Service Scenario
Adding a FlexE NE to a live network running Ethernet services involves the connection between a FlexE physical interface and standard Ethernet interface. If DCN auto-negotiation is enabled on the FlexE physical interface, the two interfaces can automatically communicate with each other, and the NMS can manage the FlexE NE.
Usage Scenario
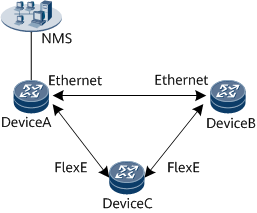
As shown in Figure 1, DeviceA and DeviceB on the live network work in standard Ethernet mode and do not support DCN auto-negotiation on FlexE physical interfaces. The new NE DeviceC works in FlexE mode and supports DCN auto-negotiation on FlexE physical interfaces.
After DeviceC is added, the underlying working mode of the FlexE physical interfaces automatically switches from FlexE to standard Ethernet within about 10s because DCN auto-negotiation is enabled on them by default. The NMS can then manage DeviceC.
- If you run the following commands on DeviceC within 20 minutes of being added, the configuration takes effect immediately to ensure DCN continuity.
- Run the force-physical-mode ethernet command to forcibly switch the underlying working mode of the FlexE physical interface to standard Ethernet.

By default, the underlying working mode of a FlexE physical interface automatically switches from standard Ethernet back to FlexE after 20 minutes.
- To change the time for switching the underlying working mode of a FlexE physical interface from standard Ethernet back to FlexE, or to disable a FlexE physical interface from switching from the standard Ethernet mode back to the FlexE mode, perform the following operations:
- Run the phyautoclear forcephysicalmode enable cleartime command to set the time for switching the underlying working mode of the FlexE physical interface from standard Ethernet back to FlexE.
- Run the phyautoclear forcephysicalmode disable command to disable the underlying working mode of the FlexE physical interface from switching from standard Ethernet back to FlexE.
- Run the force-physical-mode ethernet command to forcibly switch the underlying working mode of the FlexE physical interface to standard Ethernet.
- If the preceding commands are not run on DeviceC within 20 minutes of being added, the underlying working mode of the FlexE physical interfaces on DeviceC is switched from the standard Ethernet mode to the FlexE mode at the 20-minute mark. DCN auto-negotiation is then performed 10 seconds later to implement DCN connectivity. As a result, the NMS cannot manage DeviceC for about 10 seconds, and the process repeats.
If you want to change the services on the live network to the FlexE mode, perform the following steps:
Procedure
- Run the flexe enable port port-position command on DeviceA to switch the working mode of the Ethernet interface from standard Ethernet to FlexE. Because the underlying working mode of the FlexE physical interface on DeviceC has been switched to standard Ethernet, the DCN channel between DeviceA and DeviceC is interrupted, and DeviceC is disconnected from the NMS.
- Change the status of the FlexE physical interface on DeviceA manually, triggering the underlying working mode of DeviceC's FlexE physical interface connected to the FlexE physical interface on DeviceA to quickly switch back to the FlexE mode. You can perform the following operations:
- Run the laser turn-off command on DeviceA to disable the optical module laser, and then run the laser turn-on command to enable the optical module laser.
- Run the shutdown command on DeviceA to disable the interface, and then run the undo shutdown command to enable the interface.
After the preceding operations are complete, the FlexE physical interface connecting DeviceC to DeviceA is switched back to the FlexE mode. The two devices are now successfully connected using FlexE, and the NMS can continue to manage DeviceC.

In the preceding scenarios, the operations on DeviceB are the same as those on DeviceA.
