Example for Configuring SSH Clients on the Public Network to Access an SSH Server on a Private Network
This example shows how to configure an SSH client on the public network to access an SSH server on a private network. You can configure SSH-related attributes for public users to allow them to access devices on private networks in STelnet or SFTP mode.
Networking Requirements
As shown in Figure 1, PE1 is an SSH client located on the MPLS backbone network, and CE1 functions as an SSH server located on the private network with the AS number of 65410. Public network users need to securely access and manage CE1 after logging in to PE1.
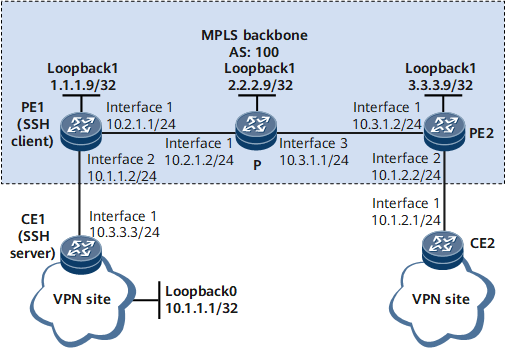

In this example, interface 1, interface 2, and interface 3 represent GE 0/1/1, GE 0/1/9 and GE 0/1/2, respectively.
Configuration Roadmap
The configuration roadmap is as follows:
Configure a VPN instance on PE1 to allow CE1 to access PE1.
Set up EBGP peer relationships between PEs and CEs and import VPN routes.
Configure client002 and the SSH server to generate local key pairs, and bind client002 to the RSA public key of the SSH server to authenticate the client when the client attempts to log in to the server.
Enable the STelnet and SFTP server functions on the SSH server.
Connect client001 and client002 to CE1 using STelnet and SFTP, respectively.
Data Preparation
To complete the configuration, you need the following data:
Name of the VPN instance on the PEs: vpn1
VPN target on the PEs: 111:1
IP address of PE1: 10.1.1.2; IP address of PE2: 10.1.2.2
Password authentication for client001
RSA authentication (public key: RsaKey001) for client002
IP address of CE1: 10.3.3.3
Procedure
- Configure the MPLS backbone network.
Configure an IGP to allow PEs and the P on the MPLS backbone network to communicate with each other. Configure basic MPLS functions, enable MPLS LDP, and establish LDP LSPs on the MPLS backbone network.
For configuration details, see Configuration Files in this section.
- Configure VPN instances on PEs and connect CEs to PEs.
# Configure PE1.
[*PE1] ip vpn-instance vpn1
[*PE1-vpn-instance-vpn1] route-distinguisher 100:1
[*PE1-vpn-instance-vpn1] vpn-target 111:1 both
[*PE1-vpn-instance-vpn1] quit
[*PE1] interface gigabitethernet 0/1/9
[*PE1-GigabitEthernet0/1/9] ip binding vpn-instance vpn1
[*PE1-GigabitEthernet0/1/9] undo shutdown
[*PE1-GigabitEthernet0/1/9] ip address 10.1.1.2 24
[*PE1-GigabitEthernet0/1/9] quit
[*PE1] commit
# Configure PE2.
[*PE2] ip vpn-instance vpn1
[*PE2-vpn-instance-vpn1] route-distinguisher 200:1
[*PE2-vpn-instance-vpn1] vpn-target 111:1 both
[*PE2-vpn-instance-vpn1] quit
[*PE2] interface gigabitethernet 0/1/9
[*PE2-GigabitEthernet0/1/9] ip binding vpn-instance vpn1
[*PE2-GigabitEthernet0/1/9] undo shutdown
[*PE2-GigabitEthernet0/1/9] ip address 10.1.2.2 24
[*PE2-GigabitEthernet0/1/9] quit
[*PE2] commit
# Configure IP addresses for interfaces on CEs according to Figure 1. For configuration details, see Configuration Files in this section.
After the configuration is complete, run the display ip vpn-instance verbose command on PEs. You can view the configurations of VPN instances. Each PE can successfully ping its connected CE.
When there are multiple interfaces on a PE bound to the same VPN instance, specify the source address in the ping -vpn-instance vpn-instance-name -a source-ip-address dest-ip-address command to ping the CE connected to the peer PE. Otherwise, the ping may fail.
[~PE1] ping -vpn-instance vpn1 10.3.3.3 PING 10.3.3.3: 56 data bytes, press CTRL_C to break Reply from 10.3.3.3: bytes=56 Sequence=1 ttl=255 time=260 ms Reply from 10.3.3.3: bytes=56 Sequence=2 ttl=255 time=70 ms Reply from 10.3.3.3: bytes=56 Sequence=3 ttl=255 time=60 ms Reply from 10.3.3.3: bytes=56 Sequence=4 ttl=255 time=60 ms Reply from 10.3.3.3: bytes=56 Sequence=5 ttl=255 time=90 ms --- 10.3.3.3 ping statistics --- 5 packet(s) transmitted 5 packet(s) received 0.00% packet loss round-trip min/avg/max = 60/108/260 ms - Establish EBGP peer relationships between the PEs and the CEs to import VPN routes.
# Configure CE1.
[*CE1] bgp 65410
[*CE1-bgp] peer 10.1.1.2 as-number 100
[*CE1-bgp] import-route direct
[*CE1-bgp] quit
[*CE1] commit
# Configure PE1.
[*PE1] bgp 100
[*PE1-bgp] ipv4-family vpn-instance vpn1
[*PE1-bgp-vpn1] peer 10.3.3.3 as-number 65410
[*PE1-bgp-vpn1] import-route direct
[*PE1-bgp-vpn1] quit
[*PE1-bgp] quit
[*PE1] commit
# Configure CE2.
[*CE2] bgp 65420
[*CE2-bgp] peer 10.1.2.2 as-number 100
[*CE2-bgp] import-route direct
[*CE2-bgp] quit
[*CE2-bgp] commit
# Configure PE2.
[*PE2] bgp 100
[*PE2-bgp] ipv4-family vpn-instance vpn1
[*PE2-bgp-vpn1] peer 10.1.2.1 as-number 65420
[*PE2-bgp-vpn1] import-route direct
[*PE2-bgp-vpn1] quit
[*PE2-bgp] quit
[*PE2-bgp] commit
After the configuration is complete, run the display bgp vpnv4 vpn-instance peer command on PEs. The command output shows that the EBGP peer relationships between PEs and the CEs are in the Established state.
The following example uses the command output on PE1.
[~PE1] display bgp vpnv4 vpn-instance vpn1 peer
 BGP local router ID : 1.1.1.9
 Local AS number : 100
 Total number of peers : 1                 Peers in established state : 1
  Peer          V      AS  MsgRcvd  MsgSent  OutQ   Up/Down        State   PrefRcv
  10.3.3.3      4   65410        3        3     0  00:00:37  Established         1
# Set up an MP-IBGP peer relationship between PEs.
For configuration details, see Configuration Files in this section.
- Configure the server to generate a local key pair.
[*CE1] rsa local-key-pair create
The key name will be: CE1_Host
The range of public key size is (2048, 3072).
NOTE: Key pair generation will take a short while.
Please input the modulus [default = 3072]:3072
Generating keys...
[*CE1] commit
- Configure the RSA public key on the server.
# Configure the client to generate a local key pair.
[*PE1] rsa local-key-pair create
The key name will be: PE1_Host
The range of public key size is (2048, 3072).
NOTE: Key pair generation will take a short while.
Please input the modulus [default = 3072]:3072
Generating keys...
[*PE1] commit
# Check the RSA public key generated on the client.
[~PE1] display rsa local-key-pair public
=====================================================
Time of Key pair created: 12:02:09  2007/6/8
Key name: PE1_Host
Key type: RSA encryption Key
=====================================================
Key code:
3047
  0240
    BC011055 8BCCB887 384E5A14 1EF982A8 CA44A376
    87787138 3BDB1FF0 D21F05D8 41BECF56 B2FA0695
    8F76F1B2 5D3E2F35 A8051CE1 E0234274 9D8BB20D
    E2EE8EB5
  0203
    010001
 Host public key for PEM format code:
---- BEGIN SSH2 PUBLIC KEY ----
AAAAB3NzaC1yc2EAAAADAQABAAAAQQC8ARBVi8y4hzhOWhQe+YKoykSjdod4cTg7
2x/w0h8F2EG+z1ay+gaVj3bxsl0+LzWoBRzh4CNCdJ2Lsg3i7o61
---- END SSH2 PUBLIC KEY ----
Public key code for pasting into OpenSSH authorized_keys file:
ssh-rsa AAAAB3NzaC1yc2EAAAADAQABAAAAQQC8ARBVi8y4hzhOWhQe+YKoykSjdod4cTg72x/w0h8F
2EG+z1ay+gaVj3bxsl0+LzWoBRzh4CNCdJ2Lsg3i7o61 rsa-key
=====================================================
Time of Key pair created: 12:02:09  2007/6/8
Key name: PE1_Server
Key type: RSA encryption Key
=====================================================
Key code:
3067
  0260
    9E6EDDE7 AEFF3F9F 5090ECA5 11DE117E 6660707F
    23AC8DE2 BDB58E1E D46856B5 419CAEDF 3A33DD40
    278C6403 24ADC2E6 B110A8ED B6CC644F 055C5437
    D720D3D8 9A3F9DE5 4FE062DF F2DC443E 9092A0F4
    970B8CC9 C8684678 CF0682F3 6301F5F3
  0203
    010001
# Copy the RSA public key generated on the client to the server.
[*CE1] rsa peer-public-key RsaKey001
Enter "RSA public key" view, return system view with "peer-public-key end".
[*CE1-rsa-public-key] public-key-code begin
Enter "RSA key code" view, return last view with "public-key-code end".
[*CE1-rsa-key-code] 3067
[*CE1-rsa-key-code] 0240
[*CE1-rsa-key-code] BC011055 8BCCB887 384E5A14 1EF982A8 CA44A376
[*CE1-rsa-key-code] 87787138 3BDB1FF0 D21F05D8 41BECF56 B2FA0695
[*CE1-rsa-key-code] 8F76F1B2 5D3E2F35 A8051CE1 E0234274 9D8BB20D
[*CE1-rsa-key-code] E2EE8EB5
[*CE1-rsa-key-code] 0203
[*CE1-rsa-key-code] 010001
[*CE1-rsa-key-code] public-key-code end
[*CE1-rsa-public-key] peer-public-key end
[*CE1-rsa-public-key] quit
[*CE1] commit
- Create SSH users on the server.
There are several authentication modes for SSH users: password, RSA, password-RSA, DSA, password-DSA, ECC, password-ECC, SM2, password-SM2 and All.
If the authentication mode is password, password-ECC, password-DSA, password-sm2 or password-RSA, configure a local user on the server with the same user name.
If the authentication mode is RSA, password-RSA, DSA, password-DSA, SM2, password-SM2, ECC, password-ECC, or All, save the RSA, DSA, SM2, or ECC public key generated on the SSH client to the server.
# Configure VTY user interfaces.
[~CE1] user-interface vty 0 4
[~CE1-ui-vty0-4] authentication-mode aaa
[*CE1-ui-vty0-4] protocol inbound ssh
[*CE1-ui-vty0-4] commit
[~CE1-ui-vty0-4] quit
Create an SSH user named client001.
# Create an SSH user named client001 and configure password authentication for the user.
[~CE1] ssh user client001
[*CE1] ssh user client001 authentication-type password
# Set a password for client001.
[*CE1] aaa
[*CE1-aaa] local-user client001 password
Please configure the password (8-128)
Enter Password:
Confirm Password:
The password must meet the following requirements:
The password is entered in man-machine interaction mode. The system does not display the entered password.
A password is a string of 8 to 16 case-sensitive characters and must contain at least two types of the following characters: uppercase letters, lowercase letters, digits, and special characters.
- Special characters exclude question marks (?) and spaces. However, spaces are allowed in the password if the password is enclosed in quotation marks.
- Double quotation marks cannot contain double quotation marks if spaces are used in a password.
- Double quotation marks can contain double quotation marks if no space is used in a password.
For example, the password "Aa123"45"" is valid, but the password "Aa 123"45"" is invalid.
The configured password is displayed in ciphertext in the configuration file.
[*CE1-aaa] local-user client001 service-type ssh
[*CE1-aaa] quit
# Set the service type of client001 to STelnet.
[*CE1] ssh user client001 service-type stelnet# Create an SSH user named client002, configure RSA authentication for the user, and bind the RSA public key to client002.
[*CE1] ssh user client002
[*CE1] ssh user client002 authentication-type rsa
[*CE1] ssh user client002 assign rsa-key RsaKey001
# Set the service type of client002 to SFTP and configure the authorized directory for the user.
[*CE1] ssh user client002 service-type sftp
[*CE1] ssh user client002 sftp-directory cfcard:
[*CE1] commit
- Enable the STelnet and SFTP server functions on the SSH server.
[~CE1] interface LoopBack 0
[~CE1-LoopBack0] ip address 10.1.1.1 255.255.255.255
[*CE1-LoopBack0] quit
[*CE1] stelnet server enable
[*CE1] sftp server enable
[*CE1] ssh server-source -i loopback 0
[*CE1] commit - Configure PE1 (the SSH client) to log in to CE1 (the SSH server).
# If the client logs in to the server for the first time, enable first authentication on the client.
[~PE1] ssh client first-time enable
[*PE1] commit
# Use STelnet to log in to the SSH server.
[~PE1] stelnet 10.1.1.1 -vpn-instance vpn1
Please input the username:client001
Trying 10.1.1.1 ...
Press CTRL+K to abort
Connected to 10.1.1.1 ...
The server is not authenticated. Do you continue to access it?(Y/N):y
Do you want to save the server's public key?(Y/N):y
The server's public key will be saved with the name:10.1.1.1. Please wait...
Enter password:
The following information indicates that the login is successful:
Info: The max number of VTY users is 10, and the current number
      of VTY users on line is 1.
<CE1>
# Use SFTP to log in to the SSH server.
[~PE1] sftp 10.1.1.1 -vpn-instance vpn1
Please input the username:client002
Trying 10.1.1.1 ...
Press CTRL+K to abort
The server is not authenticated. Do you continue to access it?(Y/N):y
Do you want to save the server's public key?(Y/N):y
The server's public key will be saved with the name:10.1.1.1. Please wait...
After the login succeeds, the following information is displayed.
<sftp-client>
- Verify the configuration.
# Check the status of the SSH server.
[~CE1] display ssh server status
SSH Version                                : 2.0
SSH authentication timeout (Seconds)       : 60
SSH authentication retries (Times)         : 3
SSH server key generating interval (Hours) : 0
SSH version 1.x compatibility              : Enable
SSH server keepalive                       : Disable
SFTP IPv4 server                           : Enable
SFTP IPv6 server                           : Enable
STELNET IPv4 server                        : Enable
STELNET IPv6 server                        : Enable
SNETCONF IPv4 server                       : Enable
SNETCONF IPv6 server                       : Enable
SNETCONF IPv4 server port(830)             : Disable
SNETCONF IPv6 server port(830)             : Disable
SCP IPv4 server                            : Enable
SCP IPv6 server                            : Enable
SSH IPv4 server port                       : 1025
SSH IPv6 server port                       : 1025
SSH server source address                  : 10.1.1.1
SSH ipv6 server source address             : 0::0
SSH ipv6 server source vpnName             :
ACL name                                   :
ACL number                                 :
ACL6 name                                  :
ACL6 number                                :
SSH server ip-block                        : Enable
Configuration Files
CE1 configuration file
#
 sysname CE1
#
rsa peer-public-key rsakey001
public-key-code begin
3067
  0260
    9E6EDDE7 AEFF3F9F 5090ECA5 11DE117E 6660707F 23AC8DE2 BDB58E1E D46856B5
    419CAEDF 3A33DD40 278C6403 24ADC2E6 B110A8ED B6CC644F 055C5437 D720D3D8
    9A3F9DE5 4FE062DF F2DC443E 9092A0F4 970B8CC9 C8684678 CF0682F3 6301F5F3
  0203
    010001
public-key-code end
peer-public-key end
#
interface loopback 0
 ip address 10.1.1.1 255.255.255.255
stelnet server enable
sftp server enable
ssh server-source -i loopback 0
ssh user client001
ssh user client001 authentication-type password
ssh user client001 service-type stelnet
ssh user client002
ssh user client002 assign rsa-key rsakey001
ssh user client002 authentication-type rsa
ssh user client002 sftp-directory cfcard:
ssh user client002 service-type sftp
#
aaa
 local-user client001 password cipher @%@%UyQs4,KTtSwJo(4QmW#K,LC:@%@%
 local-user client001 service-type ssh
 #
interface GigabitEthernet0/1/1
 undo shutdown
 ip address 10.3.3.3 255.255.255.0
#
bgp 65410
 peer 10.1.1.2 as-number 100
 #
 ipv4-family unicast
  undo synchoronization
  import-route direct
  peer 10.1.1.2 enable
#
user-interface vty 0 4
 authentication-mode aaa
 protocol inbound ssh
#
return
PE1 configuration file
#
 sysname PE1
#
ip vpn-instance vpn1
 ipv4-family
  route-distinguisher 100:1
  apply-label per-instance
  vpn-target 111:1 export-extcommunity
  vpn-target 111:1 import-extcommunity
#
mpls lsr-id 1.1.1.9
#
mpls
#
mpls ldp
#
interface GigabitEthernet0/1/1
 undo shutdown
 ip address 10.2.1.1 255.255.255.0
 mpls
 mpls ldp
#
interface GigabitEthernet0/1/9
 undo shutdown
 ip binding vpn-instance vpn1
 ip address 10.1.1.2 255.255.255.0
#
interface LoopBack1
 ip address 1.1.1.9 255.255.255.255
#
bgp 100
 peer 3.3.3.9 as-number 100
 peer 3.3.3.9 connect-interface LoopBack1
 #
 ipv4-family unicast
  undo synchoronization
  peer 3.3.3.9 enable
 #
 ipv4-family vpnv4
  policy vpn-target
  peer 3.3.3.9 enable
 #
 ipv4-family vpn-instance vpn1
  import-route direct
  peer 10.3.3.3 as-number 65410
#
ssh client first-time enable
#
return
P configuration file
#
 sysname P
#
mpls lsr-id 2.2.2.9
#
mpls
#
mpls ldp
#
interface GigabitEthernet0/1/1
 undo shutdown
 ip address 10.2.1.2 255.255.255.0
 mpls
 mpls ldp
#
interface GigabitEthernet0/1/2
 undo shutdown
 ip address 10.3.1.1 255.255.255.0
 mpls
 mpls ldp
#
interface LoopBack1
 ip address 2.2.2.9 255.255.255.255
#
return
PE2 configuration file
#
 sysname PE2
#
ip vpn-instance vpn1
 ipv4-family
  route-distinguisher 200:1
  apply-label per-instance
  vpn-target 111:1 export-extcommunity
  vpn-target 111:1 import-extcommunity
#
mpls lsr-id 3.3.3.9
#
mpls
#
mpls ldp
#
interface GigabitEthernet0/1/1
 undo shutdown
 ip address 10.3.1.2 255.255.255.255
 mpls
 mpls ldp
#
interface GigabitEthernet0/1/9
 undo shutdown
 ip binding vpn-instance vpn1
 ip address 10.1.2.2 255.255.255.0
#
interface LoopBack1
 ip address 3.3.3.9 255.255.255.255
#
bgp 100
 peer 1.1.1.9 as-number 100
 peer 1.1.1.9 connect-interface LoopBack1
 #
 ipv4-family unicast
  undo synchoronization
  peer 1.1.1.9 enable
 #
 ipv4-family vpnv4
  policy vpn-target
  peer 1.1.1.9 enable
 #
 ipv4-family vpn-instance vpn1
  import-route direct
  peer 10.1.2.1 as-number 65420
#
return
CE2 configuration file
#
 sysname CE2
#
interface GigabitEthernet0/1/1
 undo shutdown
 ip address 10.1.2.1 255.255.255.0
#
bgp 65420
 peer 10.1.2.2 as-number 100
 #
 ipv4-family unicast
  undo synchoronization
  import-route direct
  peer 10.1.2.2 enable
#
return