(Optional) Configuring DHCP Server Dual-Device Hot Backup

Dual-device hot backup of a DHCP server can be enabled to achieve backup of user session information between devices. When a network node or link experiences an abnormality, fast user service switching is triggered, which enhances service reliability.

Prerequisites

Before configuring DHCP server dual-device hot backup, ensure that the same DHCP server configuration has been performed on the master and slave devices. Otherwise, a master/slave switchover may lead to an abnormality in new user access and user renewal.

The DHCP server function has been enabled using the dhcp server enable command on an interface if the interface needs to be used as a DHCP server.

  • If multiple interfaces need to be used as DHCP servers, for security purposes, you are advised to preferentially run the dhcp server enable command on the interfaces to enable the DHCP server function. If high security is not required, you run the dhcp server request-packet all-interface enable command in the system view to enable the DHCP server function for all interfaces.
  • If the DHCP server function is not enabled, a DHCP server does not process DHCP request messages.
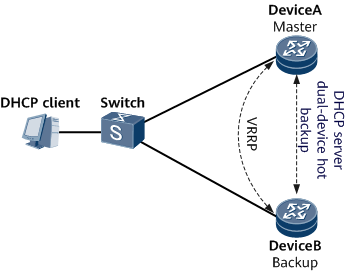
Background

As shown in Figure 1, the DHCP client is connected to DeviceA and DeviceB over a switch. A VRRP group is configured between DeviceA and DeviceB to establish the master/backup relationship, with DeviceA as the master device and DeviceB as the backup device. Both DeviceA and DeviceB serve as a DHCP server to assign IP addresses to DHCP clients.

In normal cases, DeviceA implements new user access and online user renewal. When DeviceA or the link between DeviceA and the switch becomes faulty, a master/backup VRRP switchover is implemented and DeviceB takes over to become the master device. DeviceB can properly perform address assignment for new users and renewal requests for online users only when user session information has been synchronized from DeviceA to DeviceB.

To prevent abnormalities of new user access and online user renewal after a master/backup switchover due to a failure to synchronize user session information from DeviceA to DeviceB, deploy DHCP server dual-device hot backup on DeviceA and DeviceB.

Figure 1 DHCP server dual-device hot backup

Perform the following operations on the DHCP servers that back up each other:

Procedure

  1. Configure basic functions of a VRRP group.
    1. Run system-view

      The system view is displayed.

    2. Run interface interface-type interface-number [.subinterface-number ]

      The interface view for a VRRP group is displayed.

    3. Run vrrp vrid virtual-router-id virtual-ip virtual-address

      A VRRP group is created and a virtual IP address is configured.

    4. Run vrrp vrid virtual-router-id preempt-mode timer delay delay-time

      The preemption delay for devices in the VRRP group is configured.

      Set the preemption delay value to 0 on the backup device to allow it to become a master device immediately after its priority changes; set the preemption delay to a non-0 value on the master device so that it can preempt the Master state after a specified delay if a master/backup VRRP switchover is performed.

      In DHCP server dual-device hot backup scenarios, to ensure that the master device can completely back up user session information to the backup device, set a preemption delay to over 600s for the master device. Set the preemption delay to an even larger value when the address pool contains a large number of IP addresses.

    5. Run vrrp vrid virtual-router-id priority priority-value

      A priority is configured for the VRRP group.

    6. (Optional) Run vrrp vrid virtual-router-id timer advertise advertise-interval

      The interval for sending VRRP Advertisement packets is configured.

      The interval for sending VRRP Advertisement packets cannot be less than the time required for master/slave switching. Otherwise, VRRP intermittently goes Down. You are advised to set the interval for sending VRRP Advertisement packets to more than 1 second.

    7. Run commit

      The configuration is committed.

    8. Run quit

      Exit from the interface view.

  2. Configure an RBS.
    1. Run remote-backup-service remote-backup-service-name

      An RBS is created, and the RBS view is displayed.

    2. (Optional) Run bind ssl-policy ssl-policy-name

      An SSL policy is bound to the TCP connection.

    3. Run peer peer-ip-address source source-ip-address port port-id

      TCP connection parameters are configured for the RBS.

      The peer-ip-address parameter specifies the IP address of the peer device that backs up the local device, and the source-ip-address parameter specifies the IP address of the local device that backs up the peer device. The IP address of the peer device must be configured on a main interface, a sub-interface, or a logical interface (loopback interface) on the peer device. The IP address of the local device must be configured on a main interface, a sub-interface, or a logical interface (loopback interface) on the local device. The two IP addresses must be able to ping each other.

      The port-id parameter specifies a listening port number. The TCP port numbers configured on the master and backup devices must be the same.

    4. (Optional) Run batch-backup service-type dhcp-server now

      The user service configured for the RBS is backed up instantly.

    5. Run commit

      The configuration is committed.

    6. Run quit

      Exit from the RBS view.

  3. Configure an RBP.
    1. Run remote-backup-profile profile-name

      An RBP is created, and the RBP view is displayed.

    2. Run peer-backup hot

      A backup mode is configured for user information backup between devices.

    3. Run vrrp-id vrid interface interface-type interface-number

      The RBP is bound to the VRRP group.

      The vrid parameter specifies the ID of a VRRP group. The ID must be the same as the VRRP group's ID that was configured using the vrrp vrid virtual-router-id [ virtual-ip virtual-address ] command in the interface view.

    4. Run backup-id backup-id remote-backup-service service-name

      The RBP is associated with the RBS, and the user backup ID for the RBP is set.

      The backup-id parameter specifies a backup ID for the RBP. You can use a backup ID and an RBS to determine an RBP. The backup IDs configured for the same RBP must be the same on the master and backup devices and can no longer be configured for other RBPs.

    5. Run commit

      The configuration is committed.

    6. Run quit

      Exit from the RBP view.

  4. Enable remote backup for the DHCP server.
    1. Run remote-backup-profile profile-name

      An RBP is created, and the RBP view is displayed.

    2. Run service-type dhcp-server

      Remote backup is enabled for the DHCP server.

    3. Run commit

      The configuration is committed.

    4. Run quit

      Exit from the RBP view.

    5. Run ip pool ip-pool-name [ server ]

      The view of the address pool bound to the RBP is displayed.

      The server parameter is mandatory when an address pool is created for the first time. After the address pool is created, the address pool view is displayed. The server parameter is optional.

    6. Run remote-backup-profile profile-name

      The RBP is bound to the current address pool.

    7. Run server identifier ip ip-address

      An identifier is configured for the DHCP server.

      If an IP address has been specified as the DHCP server identifier, ensure that routes from the DHCP client to the IP address are reachable so that packets can be properly sent to the DHCP server.

      In case of DHCP server dual-device hot backup:
      • Configure the virtual IP address of the VRRP group on the inbound interfaces of the master and slave DHCP servers as the DHCP server identifier.
      • If an IP address has been specified to be included in the current address pool using the server identifier ip command, the IP address cannot be assigned to users.

    8. Run commit

      The configuration is committed.

Copyright © Huawei Technologies Co., Ltd.
< Previous topic Next topic >