(Optional) Configuring Manually Triggered Dual-Device ND Hot Backup

Dual-device ND hot backup can be enabled to achieve backup of ND entries between devices. This allows fast service switching in case of a network node or link failure, enhancing service reliability.

Prerequisites

Before configuring manually triggered dual-device ND hot backup, ensure that the same ND configuration has been performed on both the master and backup devices. Otherwise, downstream traffic may be interrupted after a master/backup switchover.

Background

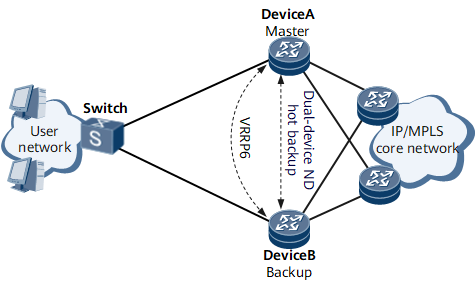
On the network shown in Figure 1, users access DeviceA and DeviceB over the switch. A VRRP6 group is configured between DeviceA and DeviceB to establish the master/backup relationship, with DeviceA as the master device and DeviceB as the backup device.

In normal circumstances, DeviceA forwards both upstream and downstream traffic. If DeviceA or the link between DeviceA and the switch fails, a master/backup VRRP6 switchover is triggered and DeviceB becomes the master device. Then, DeviceB needs to advertise network segment routes to devices on the network side so that downstream traffic is directed from the network side to DeviceB. If DeviceB has not learned ND entries from user-side devices, the downstream traffic is interrupted. DeviceB can properly forward downstream traffic only after it learns ND entries from user-side devices.

If ND entries are not synchronized from DeviceA to DeviceB and a master/backup switchover occurs, downstream traffic may be interrupted because DeviceB does not learn ND entries from users-side devices in time. To address this problem, deploy dual-device ND hot backup on DeviceA and DeviceB.

Figure 1 Networking of dual-device ND hot backup

Perform the following steps on the devices that back up ND entries from each other:

Dual-device ND hot backup applies in both VRRP6 and E-Trunk scenarios. This section describes the implementation of dual-device ND hot backup in VRRP6 scenarios. For details about the configuration in E-Trunk scenarios, see Configuration Guide > Network Reliability > Dual-Device Backup Configuration > Configuring Dual-Device IGMP Snooping Hot Backup in a Master/Backup E-Trunk Scenario.

Procedure

  1. Configure basic VRRP6 group functions.
    1. Run system-view

      The system view is displayed.

    2. Run interface interface-type interface-number [.subinterface-number ]

      The interface view for a VRRP6 group is displayed.

    3. Run ipv6 enable

      IPv6 is enabled for the interface.

    4. Run ipv6 address { ipv6-address prefix-length | ipv6-address/prefix-length } or ipv6 address { ipv6-address prefix-length | ipv6-address/prefix-length } eui-64

      A global unicast address is configured for the interface.

    5. Run vrrp6 vrid virtual-router-id virtual-ip virtual-address

      A VRRP6 group is created and assigned a virtual IPv6 address.

    6. Run vrrp6 vrid virtual-router-id preempt-mode timer delay delay-time

      A preemption delay is set for devices in the VRRP6 group.

      You are advised to set the preemption delay to 0 on a backup device to allow it to preempt the master role immediately after the master device fails or set the preemption delay to a non-0 value on the master device so that it can preempt the master role after a specified delay if a master/backup VRRP6 switchover is performed.

    7. Run vrrp6 vrid virtual-router-id priority priority-value

      A priority is configured for the VRRP6 group.

    8. (Optional) Run vrrp6 vrid virtual-router-id timer advertise advertise-interval

      An interval for sending VRRP6 Advertisement packets is set.

      The interval for sending VRRP6 Advertisement packets cannot be less than the time required for a master/backup switchover. Otherwise, VRRP6 intermittently goes Down. You are advised to set the interval for sending VRRP6 Advertisement packets to more than 1 second.

    9. Run commit

      The configuration is committed.

    10. Run quit

      Exit the interface view.

  2. Configure an RBS.
    1. Run remote-backup-service remote-backup-service-name

      An RBS is created, and the RBS view is displayed.

    2. (Optional) Run batch-backup service-type nd now

      The user service configured for the RBS is backed up instantly.

    3. Run commit

      The configuration is committed.

    4. Run quit

      Exit the RBS view.

  3. Configure an RBP.
    1. Run remote-backup-profile profile-name

      An RBP is created, and the RBP view is displayed.

    2. Run peer-backup hot

      A backup mode is configured for user information backup between devices.

    3. Run vrrp6-id vrid interface interface-type interface-number

      The RBP is bound to the VRRP6 group.

      vrid specifies the ID of a VRRP6 group. The ID must be the same as the VRRP6 group's ID that was configured using the vrrp6 vrid virtual-router-id [ virtual-ip virtual-address ] command in the corresponding interface view.

    4. Run backup-id backup-id remote-backup-service service-name

      A backup ID is configured for the RBP, and the RBP is associated with a specified RBS.

      backup-id specifies a backup ID for an RBP. You can use a backup ID and an RBS to determine an RBP. The backup IDs configured for the same RBP must be the same on the master and backup devices and can no longer be configured for other RBPs.

    5. Run commit

      The configuration is committed.

    6. Run quit

      Exit the RBP view.

  4. Enable the remote backup function for ND.
    1. Run remote-backup-profile profile-name

      An RBP is created, and the RBP view is displayed.

    2. Run service-type nd

      The remote backup function for ND is enabled.

    3. Run commit

      The configuration is committed.

    4. Run quit

      Exit the RBP view.

  5. Bind the RBP to an interface.
    1. Run interface interface-type interface-number [.subinterface-number ]

      The interface view for the VRRP6 group is displayed.

    2. Run remote-backup-profile profile-name

      The RBP is bound to the interface.

      The name of the RBP to be bound to an interface must be the same as the name of the RBP created using the remote-backup-profile command in the system view.

    3. Run commit

      The configuration is committed.

Copyright © Huawei Technologies Co., Ltd.
< Previous topic Next topic >