Configuring the Dynamic IPv6 VXLAN Active-Active Scenario

In scenarios where an IPv6-based data center is interconnected with an enterprise site, a CE can be dual-homed to an IPv6 VXLAN to implement rapid convergence if a fault occurs, thereby enhancing access reliability and improving service stability.

Context

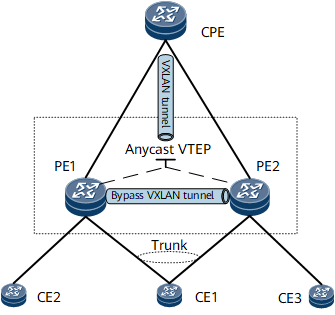
On the network shown in Figure 1, CE1 is dual-homed to PE1 and PE2. Both PEs use the same virtual address as an NVE interface address (namely, an Anycast VTEP address) at the network side. In this way, the CPE is aware of only one remote VTEP address. To allow the CPE to communicate with PE1 and PE2, a VTEP address must be configured on the CPE to establish an IPv6 VXLAN tunnel with the Anycast VTEP address.

The packets from the CPE can reach CE1 through either PE1 or PE2. However, when a single-homed CE (CE2 and CE3 in this example) exists on the network, the packets from the CPE to the single-homed CE may need to detour to the other PE after reaching one PE. To ensure PE1-PE2 reachability, a bypass VXLAN tunnel must be established between PE1 and PE2.

Figure 1 Configuring the dynamic IPv6 VXLAN active-active scenario

Procedure

  1. Configure AC-side service access.
    1. Configure an Eth-Trunk interface on CE1 to dual-home CE1 to PE1 and PE2.
    2. Configure service access to the VXLAN network. For details, see Configuring a VXLAN Service Access Point.
    3. Configure the same Ethernet Segment Identifier (ESI) for the links connecting PE1 and PE2 to CE1.

      1. Run interface eth-trunk

        The Eth-Trunk interface view is displayed.

      2. Run esi esi

        An ESI is configured.

      3. Run commit

        The configuration is committed.

  2. Configure an IPv6 VXLAN tunnel between the CPE and each PE using BGP EVPN. For details, see Configuring an IPv6 VXLAN Tunnel.
  3. Configure a bypass VXLAN tunnel between PE1 and PE2.
    1. Configure a BGP EVPN peer relationship.

      1. Run bgp as-number

        BGP is enabled, and the BGP view is displayed.

      2. Run peer ipv6-address as-number as-number

        An IPv6 BGP peer is specified.

      3. Run l2vpn-family evpn

        The BGP-EVPN address family view is displayed.

      4. Run peer { group-name | ipv6-address } enable

        The device is enabled to exchange EVPN routes with a specified peer or peer group.

      5. Run peer { group-name | ipv6-address } advertise encap-type vxlan

        The device is enabled to add the VXLAN encapsulation attribute to EVPN routes to be advertised to the peer or peer group.

      6. Run quit exi

        Exit the BGP-EVPN address family view.

      7. Run quitexit

        Exit the BGP view.

      8. Run commit

        The configuration is committed.

    2. Configure an EVPN instance.

      1. Run evpn vpn-instance vpn-instance-name bd-mode

        A BD EVPN instance is created, and its view is displayed.

      2. Run route-distinguisher route-distinguisher

        An RD is configured for the EVPN instance.

      3. Run vpn-target vpn-target &<1-8> [ both | export-extcommunity | import-extcommunity ]

        VPN targets are configured for the EVPN instance. The import and export VPN targets of the local end must be the same as the export and import VPN targets of the remote end, respectively.

      4. Run quit

        Exit the EVPN instance view.

      5. Run bridge-domain bd-id

        The BD view is displayed.

      6. Run vxlan vni vni-id split-horizon-mode

        A VNI is created and associated with the BD, and split horizon is applied to the BD.

      7. Run evpn binding vpn-instance vpn-instance-name [ bd-tag bd-tag ]

        The BD is bound to a specified EVPN instance. By specifying different bd-tag values, you can bind multiple BDs to the same EVPN instance. In this way, VLAN services of different BDs can access the same EVPN instance while being isolated.

      8. Run quit

        Exit the BD view.

      9. Run commit

        The configuration is committed.

    3. Enable the inter-chassis VXLAN function on PE1 and PE2.

      1. Run evpn

        The EVPN view is displayed.

      2. Run bypass-vxlan enable

        The inter-chassis VXLAN function is enabled.

      3. Run quit

        Exit the EVPN view.

      4. Run commit

        The configuration is committed.

    4. Configure ingress replication.

      1. Run interface nve nve-number

        The NVE interface view is displayed.

      2. Run source ipv6-address

        An IPv6 address is configured for the source VTEP.

      3. Run vni vni-id head-end peer-list protocol bgp

        Ingress replication is configured.

      4. Run bypass source ipv6-address

        An IPv6 address is configured for the source VTEP of the bypass VXLAN tunnel.

      5. Run mac-address mac-address

        A MAC address is configured for the VTEP.

      6. Run quit

        Exit the NVE interface view.

      7. Run commit

        The configuration is committed.

  4. Configure FRR on each PE.

    • For Layer 2 communication:

      1. Run evpn

        The EVPN view is displayed.

      2. Run vlan-extend private enable

        The function to add the VLAN private extended community attribute to routes to be sent to a peer is enabled.

      3. Run vlan-extend redirect enable

        The function to redirect the received routes that carry the VLAN private extended community attribute is enabled.

      4. Run local-remote frr enable

        Local-remote FRR is enabled.‏

      5. Run quit

        Exit the EVPN view.

      6. Run commit

        The configuration is committed.

    • For Layer 3 communication:

      1. Run bgp as-number

        The BGP view is displayed.

      2. Run ipv6-family vpn-instance vpn-instance-name

        The BGP-VPN instance IPv6 address family view is displayed.

      3. Run auto-frr

        BGP auto FRR is enabled.

      4. Run peer { ipv6-address | group-name } as-number as-number

        A peer IP address and the number of the AS where the peer resides are specified.

      5. Run advertise l2vpn evpn

        The function to advertise EVPN IP prefix routes from a VPN instance is enabled.

      6. Run quit

        Exit the BGP-VPN instance IPv6 address family view.

      7. Run quit

        Exit the BGP view.

      8. Run commit

        The configuration is committed.

Verifying the Configuration

After configuring a dynamic IPv6 VXLAN active-active scenario, verify the configuration.

  • Run the display bridge-domain [ binding-info | [ bd-id [ brief | verbose | binding-info ] ] ] command to check BD configurations.
  • Run the display interface nve [ nve-number | main ] command to check NVE interface information.
  • Run the display evpn vpn-instance command to check EVPN instance information.
  • Run the display bgp evpn peer [ [ ipv6-address ] verbose ] command to check information about BGP EVPN peers.
  • Run the display vxlan peer [ vni vni-id ] command to check the ingress replication lists of all VNIs or a specified one.
  • Run the display vxlan tunnel [ tunnel-id ] [ verbose ] command to check IPv6 VXLAN tunnel information.
  • Run the display vxlan vni [ vni-id [ verbose ] ] command to check IPv6 VXLAN configurations and the VNI status.
Copyright © Huawei Technologies Co., Ltd.
< Previous topic Next topic >