Obtaining the NETCONF Enabling Configuration and iMaster NCE-Campus's Address Information Through a DHCP Server
Procedure
In the Huawei CloudCampus Solution, a DHCP server helps implement plug-and-play deployment of switches, removing the need to manually enable NETCONF and configure iMaster NCE-Campus's address information.

- An administrator deploys the DHCP server function on the egress gateway or deploys an independent DHCP server on the network, and then configures DHCP Option 148, which contains the NETCONF enabling configuration and iMaster NCE-Campus's IP address/URL and port number.
- An unconfigured switch starts and sends a request packet containing VLAN 1 to the DHCP server.
- If the VLAN for the IP address pool of the DHCP server is VLAN 1, the switch can use VLAN 1 to communicate with the DHCP server and register with iMaster NCE-Campus. If the switch successfully negotiates a PnP VLAN with the upstream device, the switch uses this PnP VLAN to register with iMaster NCE-Campus again. For details about the PnP VLAN negotiation process, see PnP VLAN Auto-negotiation.
- If the VLAN for the IP address pool of the DHCP server is not VLAN 1, the switch cannot use VLAN 1 to communicate with the DHCP server. The switch then uses the upstream device's PnP VLAN negotiated through the Link Layer Discovery Protocol (LLDP) to initiate a request to the DHCP server again.
- The DHCP server receives the request and sends a DHCP packet containing Option 148 to the switch.
- Based on Option 148, the switch enables NETCONF and obtains the URL/IP address and port number of iMaster NCE-Campus. The switch then generates a configuration file for the management VLAN.
- The switch uses the obtained URL/IP address and port number of iMaster NCE-Campus to register with it for authentication.

- If a management VLAN has been configured on a switch using iMaster NCE-Campus or a command, the switch directly uses this management VLAN to send requests to the DHCP server. Even if the requests fail, the switch will not use the PNP VLAN to send requests to the DHCP server. Therefore, ensure that the switch can communicate with the DHCP server in this management VLAN, so that the switch can go online properly.
- If this is not the first time the switch registers with iMaster NCE-Campus, the switch preferentially uses the device IP address and iMaster NCE-Campus's URL/IP address and port number cached in the memory. To change the iMaster NCE-Campus's URL/IP address and port number through Option 148, you need to restart the switch to make it obtain the iMaster NCE-Campus's URL/IP address and port number again.
PnP VLAN Auto-negotiation
Background
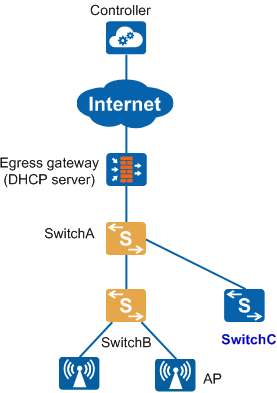
In Figure 2, assume that an administrator changes the management VLAN to a VLAN other than VLAN 1 (default VLAN) on iMaster NCE-Campus. The administrator also needs to change the VLAN for the IP address pool of the DHCP server to the management VLAN. An unconfigured switch, SwitchC, needs to connect to the network. After SwitchC is powered on and starts, it sends a request packet containing VLAN 1 to the DHCP server to obtain the NETCONF enabling configuration and iMaster NCE-Campus's address information. However, SwitchC fails to obtain the requested data and register with iMaster NCE-Campus. This is because the VLAN for the IP address pool of the DHCP server has been changed to a VLAN other than VLAN 1.
To solve this problem, PnP VLAN auto-negotiation is used:- If SwitchA has NETCONF enabled and has registered with iMaster NCE-Campus, iMaster NCE-Campus delivers a PnP VLAN to SwitchA based on the preconfiguration. If SwitchA does not have NETCONF enabled, manually configure a PnP VLAN on SwitchA using a command. SwitchA can use this PnP VLAN to communicate with the DHCP server normally.
- SwitchC connects to the network and auto-negotiates with the upstream device (SwitchA) to obtain the PnP VLAN.
- SwitchC uses the negotiated PnP VLAN to obtain the NETCONF enabling configuration and iMaster NCE-Campus's address information from the DHCP server. This process implements plug and play of newly added devices.
Switches managed by iMaster NCE-Campus support PnP VLAN auto-negotiation, which has the following advantages:- A new device can connect to the network through any interface of an upstream device, and the upstream device can identify the access interface and adds the interface to the PnP VLAN.
- If an upstream device and a downstream device are connected through multiple links, they can auto-negotiate the multiple links as an Eth-Trunk and auto-negotiate the working mode of the Eth-Trunk as LACP.
The auto-negotiated uplink Eth-Trunk of the downstream device is fixed as Eth-Trunk 0, whose working mode is also auto-negotiated with the upstream device. To manually change the working mode of Eth-Trunk 0, you need to first run the undo pnp startup-vlan receive enable command to disable the PnP VLAN auto-negotiation function on the downstream device.
Adding a new unconfigured switch to a campus network
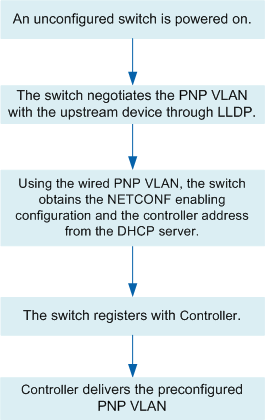
Figure 3 shows the process of adding a new unconfigured switch to a campus network, which is described as follows:- A new unconfigured switch starts and sends LLDP packets to negotiate with the upstream device in an effort to obtain the PnP VLAN configured on the upstream device.
- The switch uses the negotiated PnP VLAN to obtain the NETCONF enabling configuration and iMaster NCE-Campus's address information from the DHCP server. The switch uses the negotiated PnP VLAN to send DHCP request packets regardless of whether it can use VLAN 1 to receive DHCP response packets. That is, a PnP VLAN takes precedence over VLAN 1.
- The switch enables NETCONF based on the obtained NETCONF enabling configuration.
- The switch registers with iMaster NCE-Campus based on the obtained address information about iMaster NCE-Campus.
- iMaster NCE-Campus delivers the preset PnP VLAN configuration to the upstream switch of the new switch, so that the new switch can perform PnP VLAN auto-negotiation with the upstream switch. The PnP VLAN configuration includes: PnP VLAN ID, enabling the function of transmitting a PnP VLAN to a downstream device, enabling the function of sending LLDP packets containing PnP VLAN information to a downstream device (this function is enabled by default).
Processing a PnP VLAN switchover
In Figure 4, when the upstream device has NETCONF enabled, iMaster NCE-Campus can modify the PnP VLAN of the upstream device to enable the downstream device to use the new PnP VLAN for re-registration. When the upstream device does not have NETCONF enabled, you can modify the PnP VLAN of the upstream device using a command to enable the downstream device to use the new PnP VLAN for re-registration.
The upstream device's PnP VLAN and the management VLAN are two concepts. The two VLANs can be the same or different. If the two VLANs are different, the downstream device can register with iMaster NCE-Campus normally only when iMaster NCE-Campus communicates with the upstream device normally.
When the upstream device has NETCONF enabled, changing the PnP VLAN enables only the downstream device but not the upstream device to register with iMaster NCE-Campus again. Whether the upstream device registers with iMaster NCE-Campus again depends on whether its management VLAN is changed.