Configuring a Mesh Role and Mesh Profile
Context
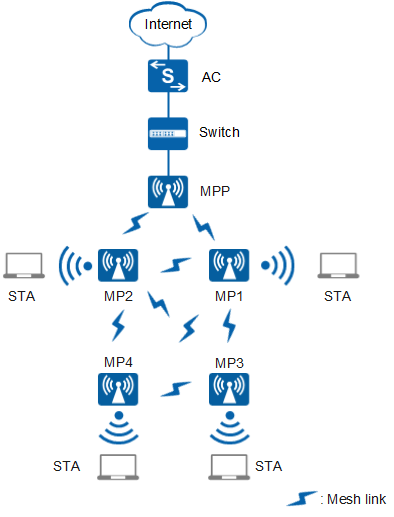
On a Mesh network shown in Figure 1, you need to deploy APs as MPPs or MPs based on AP locations.
- mesh-portal (MPP): an MP that connects to a WMN or another type of network. An MPP connects Mesh nodes to external networks. Each WMN has at least one MPP.

You are not advised to configure access VAPs on an MPP to ensure a high throughput.
- mesh-node (MP): a node that provides both mesh service and user access service. All nodes except MPPs on a WMN are MPs.
Procedure
- Run system-view
The system view is displayed.
- Run wlan
The WLAN view is displayed.
- Run ap-system-profile name profile-name
The AP system profile view is displayed.
By default, the system provides the AP system profile default.
- Run mesh-role { mesh-portal | mesh-node }
A Mesh role is configured.
By default, the Mesh role of an AP is mesh-node in the AP system profile.
- Run quit
Return to the WLAN view.
- Run mesh-profile name profile-name
A Mesh profile is created, and the Mesh profile view is displayed.
By default, the system provides the Mesh profile default.
- Run mesh-id name
A Mesh ID is configured. Mesh nodes use a Mesh ID to identify connections between them.
By default, the Mesh ID of a Mesh profile is HUAWEI-WLAN-MESH.
- Run security-profile profile-name
A security profile is bound to the Mesh profile.
By default, the security profile default-mesh is bound to a Mesh profile.
By default, the system provides the Mesh profile default. Both the default Mesh profile default and a self-defined Mesh profile have the security profile default-mesh referenced by default. In the security profile default-mesh, the security policy is set to WPA2+PSK+AES and the security key to huawei_secmesh. If the default security profile default-mesh is used, you are advised to change the security key of the profile to ensure security.
- (Optional) Improve channel usage efficiency.
Run the beacon-2g-rate beacon-2g-rate command to set the transmit rate of 2.4 GHz Beacon frames.
By default, the transmit rate of 2.4 GHz Beacon frames is 1 Mbit/s.
Run the beacon-5g-rate beacon-5g-rate command to set the transmit rate of 5 GHz Beacon frames.
By default, the transmit rate of 5 GHz Beacon frames is 6 Mbit/s.
- (Optional) Run max-link-number link-num
The maximum number of Mesh links allowed on an AP is configured.
By default, a maximum of eight mesh links can be established between APs. After you enable FWA for a mesh profile using the fwa enable command, a maximum of 32 mesh links can be established between APs by default.
- (Optional) Run link-rssi-threshold threshold-value
The RSSI threshold of a Mesh link is configured. When the minimum RSSI of all Mesh links on the optimal route to the current MPP is lower than the RSSI threshold of a Mesh link, the MP reselects Mesh links.
By default, the RSSI threshold of a mesh link is -75 dBm. After the FWA mode is enabled in a Mesh profile, the RSSI threshold of a Mesh link is fixed as -90 dBm.
- (Optional) Run link-aging-time aging-time
The aging time of a Mesh link is specified.
The default aging time of a Mesh link is 60 seconds.
- (Optional) Run link-report-interval report-interval
The interval at which an MP reports Mesh link information to an AC is specified.
By default, an MP reports Mesh link information to the AC at an interval of 30 seconds.
- (Optional) Run dhcp trust port
A DHCP trusted port is enabled in the Mesh profile.
By default, a DHCP trusted port is enabled in a Mesh profile.
After a DHCP trusted port is enabled in a Mesh profile and the Mesh profile is applied to an AP, the AP receives the DHCP OFFER, ACK, and NAK packets sent by authorized DHCP servers and forwards the packets to STAs so that the STAs can obtain valid IP addresses and go online.
- (Optional) Run nd trust port
An ND trusted port is enabled in the Mesh profile.
By default, an ND trusted port is enabled in a Mesh profile.
After an ND trusted port is enabled in a Mesh profile and the Mesh profile is applied to an AP, the AP receives valid ND protocol packets and forwards the packets to STAs or peer APs so that the STAs can obtain valid IPv6 addresses and go online.
- (Optional) Run priority-map trust { dot1p | dscp }
The priority mapping trusted by the Mesh air interface is configured.
By default, the Mesh air interface trusts the mapping from DSCP priorities to 802.11e user priorities.
- (Optional) Run priority-map dscp { dscp-value1 [ to dscp-value2 ] } &<1-10> dot11e dot11e-value
The Mesh air interface to be configured to trust the mapping from DSCP priorities to 802.11e user priorities.
Table 1 describes the mapping from DSCP priorities to 802.11e user priorities by default. - Run quit
Return to the WLAN view.
- Run ap-system-profile name profile-name
An AP system profile is created, and the AP system profile view is displayed.
By default, the system provides the AP system profile default.
- (Optional) Run mpp-active-reselection enable
Active MPP reselection is enabled.
By default, active MPP reselection is disabled.
- Run quit
Return to the WLAN view.
- Apply the Mesh profile. You can use any
of the following methods according to actual situations:
Bind the Mesh profile to an AP group.
Run the ap-group name group-name command to enter the AP group view.
Run the mesh-profile profile-name radio { all | radio-id } command to bind the Mesh profile to the AP group.
By default, no Mesh profile is bound to an AP group or AP.
A Mesh link uses the VAP with the WLAN ID 16, which cannot be occupied by other WLAN services.
Bind the Mesh profile to an AP.
- Run the ap-id ap-id, ap-mac ap-mac, or ap-name ap-name command to enter the AP view.
Run the mesh-profile profile-name radio { all | radio-id } command to bind the Mesh profile to the AP.
By default, no Mesh profile is bound to an AP group or AP.
A Mesh link uses the VAP with the WLAN ID 16, which cannot be occupied by other WLAN services.
Bind the Mesh profile to AP group radios.
- Run the ap-group name group-name command to enter the AP group view.
- Run the radio radio-id command to enter the radio view.
Run the mesh-profile profile-name command to bind the Mesh profile to AP group radios.
By default, no Mesh profile is bound to an AP radio.
A Mesh link uses the VAP with the WLAN ID 16, which cannot be occupied by other WLAN services.
Bind the Mesh profile to an AP radio.
- Run the ap-id ap-id, ap-mac ap-mac, or ap-name ap-name command to enter the AP view.
- Run the radio radio-id command to enter the radio view.
Run the mesh-profile profile-name command to bind the Mesh profile to the AP radio.
By default, no Mesh profile is bound to an AP radio.
A Mesh link uses the VAP with the WLAN ID 16, which cannot be occupied by other WLAN services.