Example for Configuring Authentication for Telnet Login Users (Using the Secure ACS as a RADIUS Authentication Server)
RADIUS Authentication Overview
When a RADIUS authentication server is deployed on a network, users can be authenticated through RADIUS. User information is created and maintained by the RADIUS authentication server. A user can successfully log in to the device only when the entered user name and password are the same as those configured on the RADIUS server. Generally, RADIUS authentication is configured on the network requiring high security, for example, financial, government, and telecommunication carrier networks.
Configuration Notes
This configuration example applies to all switches running all versions.
In this example, the RADIUS authentication server is the secure ACS running version 5.2.0.26.
Networking Requirements
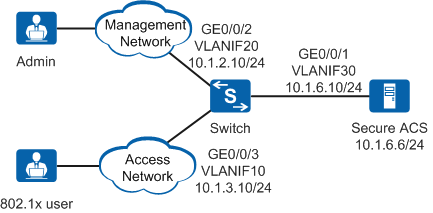
As shown in Figure 1, on an enterprise network, an administrator connects to the switch through a management network and an 802.1X user connects to the switch through an access network. The enterprise uses ACS to create and maintain user information. The administrator can log in to the ACS through web.
The administrator and 802.1X user are allocated different accounts and rights to improve security. The requirements are as follows:
- The administrator can Telnet to the switch only after entering the user name and password, and can use the commands from level 0 to level 15 after login.
To access the switch, the 802.1X user needs to start the 802.1X client, enter the user name and password, and be authenticated.
After the 802.1X user accesses the switch:
- The user can use the commands at level 0 to level 2.
- The ACS delivers VLAN 100 and ACL 3000 to the user.
- The administrator is authenticated in the default domain, and the 802.1X user is authenticated in the huawei.com domain.
Preparations
Item |
Data |
|---|---|
Administrator's user name and password of the ACS client |
User name: acsadmin Password: Admin_123 |
Administrator's user name and password of the switch |
User name: admin1 Password: Admin@1234 |
User name and password of the 802.1X user |
User name: user1@huawei.com Password: Huawei@1234 |
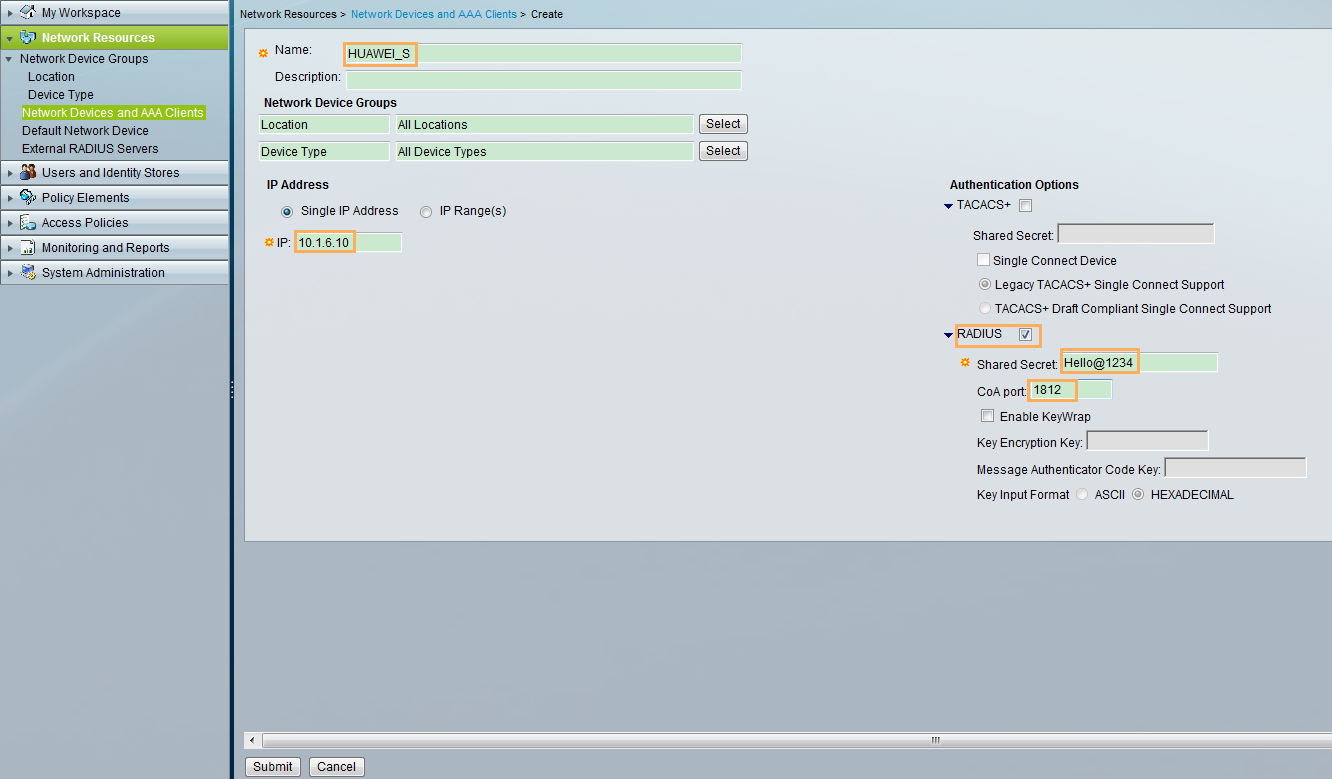
Switch name and the IP address of the interface connected to the ACS |
Switch name: Switch IP address: 10.1.6.10 |
Shared password of switch and ACS |
Hello@1234 |
Configuration Roadmap
- Configure the switch.
- Configure interfaces and allocate IP addresses to them, so that the switch can communicate with the ACS.
- Create a VLAN and an ACL that the ACS will deliver.
- Enable the Telnet service.
- Configure AAA authentication for the administrator to Telnet to the switch.
- Configure RADIUS authentication, including creating the RADIUS server template and AAA authentication scheme and applying them to the default_admin and huawei.com domains.
- Enable 802.1X authentication on the interface that the 802.1X user accesses.
- Configure the ACS, add access devices and users, and configure an authentication and authorization profile. Add access policies and bind users to the authentication and authorization profile.

Ensure that the Switch and ACS can communicate with each other.
Procedure
- Configure the switch.
- Configure RADIUS authentication for access users on the switch.
# Configure a RADIUS server template so that the switch and ACS can communicate through RADIUS.
[Switch] radius-server template 1
[Switch-radius-1] radius-server authentication 10.1.6.6 1812   //Specify the IP address and port number of the ACS.
[Switch-radius-1] radius-server shared-key cipher Hello@1234   //Set the ACS shared key, which must be the same as that configured on the ACS.
[Switch-radius-1] quit
If the user name stored on the AAA server does not contain a domain name, run the undo radius-server user-name domain-included command. After this command is executed, the user names in the packets sent from the switch to RADIUS server do not contain domain names.
# Create an AAA authentication scheme and set the authentication mode to RADIUS.
[Switch] aaa
[Switch-aaa] authentication-scheme sch1
[Switch-aaa-authen-sch1] authentication-mode radius
[Switch-aaa-authen-sch1] quit
# Apply the AAA authentication scheme and RADIUS server template to the default administrative domain.
Administrators (users accessing the switch through Telnet, SSH, FTP, HTTP, or terminal) are authenticated in the default administrative domain.
By default, the administrative domain is default_admin.
[Switch-aaa] domain default_admin
[Switch-aaa-domain-default_admin] radius-server 1
[Switch-aaa-domain-default_admin] authentication-scheme sch1
[Switch-aaa-domain-default_admin] quit
# Apply the AAA authentication scheme and RADIUS server template to the huawei.com domain.
[Switch-aaa] domain huawei.com
[Switch-aaa-domain-huawei.com] radius-server 1
[Switch-aaa-domain-huawei.com] authentication-scheme sch1
[Switch-aaa-domain-huawei.com] quit
[Switch-aaa] quit
- Enable 802.1X authentication on an interface.# Set the NAC mode to unified mode.
[Switch] authentication unified-mode
After a switching between common mode and unified mode, the device automatically restarts.
# Enable 802.1X authentication on interface GE0/0/3.[Switch] interface gigabitethernet0/0/3 [Switch-GigabitEthernet0/0/3] authentication dot1x [Switch-GigabitEthernet0/0/3] dot1x authentication-method eap //This step is recommended because most 802.1X clients use EAP relay authentication. [Switch-GigabitEthernet0/0/3] quit
- Configure RADIUS authentication for access users on the switch.
- Configure the secure ACS.
- Log in to the ACS client and enter the user name and password to open the homepage.
Enter the uniform resource locator (URL) address of the ACS and press Enter to open the ACS login page. Enter the user name and password, and click Login.
The ACS's URL address is in the format http://IP/ or https://IP/, for example, http://10.13.1.1/ or https://10.13.1.1/.
After you log in to the ACS, the homepage is displayed.
Table 2 Navigation areas on the ACS client Navigation Area
Description
My Workspace
Includes welcome page, configuration instruction of common tasks, and account information.
To change the administrator password, choose My Workspace > My Account.
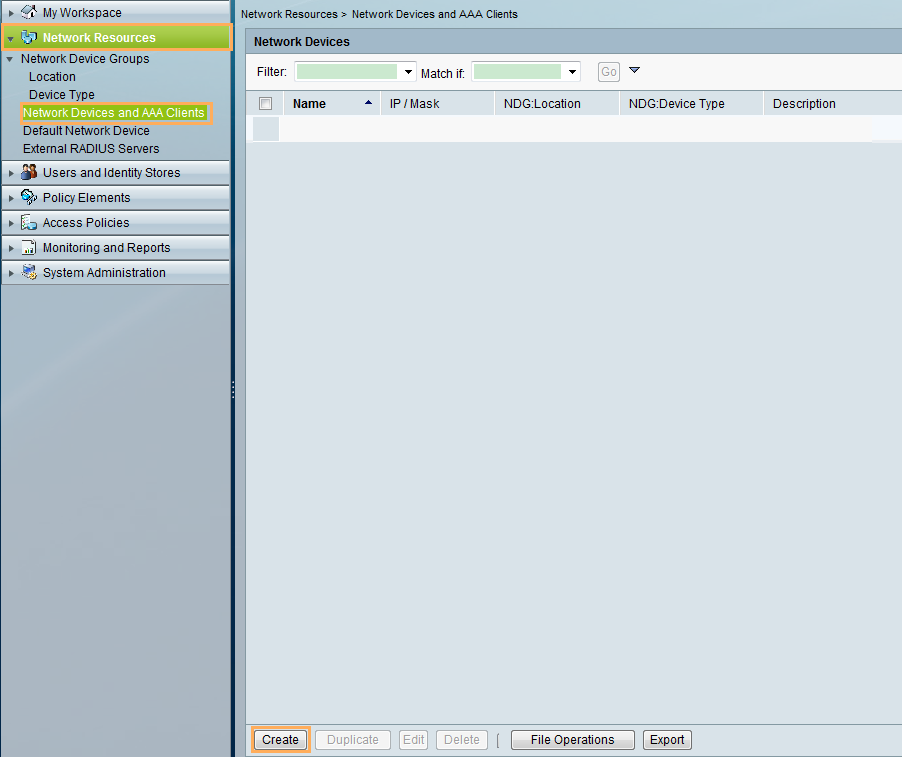
Network Resources
Configures network devices, including AAA clients and network device groups.
Users and Identity Stores
Configures the users and identities.
Policy Elements
Configures the authentication and authorization profiles, including the matching conditions and results of access policies.
Access Policies
Configures access policies and associates users with authentication and authorization profiles.
Monitoring and Reports
Displays log information.
System Administration
Manages and maintains ACS.
- Add an access device.
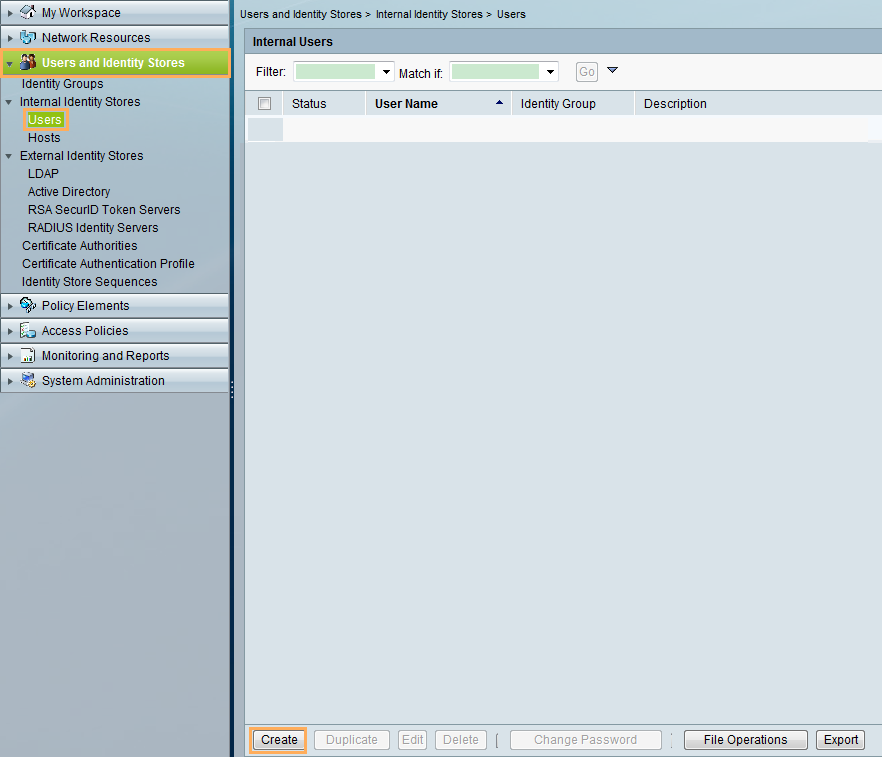
- Add a user.
Choose Users and Identity Stores > Internal Identity Stores > Users > Create, as shown in Figure 4.
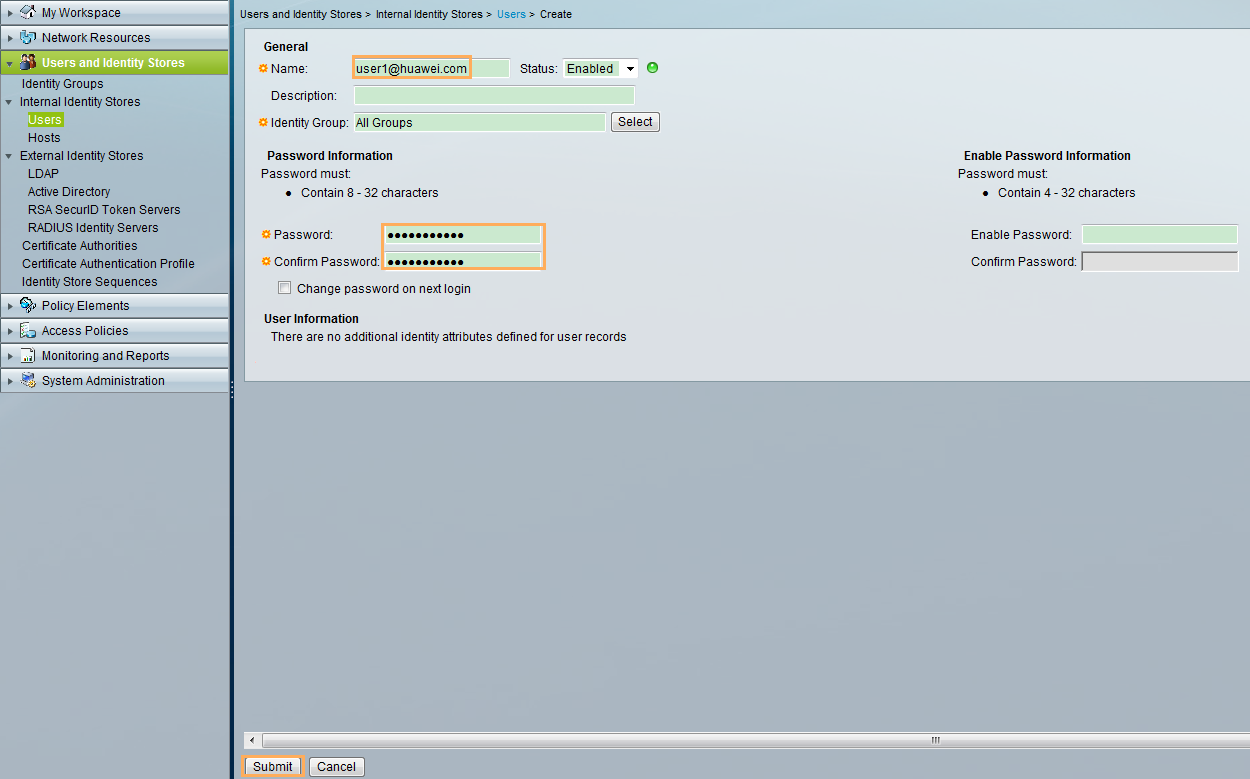
Enter the user name, password, and confirm password, and click Submit, as shown in Figure 5.
Figure 5 shows the page for adding an 802.1X user. After adding the access user, add an administrator according to the administrator parameters.
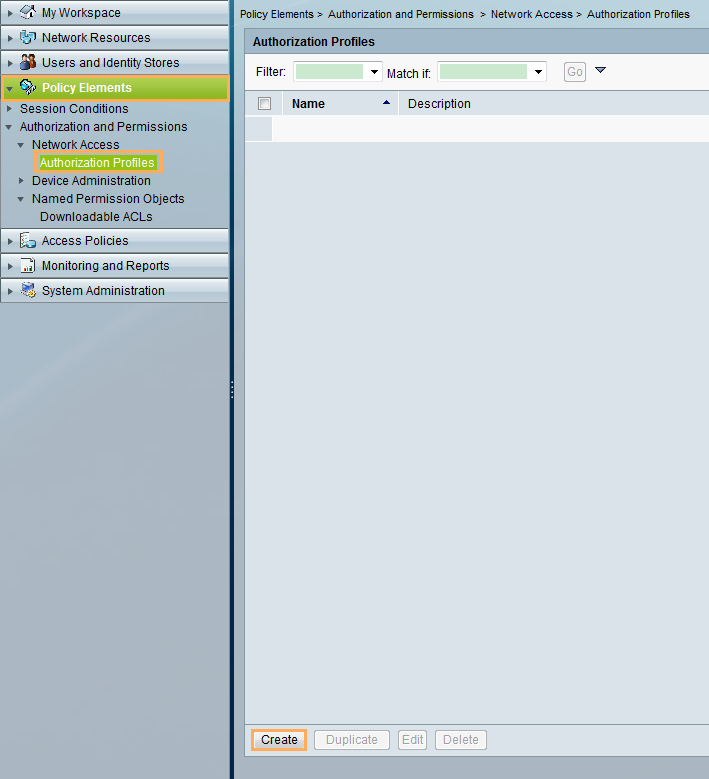
- Add an authentication and authorization profile.
Choose Policy Elements > Authorization and Permissions > Network Access > Authorization Profiles > Create to add an authentication and authorization profile, as shown in Figure 6.
When you use the RADIUS protocol, it is recommended that you choose Policy Elements > Authorization and Permissions > Network Access.
When you use the TACACS+ protocol, it is recommended that you choose Policy Elements > Authorization and Permissions > Authorization Profiles.
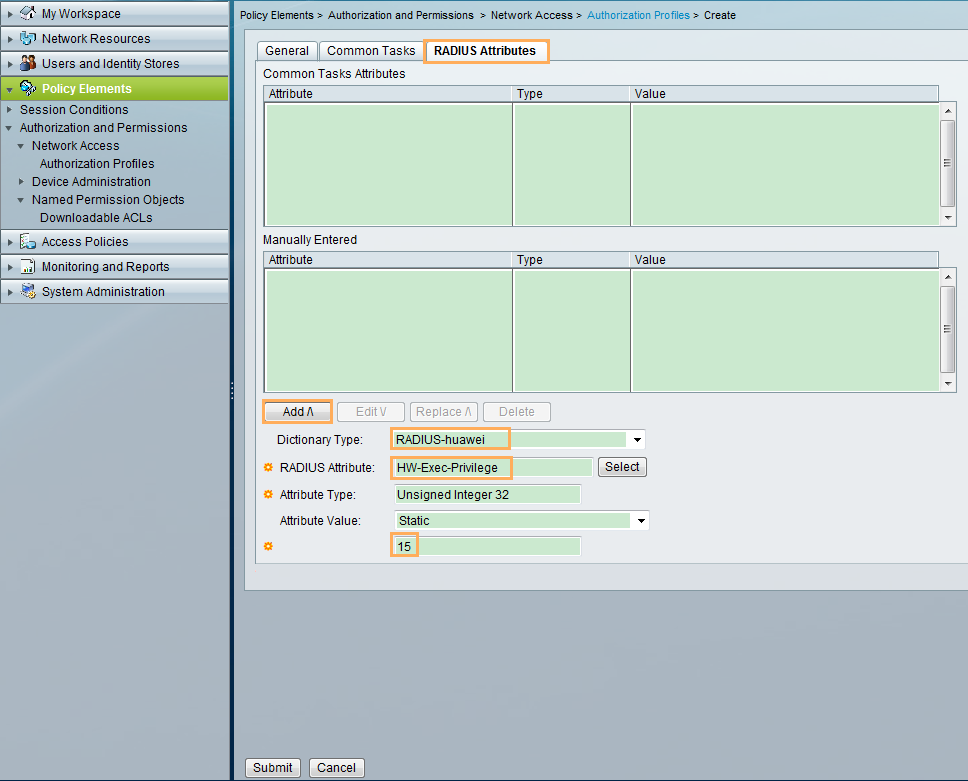
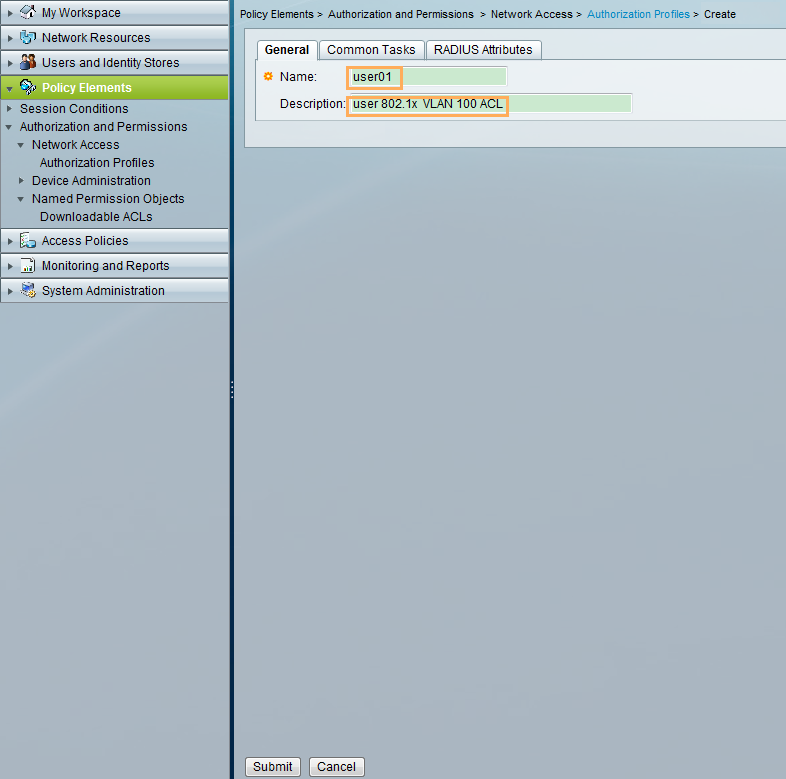
Add the authentication and authorization profile for the administrator to specify that the administrator can only log in through Telnet and has a user privilege of 15.
The settings on the General tab page are shown in Figure 7.
Figure 7 Setting general parameters for the administrator's authentication and authorization profile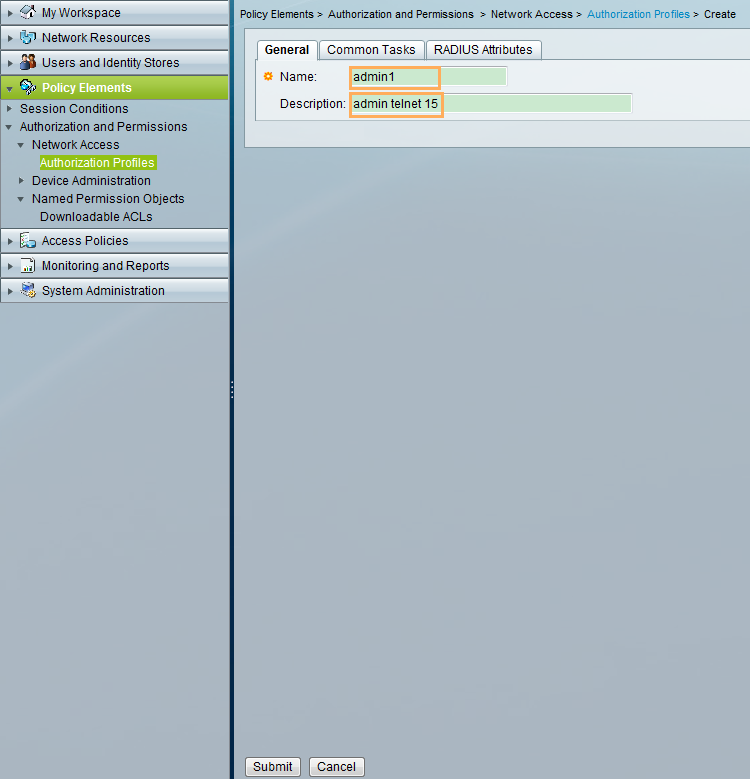
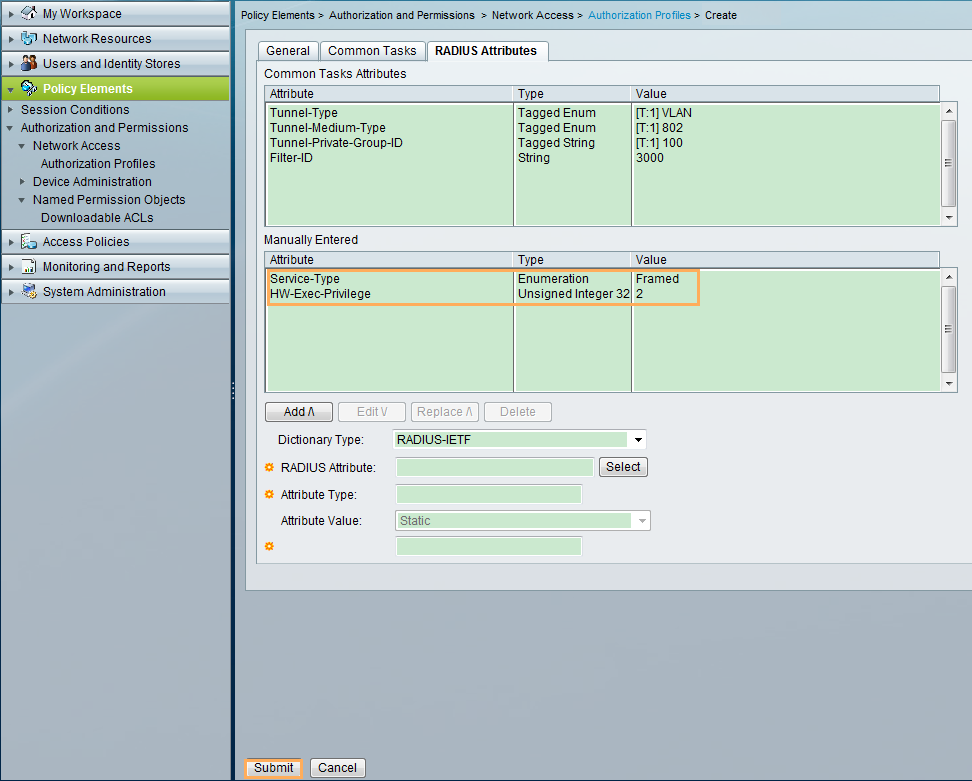
The settings on the RADIUS Attributes tab page are shown in Figure 8. Click Submit to commit the profile configuration.
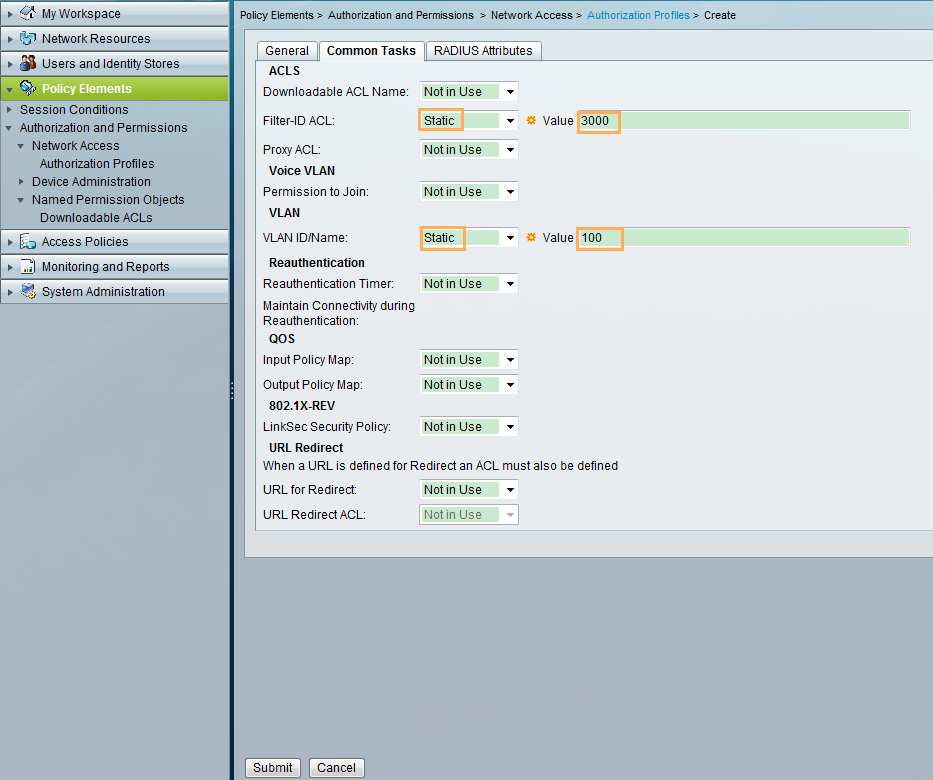
Add an authentication and authorization profile for an 802.1X user to specify that the user can only log in through 802.1X and has a user privilege of 2 and ACS delivers ACL 3000 and VLAN 100, as shown in Figure 9, Figure 10, and Figure 11. Click Submit to commit the profile configuration.
- Add an access policy to bind the user to an authentication and authorization profile.
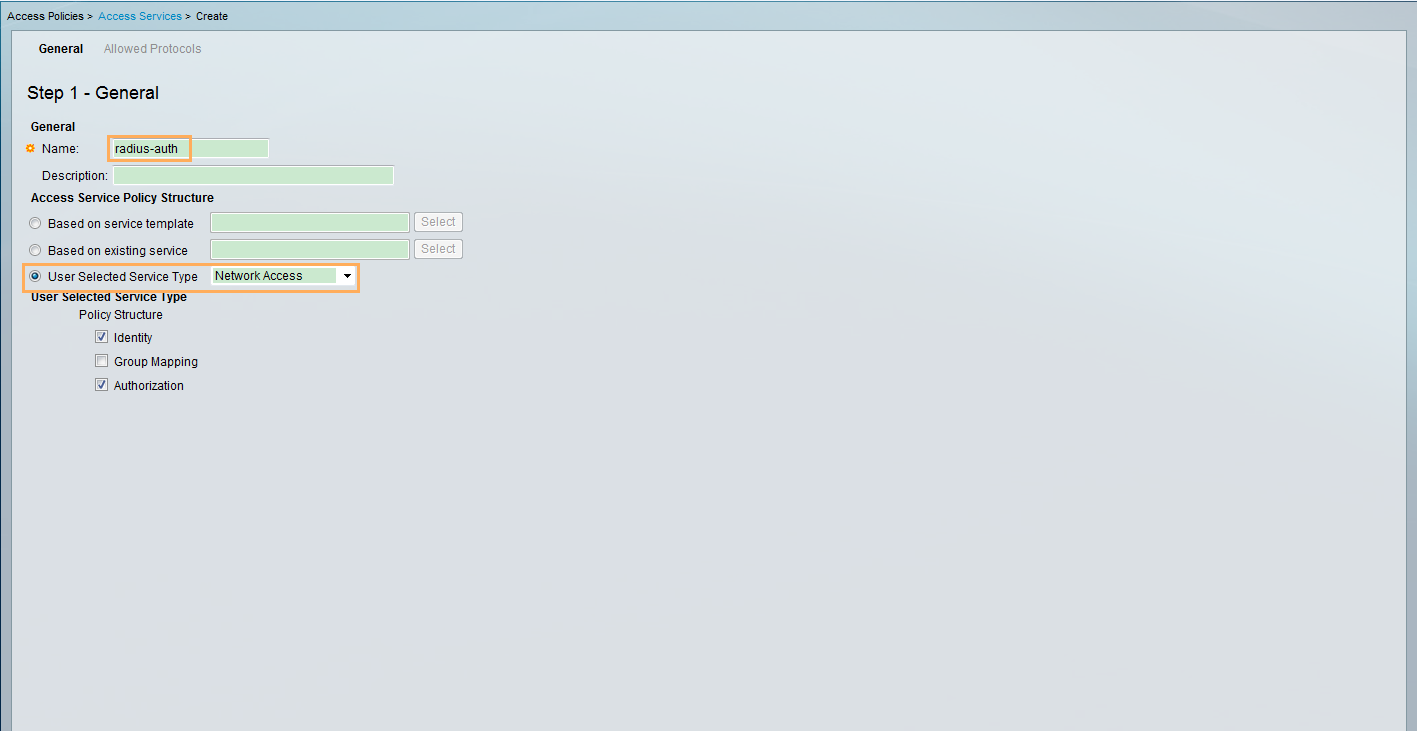
Create an access service and choose Access Policies > Access Services > Create.
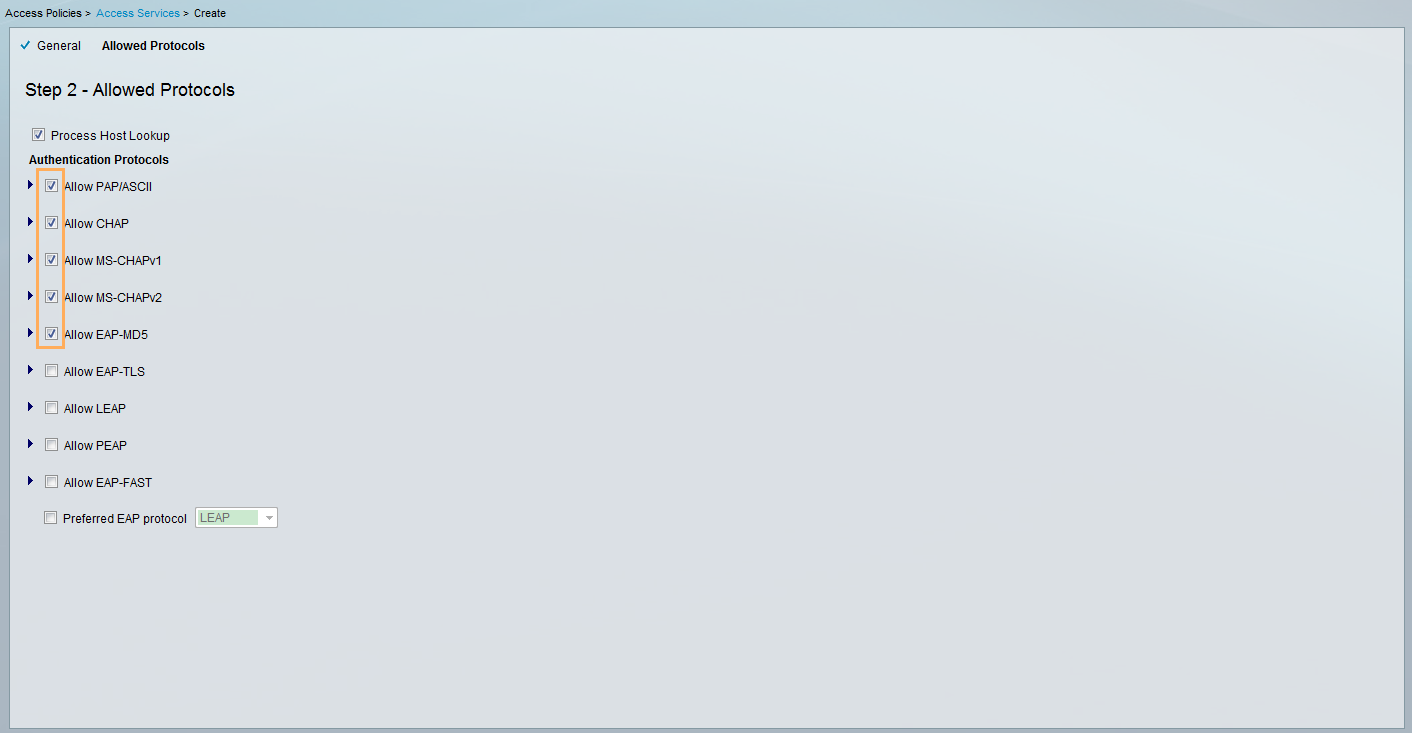
Configure the access service. Set the communication mode to Network Access and specify the user access protocol, as shown in Figure 12 and Figure 13.
The S series switches support the first five user access protocols.
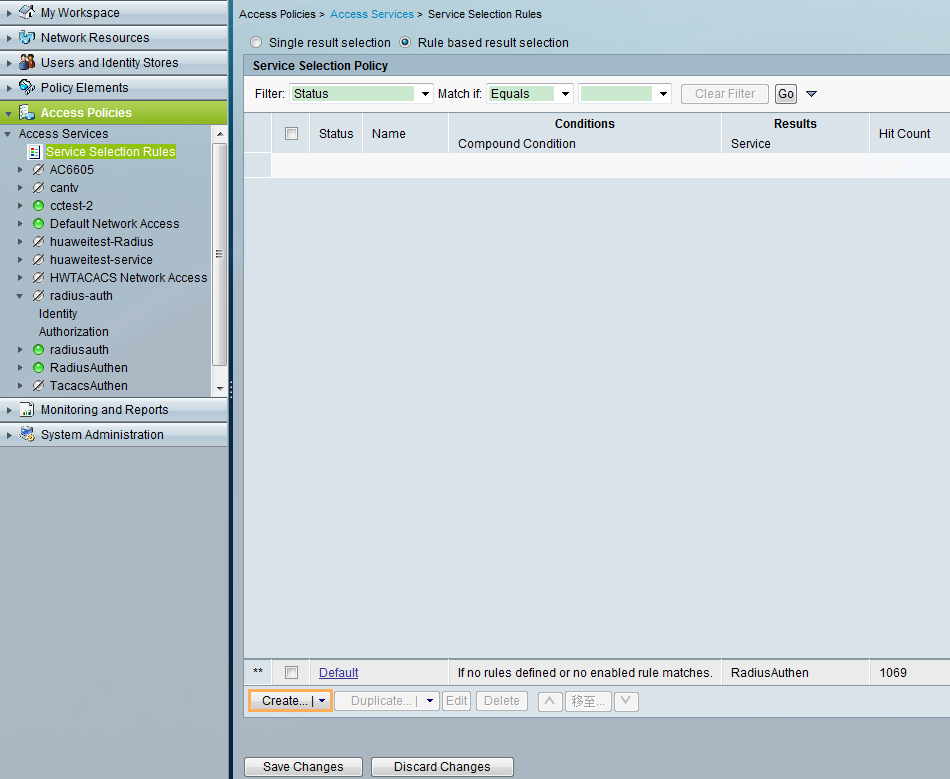
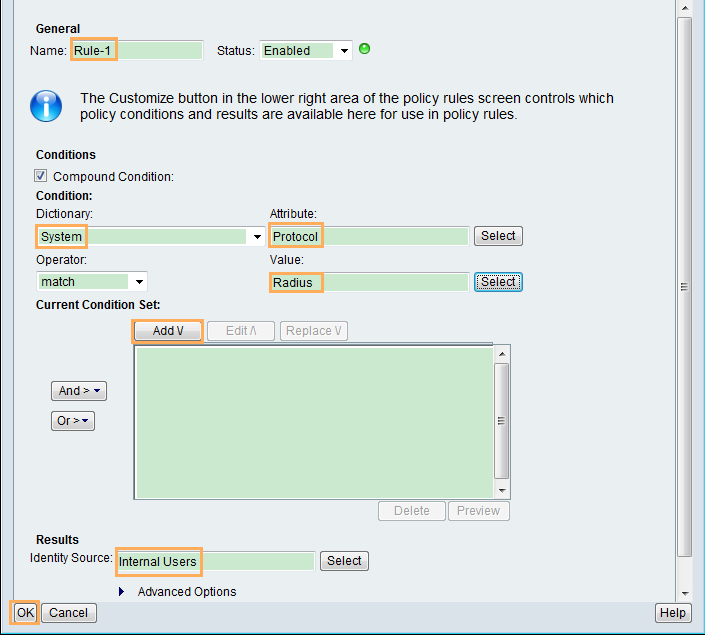
Choose Access Policies > Access Services > Service Selection Rules to create a rule, as shown in Figure 14.
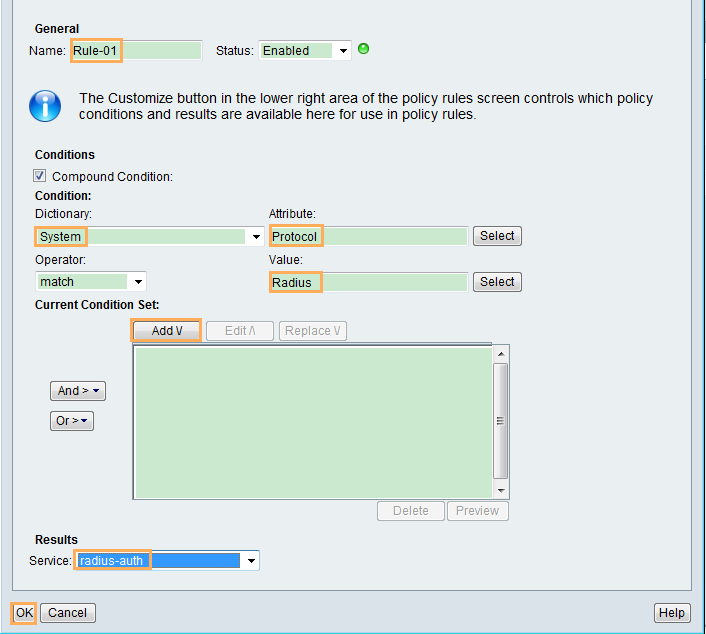
Configure the rule. Set the authentication mode to RADIUS and add attributes according to Figure 15.
You can choose Access Policies > Access Services > Service Selection Rules to prepare the attributes that you want to add.
Click OK, and then click Save Changes.
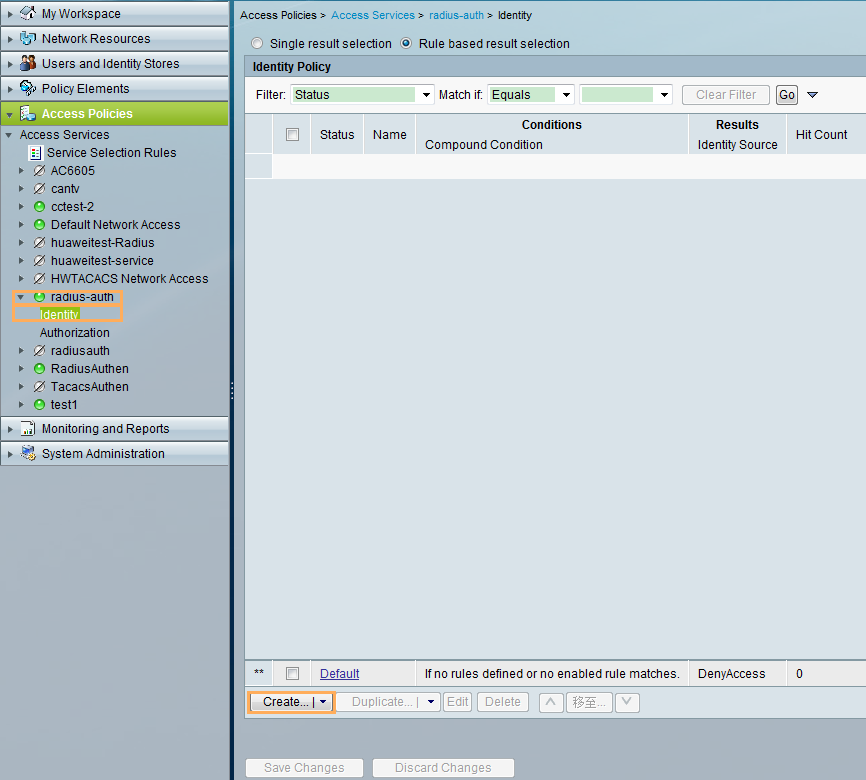
Select the created access service and click Identity to add an Identity rule, as shown in Figure 16.
Configure the rule, as shown in Figure 17.
Click OK, and then click Save Changes.
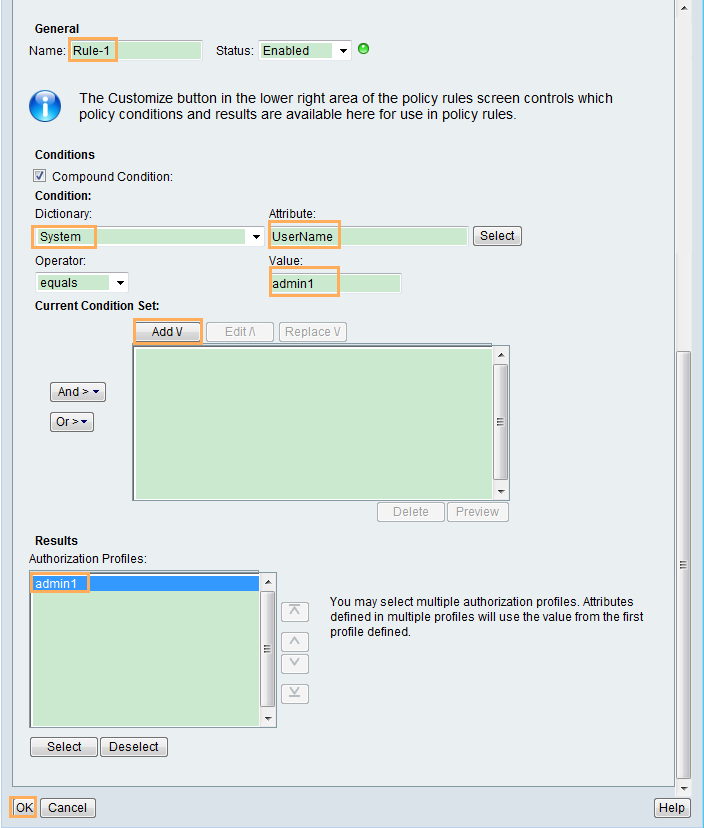
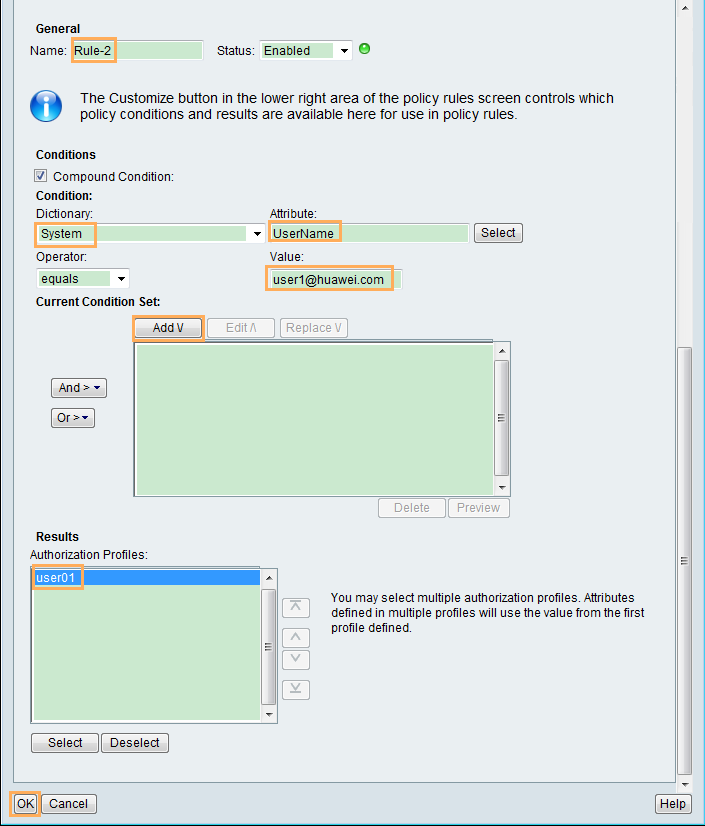
Select the created access service and click Authorization. Configure the authentication rule for the administrator according to Figure 18 or for the 802.1 user according to Figure 19.
- Click OK, and then click Save Changes.
- Log in to the ACS client and enter the user name and password to open the homepage.
- Verify the configuration.
An administrator logs in to the switch through Telnet.
# Choose Start > Run on your PC and enter cmd to open the Windows command line interface. Run telnet, and enter the user name admin1 and password Huawei@1234 to Telnet to the switch.
C:\Documents and Settings\Administrator> telnet 10.1.2.10
Username:admin1
Password:**********
<Switch> //You can log in successfully.
# Run the display access-user username admin1 command to view the granted right.
An 802.1X user logs in to the switch.
# Run the test-aaa command on the switch to test whether the user can pass RADIUS authentication.
[Switch] test-aaa user1@huawei.com Huawei@1234 radius-template 1
# The 802.1X user starts the 802.1X client on the PC, and enters the user name user1@huawei.com and password Huawei@1234. If the user name and password are correct, the client displays a successful authentication message. The user can access the network.
# After the 802.1X user goes online, run the display access-user access-type dot1x command on the switch to view the user information. The Dynamic VLAN and Dynamic ACL number(Effective) fields indicate the VLAN and ACL delivered by the RADIUS server.
Configuration Files
Switch configuration file
#
sysname Switch
#
vlan batch 10 20 30 100
# telnet server enable #
acl number 3000
#
radius-server template 1
 radius-server shared-key cipher %^%#9nP3;sDW-AN0f@H@S*l&\f{V=V_auKe|^YXy7}bU%^%#
 radius-server authentication 10.1.6.6 1812 weight 80
#
aaa
 authentication-scheme sch1
  authentication-mode radius
 domain default_admin
  authentication-scheme sch1
  radius-server 1
 domain huawei.com
  authentication-scheme sch1
  radius-server 1
#
interface Vlanif10
 ip address 10.1.6.10 255.255.255.0
#
interface Vlanif20
 ip address 10.1.2.10 255.255.255.0
#
interface Vlanif30
 ip address 10.1.3.10 255.255.255.0
#
interface GigabitEthernet0/0/1
 port link-type access
 port default vlan 10
#
interface GigabitEthernet0/0/2
 port link-type access
 port default vlan 20
#
interface GigabitEthernet0/0/3
 port link-type hybrid
 port hybrid untagged vlan 30
 authentication dot1x
 dot1x authentication-method eap
#
user-interface maximum-vty 15
user-interface vty 0 14
 authentication-mode aaa
 protocol inbound telnet
#
return