Example for Configuring a Device to Communicate with the NMS Using SNMPv2c
SNMP Overview
The Simple Network Management Protocol (SNMP) is a standard network management protocol widely used on TCP/IP networks. SNMP manages network elements by using a central computer (a network management station) running network management software.
SNMP has the following advantages:
- Automatic configuration management:
A network administrator can use SNMP to quickly query information, modify data, locate faults, and so forth on any SNMP agent. SNMP greatly improves work efficiency of network administrators.
- Multi-vendor management:
SNMP shields the physical differences between devices of different vendors. SNMP provides only a basic function set, so the managed tasks are separated from the managed physical features and lower-layer interoperation technologies. Therefore, SNMP can uniformly manage devices of multiple vendors simultaneously.
SNMP is available in three versions. SNMPv1 is the initial version of SNMP. It provides authentication based on community names. SNMPv1 has low security, and can return only a few error codes. SNMPv2c issued by IETF is the second release of SNMP. SNMPv2c has enhancements to standard error codes, data types (Counter 64 and Counter 32), and operations including GetBulk and Inform. SNMPv2c does not improve the security, so IETF issued SNMPv3 that provides encryption and authentication based on the user-based security model (USM) and access control based on the view-based access control model (VACM).
SNMPv2c is applicable to medium and large networks with low security requirements or with good security (for example, VPNs) but on which services are so busy that traffic congestion may occur.
Configuration Notes
This configuration example applies to all switches running all versions.
In this example, eSight running V300R007C00 is used as the NMS.
Networking Requirements
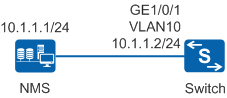
As shown in Figure 1, the NMS server manages all devices on the network. The network is large and secure but the service traffic volume on the network is high. Therefore, devices on the network use SNMPv2c to communicate with the NMS server. For capacity expansion, a new switch is added to the network. The network administrator wants to use the existing network resources to manage the new switch and quickly locate and rectify network faults.
Configuration Roadmap
The configuration roadmap is as follows:
Configure SNMPv2c on the switch so that the NMS running SNMPv2c can manage the switch.
Configure access control so that only the NMS with the specified IP address can perform read/write operations on the specified MIB objects of the switch.
Configure a community name based on which the switch permits access of the NMS.
Configure a trap host and enable the switch to automatically send traps to the NMS.
Add the switch to the NMS. The community name configured on the switch must be the same as that used by the NMS; otherwise, the NMS cannot manage the switch.
Procedure
- Configure SNMPv2c on the switch so that the NMS running SNMPv2c can manage the switch.
<HUAWEI> system-view
[HUAWEI] sysname Switch
[Switch] snmp-agent sys-info version v2c //By default, SNMPv3 is supported.
- Configure access control so that only the NMS with the specified IP address can perform read/write operations on the specified MIB objects of the switch.
# Configure an ACL to permit only the NMS 10.1.1.1 to access the switch.
[Switch] acl 2001
[Switch-acl-basic-2001] rule permit source 10.1.1.1 0
[Switch-acl-basic-2001] rule deny
[Switch-acl-basic-2001] quit
# Configure the MIB view to specify the MIB objects that can be accessed by the NMS.
[Switch] snmp-agent mib-view included isoview01 system   //Configure the MIB view isoview01 to access the system subtree.
[Switch] snmp-agent mib-view included isoview02 interfaces   //Configure the MIB view isoview02 to access the interfaces subtree.
- Configure a community name based on which the switch permits access of the NMS, apply the ACL to make the access control function take effect.
[Switch] snmp-agent community read adminnms01 mib-view isoview01 acl 2001   //Grant adminnms01 the read-only permission on the system subtree.
[Switch] snmp-agent community write adminnms02 mib-view isoview02 acl 2001   //Grant adminnms02 the read-write permission on the interface subtree.
- Configure a trap host and enable the switch to automatically send traps to the NMS.
[Switch] snmp-agent trap enable
Warning: All switches of SNMP trap/notification will be open. Continue? [Y/N]:y //Enable all trap functions on the switch. By default, only some trap functions are enabled. You can run the display snmp-agent trap all command to check trap status.
[Switch] snmp-agent target-host trap address udp-domain 10.1.1.1 params securityname adminnms01 v2c //Configure a trap host. By default, traps are sent by UDP port 162.
- Add the switch to the NMS.
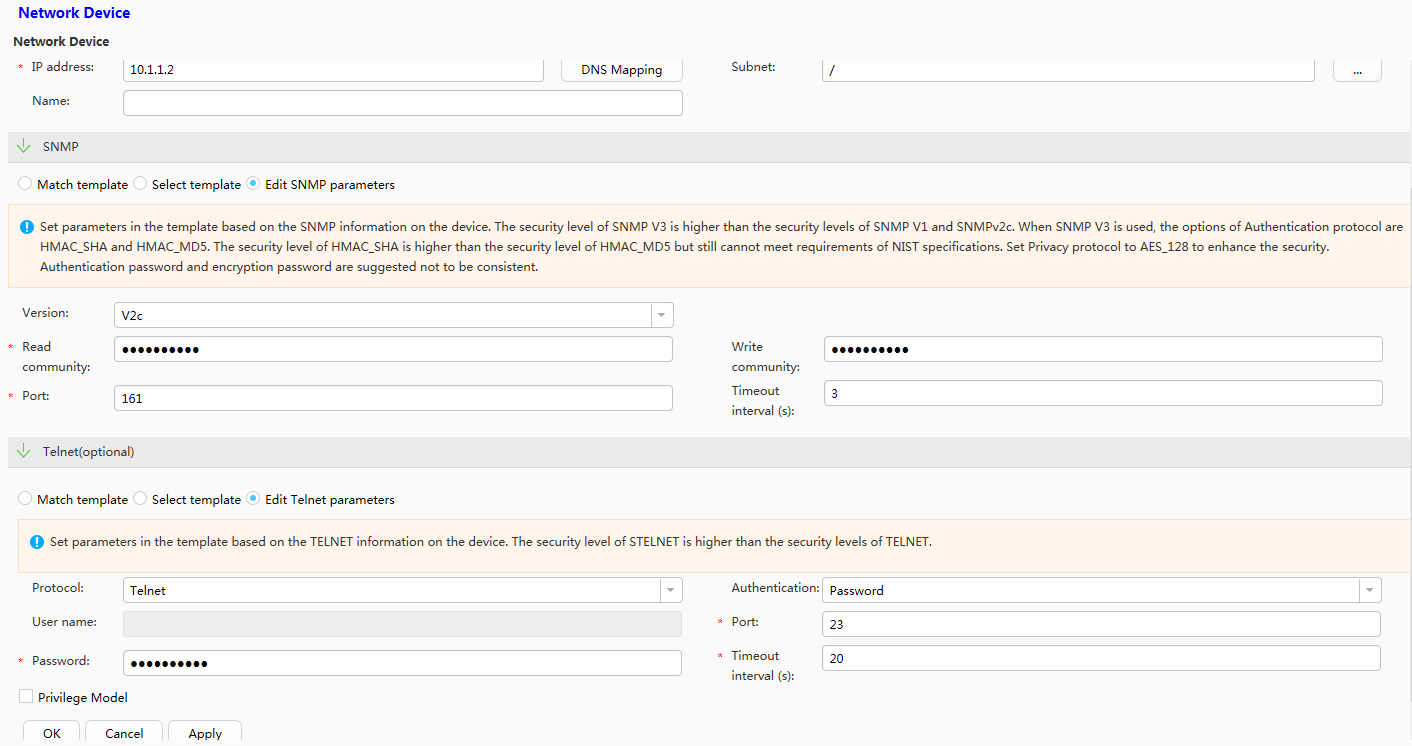
# Log in to eSight and choose . Set SNMP parameters based on Table 1 and click OK. A switch is added to and can be managed by eSight. The switch will proactively send trap messages to eSight.
Table 1 SNMP parameters Parameter
Setting
Select discovery protocol
SNMP
IP address
10.1.1.2
SNMP
Edit SNMP parameters
Version
V2c
Read community
adminnms01
Write community
adminnms02
Port
161

The parameter settings on the NMS and switch must be the same; otherwise, the switch cannot be added to the NMS.
If authentication is required for remote logins to the switch, Telnet parameters need to be set so that the NMS can manage the switch. In this example, administrators can remotely log in to the switch using Telnet, password authentication is used, and the password is huawei2012.
Configuration Files
Configuration file of the switch
#
sysname Switch
#
acl number 2001
 rule 5 permit source 10.1.1.1 0
 rule 10 deny
#
snmp-agent
snmp-agent local-engineid 800007DB03360102101100
snmp-agent community read cipher %^%#Pqp'RXi))/y\KgEtwP9A3x2z5_FgxG1v'D/8>=G,D9<yMC^RAM_YB:F0BZlF="bHXg%lH*L"Jq'lea`S%^%# mib-view isoview01 acl 2001
snmp-agent community write cipher %^%#.T|&Whvyf$<Gd"I,wXi5SP_6~Nakk6<<+3H:N-h@aJ6d,l0md%HCeAY8~>X=>xV\JKNAL=124r839v<*%^%# mib-view isoview02 acl 2001
snmp-agent sys-info version v2c v3
snmp-agent target-host trap address udp-domain 10.1.1.1 params securityname cipher %^%#uq/!YZfvW4*vf[~C|.:Cl}UqS(vXd#wwqR~5M(rU%%^%# v2c
snmp-agent mib-view included isoview01 system
snmp-agent mib-view included isoview02 interfaces
snmp-agent trap enable
#
return