Example for Configuring eSight and Switches to Communicate Through SNMPv2c
Introduction to eSight
eSight is a new-generation comprehensive operation, maintenance, and management solution developed by Huawei for network infrastructure management, unified communications, telepresence conferencing, video surveillance, and data center in enterprises. eSight supports unified monitoring and configuration management over devices of various types and from various vendors, monitors and analyzes network and service quality, manages enterprise resources, services, and users in a unified manner, and analyzes association between them. In addition, eSight offers a flexible and open platform that enables enterprises to customize software and build an intelligent management system tailored to their own needs. This example describes how a network administrator uses the Simple Network Management Protocol Version 2c (SNMPv2c) to automatically discover network devices on eSight.
Configuration Notes
This example uses eSight V200R005C00 and switch V200R003C00. The configurations may vary with software versions. For details, see the product manual of the corresponding version.
Networking Requirements
An enterprise administrator wants to use eSight to manage devices of the enterprise.
- The enterprise replans the network recently, and the number of devices on the entire network increases to about 1000. It is labor-consuming if the administrator logs in to each device to configure and manage the devices. The administrator needs to use a network management system (NMS) to uniformly manage all the devices on the network.
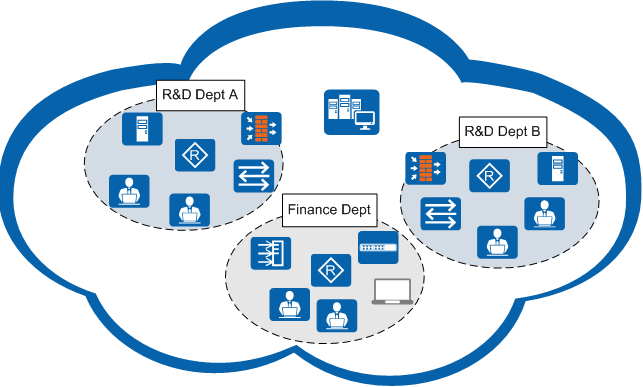
- Devices on the enterprise network belong to the R&D Dept and finance Dept, and devices in the R&D Dept are divided into two service groups. The R&D Dept has 800 devices and the finance Dept has 200 devices. The administrator wants to manage the devices by group, view the device status in different departments, and batch configure services for devices in the same service group during the maintenance process.
Requirement Analysis
- Enabling automatic device discovery: A large number of security devices and network devices need to be deployed on a network. The automatic device discovery function provided by eSight can reduce the administrator's workload, improve the operation efficiency, and lower misoperations.
- Selecting the SNMPv2c protocol: A majority of the security devices and network devices use SNMPv2c. SNMPv2c has higher security than SNMPv1, and is simple and easy to configure compared with SNMPv3.
- Enabling the subnet function in topology monitoring: The subnet function in topology monitoring enables eSight to monitor devices by area according to the subnet on which the devices are located. The administrator can divide the enterprise network into multiple subnets by department to implement differentiated management.
- Enabling the grouping function: During routine maintenance, the administrator needs to batch configure devices that provide similar services. The grouping function enables eSight to automatically add devices to different groups after grouping rules are set. The administrator can batch perform authentication and alarm filtering operations for devices in the same group.
Data Plan
Item |
Value |
Description |
|---|---|---|
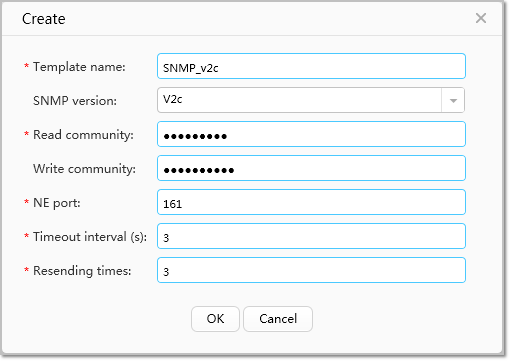
SNMP parameters |
Template name: SNMP_v2c SNMP version: v2c Read community: Public123 Write community: Private123 NE port: 161 Timeout interval(s): 3 Resending times: 3 |
It is recommended that the read and write community names have high complexity and meet complexity requirements on devices to ensure security. The highest complexity is recommended because there are different complexity requirements for devices. For example, the combination of upper-case letters, lower-case letters, and digits. |
IP address |
Different network segment IP addresses are allocated based on the service group. R&D Dept A:
R&D Dept B:
Finance Dept: 192.168.51.0-192.168.51.255 |
IP addresses are allocated based on the service group and department. Devices in a service group can only use IP addresses in a specified network segment, so that subnets can be divided and devices can be grouped based on IP addresses. |
Subnet |
The network is divided into three subnets and assigned subnet
IP address ranges.
|
One subnet on eSight can contain up to 500 devices. It is recommended that the R&D Dept with 800 devices be divided into two subnets, and the finance Dept into one subnet. |
Grouping rule |
Five groups are divided based on the service type and department.
|
The start and end IP addresses are specified in grouping rules. After eSight discovers the devices, they are automatically added to different groups. |
Configuration Roadmap
- Configure SNMP parameters on the devices.
- Create subnets on eSight.
- Set grouping rules on eSight.
- Create an SNMP template on eSight.
- Enable eSight to discover devices using SNMP.
Prerequisites
IP addresses have been configured for devices on the network according to Data Plan, and the devices can successfully communicate with eSight.
Procedure
- Configure SNMP parameters on the devices.
<SwitchA> system-view
[SwitchA] snmp-agent   //Start the SNMP agent service.
[SwitchA] snmp-agent sys-info version v2c   //Set the SNMP version to v2c.
[SwitchA] snmp-agent mib-view included View_ALL iso   //Create a MIB view View_ALL.
[SwitchA] snmp-agent community read cipher Public123 mib-view View_ALL   //Configure a read community name and set the rights of the MIB view.
[SwitchA] snmp-agent community write cipher Private123 mib-view View_ALL   //Configure a write community name and set the rights of the MIB view.
[SwitchA] snmp-agent trap source MEth0/0/1   //Specify the source interface for sending traps. Here, a management interface is specified as the source interface.
[SwitchA] snmp-agent trap enable   //Enable the trap function to report alarms.
Warning: All switches of SNMP trap/notification will be open. Continue? [Y/N]:y
[SwitchA] snmp-agent target-host trap address udp-domain 192.168.10.10 params securityname Public123 v2c   //Set the eSight IP address to 192.168.10.10, securityname to Public123, and version to v2c.
- Create subnets.
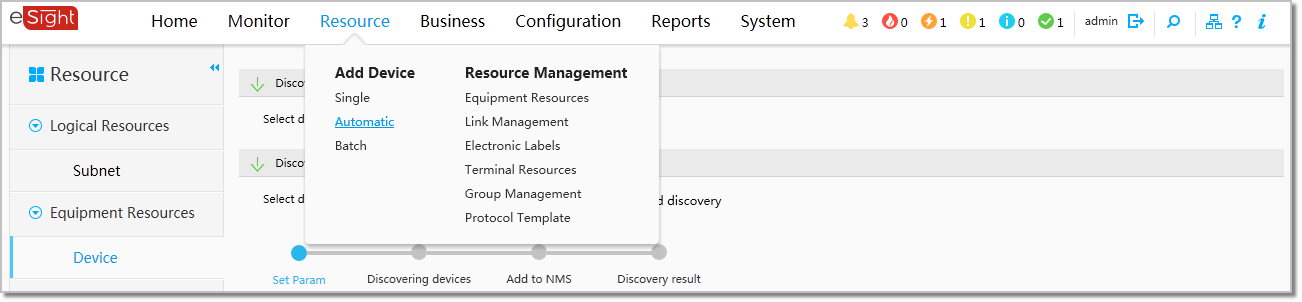
- Choose Resource > Resource Management > Equipment Resources
from the main menu.

- On the Subnet page, click
 .
.

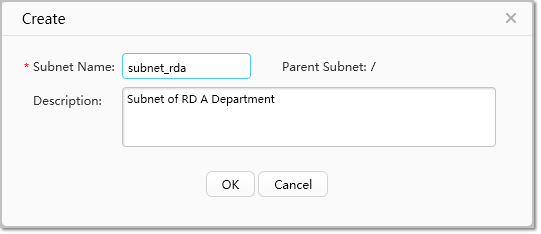
- In the dialog box that is displayed, enter the subnet
name and description, and click OK.
Repeat the steps to create the other two subnets.
- Choose Resource > Resource Management > Equipment Resources
from the main menu.
- Set grouping rules.
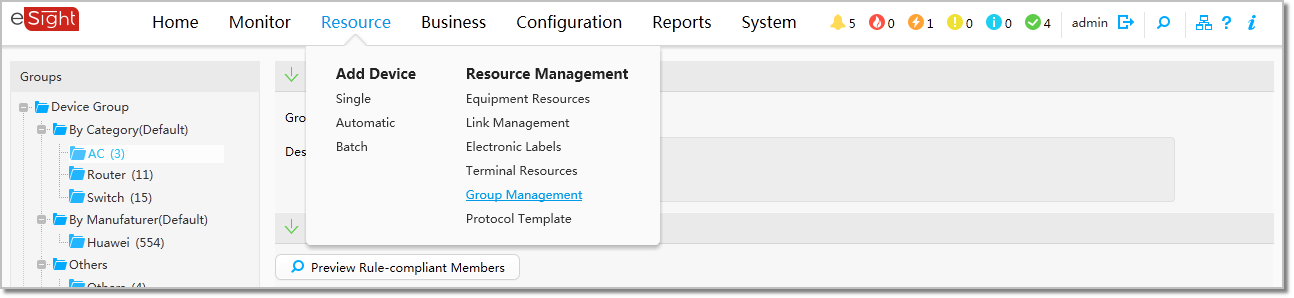
- Choose Resource > Resource Management > Group Management
from the main menu.
- In the navigation tree, choose Device Group and click
 next to User Defined Groups.
 - Click
 under Dynamic Rules to set grouping
rules.
under Dynamic Rules to set grouping
rules.
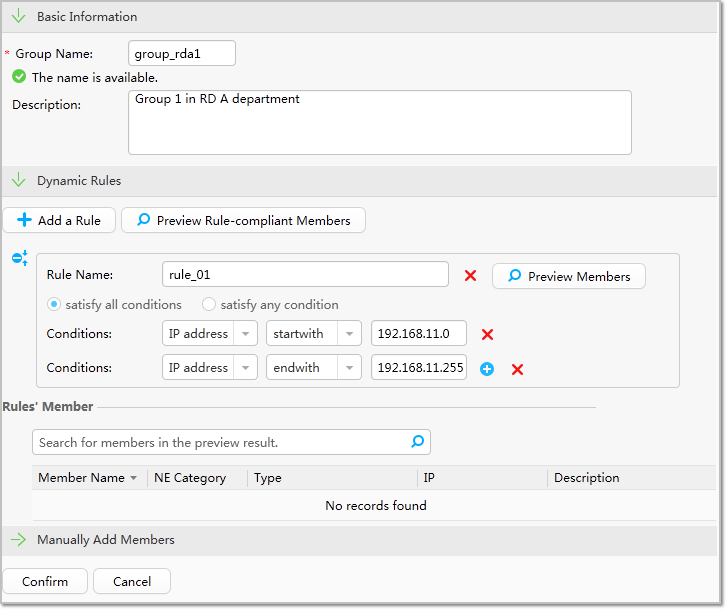
- Set the rule name to rule_01.
- Select satisfy all conditions.
- Set the dynamic rule to IP address startwith 192.168.11.0.
- Click next to the dynamic rule. A line is displayed under the dynamic
rule. Set the other dynamic rule to IP address endwith 192.168.11.255.
- Choose Resource > Resource Management > Group Management
from the main menu.
- Create an SNMP template on eSight.
- Choose Resource > Resource Management > Protocol Template
from the main menu.

- In the navigation tree, choose SNMP Template and click .
- Set parameters in the SNMP template according to Data Plan and click OK.
- Choose Resource > Resource Management > Protocol Template
from the main menu.
- Use the automatic device discovery function to add devices
to eSight.
- Choose Resource > Add Device > Automatic from the main
menu.
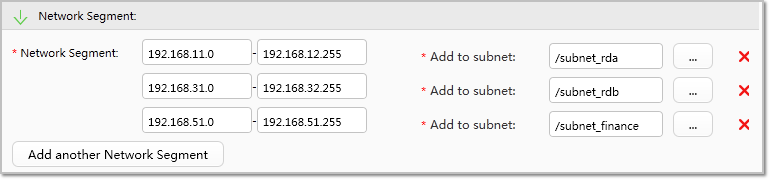
- Specify start and end IP addresses of network segments
and add them to subnets.
Click Add Another Network Segment, specify start and end IP addresses of the network segment and add it to the corresponding subnet.
- Choose Resource > Add Device > Automatic from the main
menu.
- Adjust the topology layout.
- Choose Monitor > Topology > Topology Management from the main menu.
- On the Physical topology page, adjust the device locations.
- Click
 to save the new locations of the devices in the topology.
Verification
- Check devices on subnets.
Choose Monitor > Topology > Topology Management from the main menu.
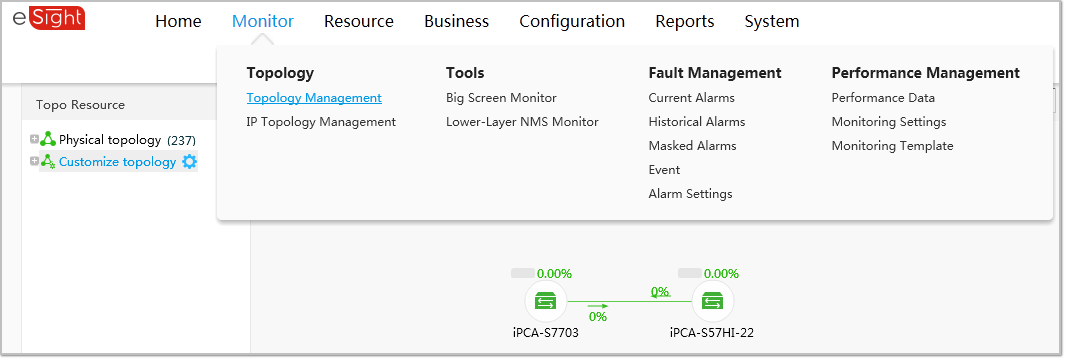
Double-click the icon of subnet_finance in the topology to display the subnet topology. Check whether all the devices in the finance Dept are added to the subnet. If so, the operations are correct. Perform similar steps to check the other two subnets. If devices are not added to the corresponding subnet, check the IP address segments of the subnets.
- Check grouping of devices.
Choose Resource > Resource Management > Group Management from the main menu.
- Choose . Check whether all the devices in the service group 1 of R&D Dept A are added to the group. If so, the operations are correct. Perform similar steps to check the other four groups. If devices are not added to the corresponding group, check whether the devices are added to eSight and whether grouping rules are correctly set.
Configuration Files
#
sysname SwitchA
#
snmp-agent
snmp-agent local-engineid 800007DB03845B12365950
snmp-agent community read cipher %^%#^<EfW&psB6Sq.z=!kAd0yrsa+T(Z\7_,LZUV*~Q2o>S:$Ct;'PVHc#KVls(D|F6=F=|N!V7z2t0T%qT!%^%# mib-view View_ALL
snmp-agent community write cipher %^%#FMFL9TM5nPTV&1-+s@lH&|HE.hk5Q-isz@#$_fsTMFx!$/LXJT}p$RW"#"jFEM5ODoOYm<(eT4Y$X1>R%^%# mib-view View_ALL
snmp-agent sys-info version v2c v3
snmp-agent target-host trap address udp-domain 192.168.10.10 params securityname cipher %^%#N'IcKJw$k>4C65.vzU%W=unvQwizfXBLv^QXV~Q4%^%# v2c
snmp-agent mib-view included View_ALL iso
snmp-agent trap source MEth0/0/1
snmp-agent trap enable
#
return