AC
Context
An AC manages APs, controls WLAN user access, and guarantees security. APs can communicate with the AC only after the basic AC attributes are configured.
Procedure
- Choose . The AC quick configuration page is displayed.
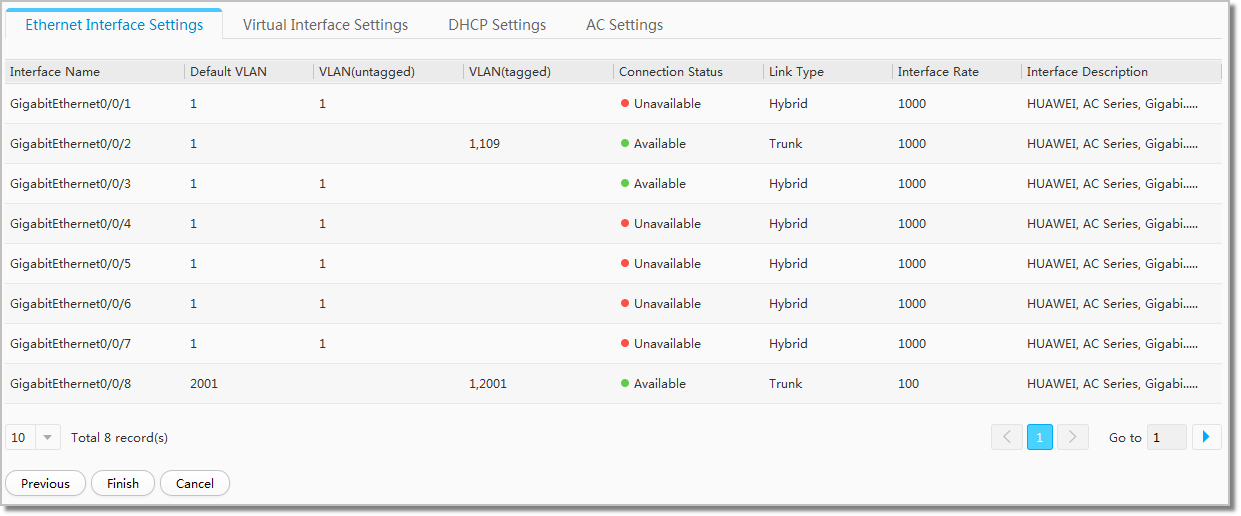
- Configure a network interface.
- Click the name of the target network interface on the 1. Configure Ethernet Interface page.
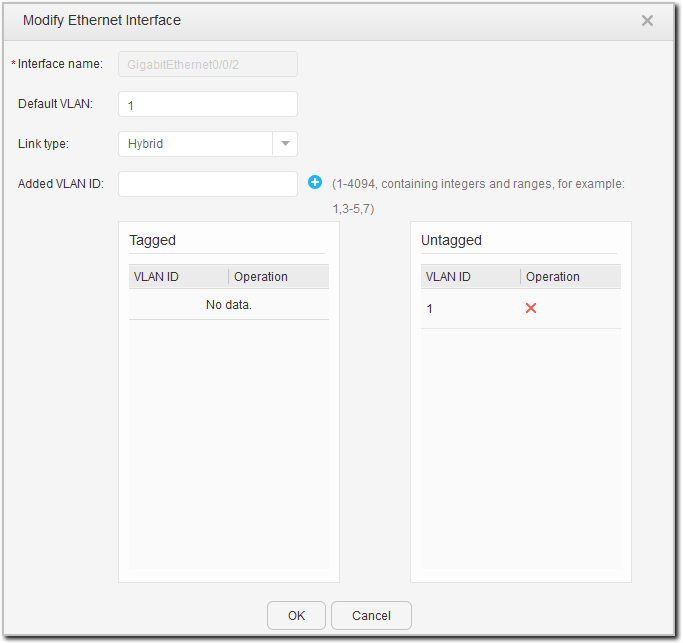
- Configure the parameters in the displayed window. For
description of the parameters, see Table 1.
Table 1 Network interface parameters Parameter
Description
Interface name
Interface name.
Default VLAN
Default VLAN of the interface.
Link type
Link type of the interface.
Added VLAN ID
ID of the VLAN to which the interface belongs.
 Enter the VLAN ID, click
 , and specify a mode (Tagged or Untagged)
in the displayed window.
, and specify a mode (Tagged or Untagged)
in the displayed window.
- Click the name of the target network interface on the 1. Configure Ethernet Interface page.
- Configure a virtual interface.
- Click Create on the 2. Configure Virtual Interface page.
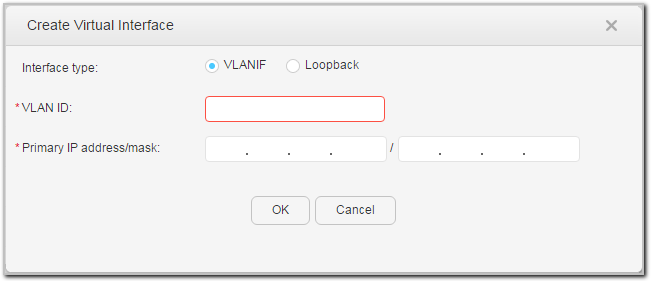
- Click Create on the 2. Configure Virtual Interface page.
- Configure a DHCP address pool.
- On the 3.Configure DHCP page, click Create under DHCP Address Pool.
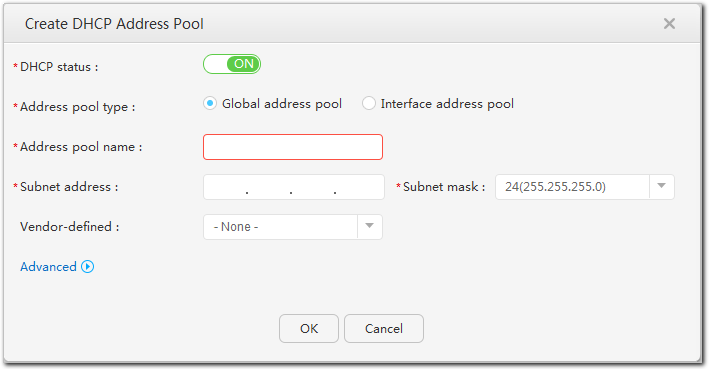
- Configure the parameters in the displayed window. For
description of the parameters, see Table 3 and Table 4.
Table 3 Parameters for configuring a DHCP global address pool Parameter
Description
DHCP status
Whether to enable the DHCP function globally.
Address pool type
DHCP address pool type (global address pool/interface address pool)
Address pool name
Name of the global address pool. The name is a string of 1 to 64 characters, including only numbers, letters, dots (.), hyphens (-), and underscores (_). A single hyphen (-) or multiple hyphens (--) alone cannot be used as an address pool name.
Subnet address
Available network segment addresses in a global address pool.
Subnet mask
Subnet mask of the IP address assigned to the DHCP client; namely, the subnet mask of the current interface. The gateway IP address and subnet mask together identify the range of an interface address pool.
Vendor-defined
User-defined option for the global IP pool. The options are as follows:- None: indicates that no user-defined option is configured for an address pool.
- ascii: indicates that the user-defined option is an ASCII character string.
- cipher: indicates that the user-defined option is a password string.
- hex: indicates that the user-defined option is a hexadecimal number.
- ip-address: indicates that the user-defined option is an IP address. One to eight IP addresses can be specified.
- sub-option: indicates that a sub-option is configured for the user-defined option. If sub-option is selected, you also need to set the sub-option parameter.
Gateway IP
Egress gateway IP address in a global address pool.
- To add a gateway IP address, enter a gateway IP address and click . You can repeat
this operation to add a maximum of eight gateway IP addresses.
- To delete a gateway IP address, select a gateway IP address and
click
 .
.
Address pool interface
Interface that can use addresses in the address pool. Users going online through this interface can obtain configuration information, such as IP addresses, from the global address pool.
- To add an interface, select an interface and click . To add multiple
interfaces, repeat this operation.
- To delete an interface, select an interface and click .
Not allocated IP
IP address that will not be dynamically allocated to clients. When IP addresses are assigned to other servers such as DNS servers, the IP addresses cannot be assigned to DHCP clients. Specify these IP addresses as forbidden IP addresses. This operation avoids IP address conflicts and shortens the IP address detection time during IP address assignment, which improves DHCP efficiency. Perform the following operations to add or delete forbidden IP addresses:- Adding forbidden IP addresses: Set the start and end IP addresses
and click . To add multiple forbidden IP addresses or IP
address segments, repeat this operation.
- Deleting forbidden IP addresses: Select the check boxes of forbidden
IP addresses or select the check box next to Forbidden IP, and click .
Table 4 Parameters for Configuring a DHCP interface address pool Parameter
Description
DHCP status
Whether to enable the DHCP function globally.
Address pool type
DHCP address pool type (global address pool/interface address pool)
Select Interface
Interface of the DHCP server on which the address pool is configured. The IP addresses in the network segment to which the interface IP address belongs can be allocated.
Interface IP address
IP address of the current interface; namely, the gateway address of the DHCP client.
Mask
Subnet mask of the IP address assigned to the DHCP client; namely, the subnet mask of the current interface. The gateway IP address and subnet mask together identify the range of an interface address pool.
Vendor-defined
User-defined option for the global IP pool. The options are as follows:- None: indicates that no user-defined option is configured for an address pool.
- ascii: indicates that the user-defined option is an ASCII character string.
- cipher: indicates that the user-defined option is a password string.
- hex: indicates that the user-defined option is a hexadecimal number.
- ip-address: indicates that the user-defined option is an IP address. One to eight IP addresses can be specified.
- sub-option: indicates that a sub-option is configured for the user-defined option. If sub-option is selected, you also need to set the sub-option parameter.
NOTE:- If the value of sub-option is 1, the sub-option type is fixed at hex.
- If the value of sub-option is 2, the sub-option type is fixed at ip-address.
- If the value of sub-option is 3, the sub-option type is fixed at ascii, and only an IP address such as 10.1.1.1 can be configured in the text box.
Not allocated IP
IP address that will not be dynamically allocated to clients. When IP addresses are assigned to other servers such as DNS servers, the IP addresses cannot be assigned to DHCP clients. Specify these IP addresses as forbidden IP addresses. This operation avoids IP address conflicts and shortens the IP address detection time during IP address assignment, which improves DHCP efficiency. Perform the following operations to add or delete forbidden IP addresses:- Adding forbidden IP addresses: Set the start and end IP addresses
and click . To add multiple forbidden IP addresses or IP
address segments, repeat this operation.
- Deleting forbidden IP addresses: Select the check boxes of forbidden
IP addresses or select the check box next to Forbidden IP, and click .
Gateway IP and Not allocated IP must be in the address pool. To ensure correct configuration, the Subnet address and Subnet mask parameters of the global address pool and the Select Interface parameter of the interface address pool can be modified or selected only when Gateway IP and Not allocated IP are not configured.
- On the 3.Configure DHCP page, click Create under DHCP Address Pool.
- Configure a DHCP relay agent.
- On the 3. Configure DHCP page,
click Create under DHCP Relay List.
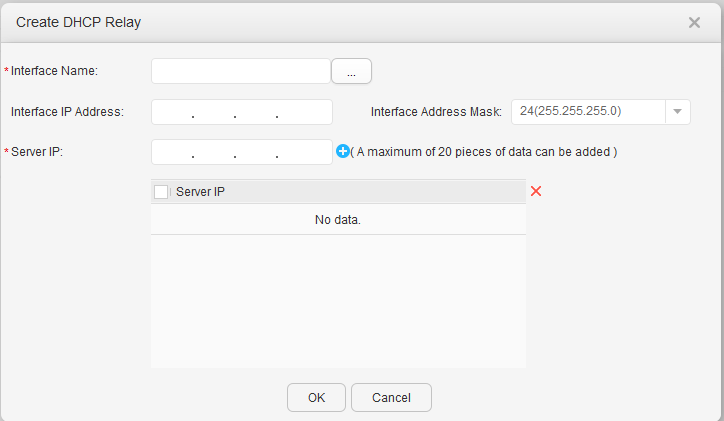
- Configure the parameters in the displayed window. For
description of the parameters, see Table 5.
Table 5 Parameters for configuring a DHCP relay agent Item
Description
Interface Name
Interface name.
Interface IP Address
IP address of the interface.
Interface Address Mask Subnet mask. Server IP
IP address of the DHCP server.
- Creating server IP addresses: Configure server IP addresses and
click
 .
. - Deleting server IP addresses: Select the check boxes of server
IP addresses or select the check box next to the IP address list,
and click
 .
.
- Creating server IP addresses: Configure server IP addresses and
click
- On the 3. Configure DHCP page,
click Create under DHCP Relay List.
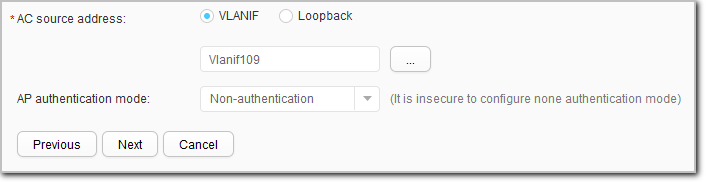
- Configure an AC.
- Configure the parameters on the 4. Configure
AC page. For description of the parameters, see Table 6.
- Configure the parameters on the 4. Configure
AC page. For description of the parameters, see Table 6.
- Check and confirm the settings on the 5. Confirm
Settings page and click Finish.