Intelligent Diagnosis
Context
When a fault occurs on a WLAN, you can use the Intelligent Diagnosis function to diagnose WLAN devices and the network and rectify the fault accordingly. For faults that you cannot rectify by yourself, export the diagnosis information and logs, then contact technical support personnel.

Only the S5720-HI, S5730-HI, S5731-H, S5731S-H, S5732-H, S6730-H, S6730S-H, and S6720-HI support Intelligent Diagnosis.
This node is only available in the NAC unified and non-NETCONF modes.
The web system is applicable to wireless service deployment on small- and middle-sized networks. For large-sized networks, use other network management systems, such as eSight.
Procedure
- Configure diagnosis parameters for WLAN users.
- Choose . The Intelligent Diagnosis page is displayed.
- Click the Wireless user, AP, or LSW icon, choose the object to diagnose, and configure diagnosis parameters on the page that is displayed. For description of the parameters, see Table 1.
Diagnosis objects can be wireless users, APs, and LSW.
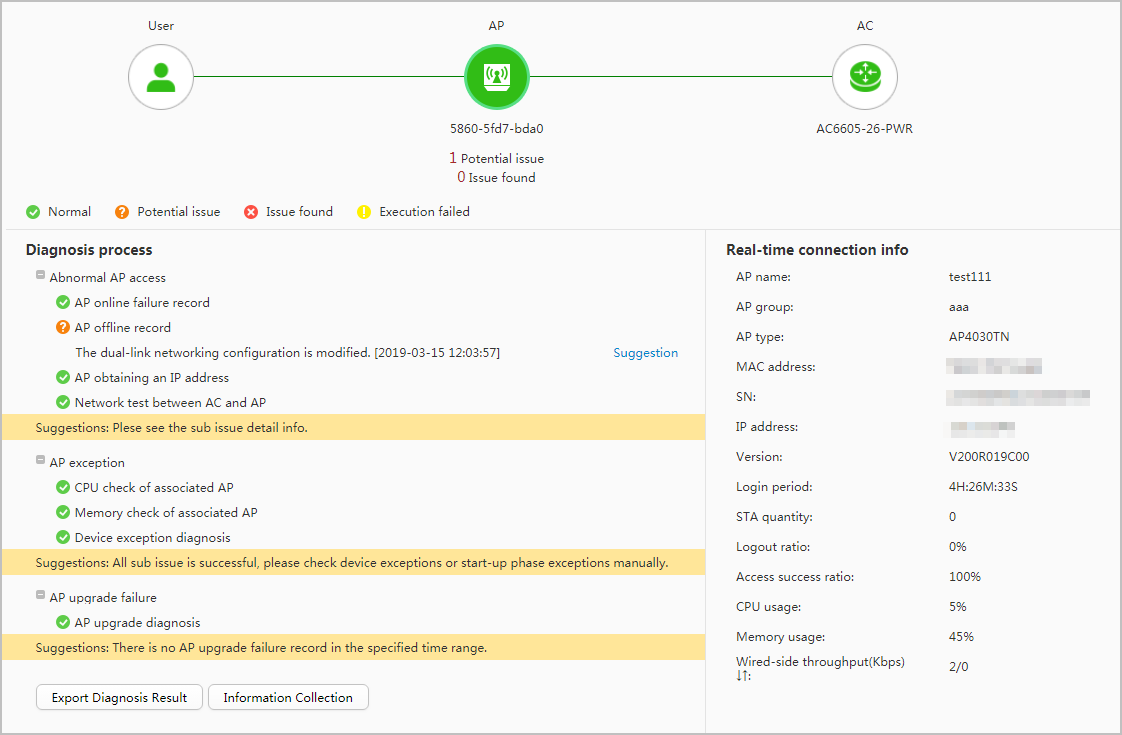
Table 1 Diagnosis parameters Parameter
Description
LSW
Diagnosis mode
Mode in which intelligent diagnosis is performed.
Start time
Start time of a fault.
End time
End time of a fault.
Start diagnosis time
Start time of the diagnosis when Diagnosis mode is set to Scheduled.
AP
Input type
Mode in which APs to diagnose are selected.- MAC address: APs are selected based on MAC addresses.
- IP address: APs are selected based on IP addresses.
- AP name: APs are selected based on AP names.
NOTE:You are advised to select APs to be diagnosed based on MAC addresses.
Wireless User
STA MAC address
MAC address of a user. Enter the MAC address directly, or click
 and then find the user in the displayed user list.
 - Click Start Diagnosis or OK.
- If Diagnosis mode is set to Real-time, the system will start diagnosing the object after you click Start Diagnosis.
- If Diagnosis mode is set to Scheduled, the system creates a scheduled diagnosis task after you click OK.
After the diagnosis is complete, the system displays the result at the lower left of the page and real-time connection information of the diagnosed object at the lower right of the page.
- Click Suggestion to view the suggestions on how to rectify the fault.
- View scheduled diagnosis tasks.
- Click
 . The Diagnosis list page is displayed.
 - Click Non-diagnosed to view scheduled diagnosis tasks that have not started.
- Click Diagnosed to view scheduled diagnosis tasks that are complete.
- Click
- Delete a scheduled diagnosis task.
- Click . The Diagnosis list page is displayed.
- To delete a scheduled diagnosis task that has not started, click Non-diagnosed and then
 .
. - To delete a scheduled diagnosis task that is complete, click Diagnosed and then .
- Click
- Export diagnosis information.
- Click Export Diagnosis Info.

- In the dialog box that is displayed, click OK.
The system saves the diagnosis information to the device as txt files (overall_diaginfo_xxx.txt and autodiagnose-detail.txt), and prompts you to save the file to a local computer.
- overall_diaginfo_xxx.txt: contains all diagnosis information on the device.
- autodiagnose-detail.txt: contains the result of the current intelligent diagnosis.
- Save diagnosis information to your local computer.
- Click Export Diagnosis Info.
- Export logs.
- Click Export Logs.
- On the Export Logs page that is displayed, select the log files to export, and click OK.