Installing an Optical Module
Context
This section describes how to install an optical module. The method used to install a copper transceiver module is the same, except that the copper transceiver module connects to a network cable instead of optical fibers.

Never look directly into an optical module or the ends of optical fibers. Optical modules and connected fibers emit laser radiation that can cause eye damage.

- Do not touch the edge connector of an optical module during the installation.
- Install an optical module on a port before connecting optical fibers to the transceiver module.
- Install dust plugs on idle optical ports.
Procedure
- Wear an ESD wrist strap or ESD gloves. When wearing an ESD wrist strap, ensure that it is in close contact with your wrist and grounded properly.
- Remove the dust plug from an optical port. Keep the dust plug for future use.
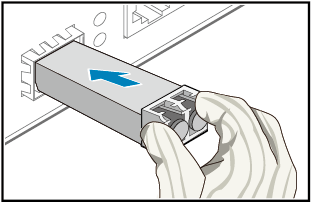
- Ensure that the optical module is correctly oriented and gently push it into the optical port until you hear a click.
If the optical module cannot be completely inserted into the optical port, do not force it into the port. Turn the optical module 180 degrees and try again.Figure 1 Installing an optical module
- Check whether the transceiver module is securely seated. While keeping the handle of the transceiver module closed, grasp the two sides of the transceiver module with your thumb and forefinger and gently pull it.
- If the transceiver module does not pull out, it is installed correctly.
- If the transceiver module pulls out, reinstall it.
 Ensure that transceiver modules are fitted with dust plugs when not in use and remove the dust plugs only when you are ready to connect optical fibers.