Example for Configuring an Eth-Trunk to Preferentially Forward Local Traffic in a CSS or Stack
Overview
In a CSS or stack, an Eth-Trunk is configured as the outbound interface of traffic to ensure reliable transmission. Member interfaces of the Eth-Trunk are located on different chassis. When devices in the CSS or stack forward traffic, the Eth-Trunk may select an inter-chassis member interface based on a hash algorithm. The cable bandwidth between devices in the CSS or stack is limited, so inter-chassis traffic forwarding occupies bandwidth resources between devices, lowering traffic forwarding efficiency. To address this issue, you can enable an Eth-Trunk to preferentially forward local traffic.
Configuration Notes
- If active interfaces of an Eth-Trunk on the local device have sufficient bandwidth to forward traffic, you can configure the Eth-Trunk to preferentially forward local traffic. This improves traffic forwarding efficiency and increases bandwidth capacity between devices in the CSS.
- If active interfaces of an Eth-Trunk on the local device do not have sufficient bandwidth to forward traffic, you can configure the Eth-Trunk not to preferentially forward local traffic. In this case, some traffic on the local device is forwarded through member interfaces of an Eth-Trunk on another device, preventing packet loss.
For applicable product models and versions, see Applicable Product Models and Versions.

For details about software mappings, visit Hardware Query Tool and search for the desired product model.
Networking Requirements
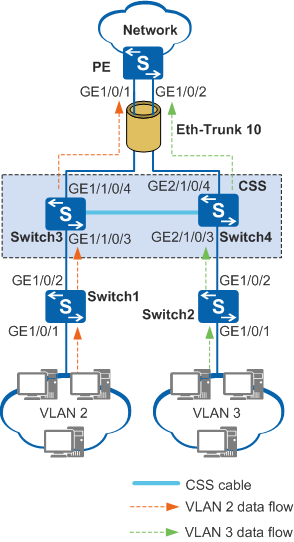
On the network shown in Figure 1, CSS technology is used to increase the total capacity of switches. Switch3 and Switch4 are connected through stack cables to form a logical switch. To implement backup between switches and improve reliability, physical interfaces on the two switches are added to an Eth-Trunk. In normal situations, traffic from VLAN 2 and VLAN 3 is forwarded through GE1/0/1 and GE1/0/2 respectively. This increases bandwidth capacity between switches and reduces traffic forwarding efficiency.
To ensure that traffic from VLAN 2 is forwarded through GE1/0/1 and traffic from VLAN 3 is forwarded through GE1/0/2, you can configure the Eth-Trunk to preferentially forward local traffic.
Configuration Roadmap
The configuration roadmap is as follows:
Create an Eth-Trunk.
Add member interfaces to the Eth-Trunk.
Enable the Eth-Trunk to preferentially forward local traffic.
Add interfaces to VLANs to implement Layer 2 connectivity.
Procedure
- Create an Eth-Trunk and configure the ID of a VLAN from which packets can pass through the Eth-Trunk.
# Configure the CSS.
<HUAWEI> system-view
[HUAWEI] sysname CSS
[CSS] interface eth-trunk 10 //Create Eth-Trunk 10 and enter the view of Eth-Trunk 10.
[CSS-Eth-Trunk10] port link-type trunk  //Set the link type of the interface to trunk.
[CSS-Eth-Trunk10] port trunk allow-pass vlan all //Configure the interface to allow all VLANs.
[CSS-Eth-Trunk10] quit
# Configure the aggregation switch PE.
<HUAWEI> system-view
[HUAWEI] sysname PE
[PE] interface eth-trunk 10 //Create Eth-Trunk 10 and enter the view of Eth-Trunk 10.
[PE-Eth-Trunk10] port link-type trunk //Set the link type of the interface to trunk.
[PE-Eth-Trunk10] port trunk allow-pass vlan all //Configure the interface to allow all VLANs.
[PE-Eth-Trunk10] quit
- Add member interfaces to the Eth-Trunk.
# Configure the CSS.
[CSS] interface gigabitethernet 1/1/0/4
[CSS-GigabitEthernet1/1/0/4] eth-trunk 10 //Add GE1/1/0/4 to Eth-Trunk 10.
[CSS-GigabitEthernet1/1/0/4] quit
[CSS] interface gigabitethernet 2/1/0/4
[CSS-GigabitEthernet2/1/0/4] eth-trunk 10 //Add GE2/1/0/4 to Eth-Trunk 10.
[CSS-GigabitEthernet2/1/0/4] quit
# Configure the PE.
[PE] interface gigabitethernet 1/0/1
[PE-GigabitEthernet1/0/1] eth-trunk 10 //Add GE1/0/1 to Eth-Trunk 10.
[PE-GigabitEthernet1/0/1] quit
[PE] interface gigabitethernet 1/0/2
[PE-GigabitEthernet1/0/2] eth-trunk 10 //Add GE1/0/2 to Eth-Trunk 10.
[PE-GigabitEthernet1/0/2] quit
- Configure the Eth-Trunk on devices in the CSS to preferentially forward local traffic.
On the S5735-L, S5735S-L, S5735S-L-M, S5735-S, S5735-S-I, and S5735S-S run the following command:
[CSS] local-preference enable //Enable Eth-Trunk 10 to preferentially forward local traffic.On the devices except the S5735-L, S5735S-L, S5735S-L-M, S5735-S, S5735-S-I, and S5735S-S, run the following commands:
[CSS] interface eth-trunk 10
[CSS-Eth-Trunk10] local-preference enable //Enable Eth-Trunk 10 to preferentially forward local traffic.
[CSS-Eth-Trunk10] quit
By default, an Eth-Trunk is enabled to preferentially forward local traffic. If you run the local-preference enable command, the system displays the message "Error: The local preferential forwarding mode has been configured."
- Configure Layer 2 forwarding.
# Configure the CSS.
[CSS] vlan batch 2 3
[CSS] interface gigabitethernet 1/1/0/3
[CSS-GigabitEthernet1/1/0/3] port link-type trunk
[CSS-GigabitEthernet1/1/0/3] port trunk allow-pass vlan 2
[CSS-GigabitEthernet1/1/0/3] quit
[CSS] interface gigabitethernet 2/1/0/3
[CSS-GigabitEthernet2/1/0/3] port link-type trunk
[CSS-GigabitEthernet2/1/0/3] port trunk allow-pass vlan 3
[CSS-GigabitEthernet2/1/0/3] quit
# Configure access switch Switch1.
<HUAWEI> system-view[HUAWEI] sysname Switch1[Switch1] vlan 2
[Switch1-vlan2] quit
[Switch1] interface gigabitethernet 1/0/1
[Switch1-GigabitEthernet1/0/1] port link-type trunk
[Switch1-GigabitEthernet1/0/1] port trunk allow-pass vlan 2
[Switch1-GigabitEthernet1/0/1] quit
[Switch1] interface gigabitethernet 1/0/2
[Switch1-GigabitEthernet1/0/2] port link-type trunk
[Switch1-GigabitEthernet1/0/2] port trunk allow-pass vlan 2
[Switch1-GigabitEthernet1/0/2] quit
# Configure access switch Switch2.
<HUAWEI> system-view[HUAWEI] sysname Switch2[Switch2] vlan 3
[Switch2-vlan3] quit
[Switch2] interface gigabitethernet 1/0/1
[Switch2-GigabitEthernet1/0/1] port link-type trunk
[Switch2-GigabitEthernet1/0/1] port trunk allow-pass vlan 3
[Switch2-GigabitEthernet1/0/1] quit
[Switch2] interface gigabitethernet 1/0/2
[Switch2-GigabitEthernet1/0/2] port link-type trunk
[Switch2-GigabitEthernet1/0/2] port trunk allow-pass vlan 3
[Switch2-GigabitEthernet1/0/2] quit
- Verify the configuration.
After the configuration is complete, run the display trunkmembership eth-trunk command in any view to check information about member interfaces of the Eth-Trunk.
The display on the CSS is used as an example.
<CSS> display trunkmembership eth-trunk 10
Trunk ID: 10
Used status: VALID
TYPE: ethernet
Working Mode : Normal
Number Of Ports in Trunk = 2
Number Of Up Ports in Trunk = 2
Operate status: up

Interface GigabitEthernet1/1/0/4, valid, operate up, weight=1
Interface GigabitEthernet2/1/0/4, valid, operate up, weight=1
Configuration Files
CSS configuration file
#
sysname CSS
#
vlan batch 2 3
#
interface Eth-Trunk10
 port link-type trunk
 port trunk allow-pass vlan 2 to 4094
#
interface GigabitEthernet1/1/0/3
 port link-type trunk
 port trunk allow-pass vlan 2
#
interface GigabitEthernet2/1/0/3
 port link-type trunk
 port trunk allow-pass vlan 3
#
interface GigabitEthernet1/1/0/4
 eth-trunk 10
#
interface GigabitEthernet2/1/0/4
 eth-trunk 10
#
return
PE configuration file
#
sysname PE
#
interface Eth-Trunk10
 port link-type trunk
 port trunk allow-pass vlan 2 to 4094
#
interface GigabitEthernet1/0/1
 eth-trunk 10
#
interface GigabitEthernet1/0/2
 eth-trunk 10
#
return
Switch1 configuration file
#
sysname Switch1
#
vlan batch 2
#
interface GigabitEthernet1/0/1
 port link-type trunk
 port trunk allow-pass vlan 2
#
interface GigabitEthernet1/0/2
 port link-type trunk
 port trunk allow-pass vlan 2
#
return
Switch2 configuration file
#
sysname Switch2
#
vlan batch 3
#
interface GigabitEthernet1/0/1
 port link-type trunk
 port trunk allow-pass vlan 3
#
interface GigabitEthernet1/0/2
 port link-type trunk
 port trunk allow-pass vlan 3
#
return
Applicable Product Models and Versions
Product |
Product Model |
Software Version |
|---|---|---|
S2700 |
S2720-EI |
V200R006C10, V200R009C00, V200R010C00, V200R011C10, V200R012C00, V200R013C00, V200R019C00, V200R019C10 |
S2750-EI |
V200R003C00, V200R005C00SPC300, V200R006C00, V200R007C00, V200R008C00, V200R009C00, V200R010C00, V200R011C00, V200R011C10, V200R012C00 |
|
S5700 |
S5700-LI |
V200R003(C00&C02&C10), V200R005C00SPC300, V200R006C00, V200R007C00, V200R008C00, V200R009C00, V200R010C00, V200R011C00, V200R011C10, V200R012C00 |
S5700S-LI |
V200R008C00, V200R009C00, V200R010C00, V200R011C00, V200R011C10, V200R012C00 NOTE:
Only S5700S-28P-PWR-LI-AC, S5700S-28X-LI-AC, and S5700S-52X-LI-AC support this function. |
|
S5710-X-LI |
V200R008C00, V200R009C00, V200R010C00, V200R011C00, V200R011C10, V200R012C00 |
|
S5700-SI |
V200R002C00, V200R003C00, V200R005C00 |
|
S5700-EI |
V200R002C00, V200R003C00, V200R005(C00&C01&C02&C03) |
|
S5710-EI |
V200R003C00, V200R005(C00&C02) |
|
S5720-EI |
V200R007C00, V200R008C00, V200R009C00, V200R010C00, V200R011C00, V200R011C10, V200R012C00, V200R013C00, V200R019C00, V200R019C10 |
|
S5720-LI, S5720S-LI |
V200R010C00, V200R011C00, V200R011C10, V200R012(C00&C20), V200R013C00, V200R019C00, V200R019C10 |
|
S5720-SI, S5720S-SI |
V200R008C00, V200R009C00, V200R010C00, V200R011C00, V200R011C10, V200R012C00, V200R013C00, V200R019C00, V200R019C10 |
|
S5720I-SI |
V200R012C00, V200R013C00, V200R019C00, V200R019C10 |
|
S5700-HI |
V200R003C00, V200R005(C00SPC500&C01&C02) |
|
S5710-HI |
V200R005C03 |
|
S5720-HI |
V200R006C00, V200R007(C00&C10), V200R008C00, V200R009C00, V200R010C00, V200R011C00, V200R011C10, V200R012C00, V200R013C00, V200R019C00, V200R019C10 |
|
S5730-HI |
V200R012C00, V200R013C00, V200R019C00, V200R019C10 |
|
S5730-SI |
V200R011C10, V200R012C00, V200R013C00, V200R019C00, V200R019C10 |
|
S5730S-EI |
V200R011C10, V200R012C00, V200R013C00, V200R019C00, V200R019C10 |
|
S5731-H |
V200R013C02, V200R019C00, V200R019C10 |
|
S5731-S, S5731S-S |
V200R019C00, V200R019C10 |
|
S5731S-H |
V200R019C00, V200R019C10 |
|
S5735-L, S5735S-L, S5735S-L-M, S5735-S, S5735S-S |
V200R019C10 |
|
S5732-H |
V200R019C00, V200R019C10 |
|
S6700 |
S6700-EI |
V200R003C00, V200R005(C00&C01) |
S6720-EI |
V200R008C00, V200R009C00, V200R010C00, V200R011C00, V200R011C10, V200R012C00, V200R013C00, V200R019C00, V200R019C10 |
|
S6720S-EI |
V200R009C00, V200R010C00, V200R011C00, V200R011C10, V200R012C00, V200R013C00, V200R019C00, V200R019C10 |
|
S6720-LI, S6720S-LI |
V200R011C00, V200R011C10, V200R012C00, V200R013C00, V200R019C00, V200R019C10 |
|
S6720-SI, S6720S-SI |
V200R011C00, V200R011C10, V200R012C00, V200R013C00, V200R019C00, V200R019C10 |
|
S6720-HI |
V200R012C00, V200R013C00, V200R019C00, V200R019C10 |
|
S6730-H |
V200R013C02, V200R019C00, V200R019C10 |
|
S6730S-H |
V200R019C10 |
|
S6730-S, S6730S-S |
V200R019C00, V200R019C10 |
|
S7700 |
S7706, S7712 |
V200R001(C00&C01), V200R002C00, V200R003C00, V200R005C00, V200R006C00, V200R007C00, V200R008C00, V200R009C00, V200R010C00, V200R011C10, V200R012C00, V200R013C00, V200R013C02, V200R019C00, V200R019C10 |
S7706 PoE |
V200R013C00, V200R019C00, V200R019C10 |
|
S9700 |
S9706, S9712 |
V200R001(C00&C01), V200R002C00, V200R003C00, V200R005C00, V200R006C00, V200R007(C00&C10), V200R008C00, V200R009C00, V200R010C00, V200R011C10, V200R012C00, V200R013C00 |