Example for Configuring 802.1X Authentication for Windows Clients (RADIUS Server and AD Server Are Used)
Networking Requirements
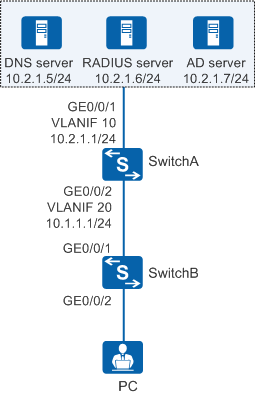
On the network shown in Figure 1, to meet the enterprise's high security requirements, 802.1X authentication is configured and a RADIUS server is deployed to authenticate terminals in the office area. To facilitate maintenance and reduce the number of authentication points, the authentication point is deployed on GE0/0/2 of SwitchA (aggregation switch). To simplify the configuration, users use the 802.1X client on Windows to perform certificate authentication and access the network. Additionally, user accounts are maintained on the AD server.
Configuration Precautions
The RADIUS authentication and accounting keys configured on the RADIUS server must be the same as the shared key of the RADIUS server configured on the device.
- The default outbound interface IP address of the device is used as the source IP address for sending RADIUS packets to the RADIUS server. This IP address must be the same as the device IP address configured on the RADIUS server. You can change the source IP address as follows:
- Run the radius-server authentication ip-address port source command to configure a RADIUS authentication server and specify the source IP address used by the device to send RADIUS packets to the RADIUS authentication server.
- Run the radius-server accounting ip-address port source command to configure a RADIUS accounting server and specify the source IP address used by the device to send RADIUS packets to the RADIUS accounting server.
- In this example, Huawei's Agile Controller-Campus (required version: V100R003C60) acts as the RADIUS server. For details, see the Agile Controller-Campus Product Documentation.
Configuration Roadmap
Configure network connectivity to ensure that devices are routable to each other.
Configure AAA to implement RADIUS authentication, authorization, and accounting for users.
Configure 802.1X authentication for users.
- Configure authentication, authorization, and accounting parameters on Agile Controller-Campus.
- Configure the Windows 802.1X client used by users to access the network.
Procedure
- Configure network connectivity.
# On SwitchA, create VLANs, configure the allowed VLANs on interfaces, and configure a static route destined for servers.
<HUAWEI> system-view
[HUAWEI] sysname SwitchA
[SwitchA] vlan batch 10 20
[SwitchA] interface gigabitethernet 0/0/1
[SwitchA-GigabitEthernet0/0/1] port link-type trunk
[SwitchA-GigabitEthernet0/0/1] port trunk allow-pass vlan 10
[SwitchA-GigabitEthernet0/0/1] quit
[SwitchA] interface gigabitethernet 0/0/2
[SwitchA-GigabitEthernet0/0/2] port link-type trunk
[SwitchA-GigabitEthernet0/0/2] port trunk allow-pass vlan 20
[SwitchA-GigabitEthernet0/0/2] quit
[SwitchA] interface vlanif 10
[SwitchA-Vlanif10] ip address 10.2.1.1 24
[SwitchA-Vlanif10] quit
[SwitchA] interface vlanif 20
[SwitchA-Vlanif20] ip address 10.1.1.1 24
[SwitchA-Vlanif20] quit
[SwitchA] ip route-static 0.0.0.0 0.0.0.0 10.2.1.2
# On SwitchB, configure transparent transmission of 802.1X packets and add interfaces to VLAN 20.

SwitchB is a Layer 2 access switch. To ensure that 802.1X authentication can be performed for users, configure transparent transmission of 802.1X packets on SwitchB. In this example, SwitchB is an S5720-LI, S5735-L, S5735S-L, and S5735S-L-M.
[SwitchB] l2protocol-tunnel user-defined-protocol 802.1X protocol-mac 0180-c200-0003 group-mac 0100-0000-0002
[SwitchB] vlan batch 20
[SwitchB] interface gigabitethernet 0/0/2
[SwitchB-GigabitEthernet0/0/2] l2protocol-tunnel user-defined-protocol 802.1X enable
[SwitchB-GigabitEthernet0/0/2] bpdu enable
[SwitchB-GigabitEthernet0/0/2] port link-type access
[SwitchB-GigabitEthernet0/0/2] port default vlan 20
[SwitchB-GigabitEthernet0/0/2] quit
[SwitchB] interface gigabitethernet 0/0/1
[SwitchB-GigabitEthernet0/0/1] l2protocol-tunnel user-defined-protocol 802.1X enable
[SwitchB-GigabitEthernet0/0/1] bpdu enable
[SwitchB-GigabitEthernet0/0/1] port link-type trunk
[SwitchB-GigabitEthernet0/0/1] port trunk allow-pass vlan 20
[SwitchB-GigabitEthernet0/0/1] quit
- Configure DHCP on SwitchA.
# Configure the interface VLANIF 20 to assign IP addresses to users through DHCP and specify a DNS server address in the interface address pool.
[SwitchA] dhcp enable
[SwitchA] interface vlanif 20
[SwitchA-Vlanif20] dhcp select interface
[SwitchA-Vlanif20] dhcp server dns-list 10.2.1.5
[SwitchA-Vlanif20] quit
- Configure AAA on SwitchA.# Create a RADIUS server template named rd1.
[SwitchA] radius-server template rd1
[SwitchA-radius-rd1] radius-server authentication 10.2.1.6 1812
[SwitchA-radius-rd1] radius-server accounting 10.2.1.6 1813
[SwitchA-radius-rd1] radius-server shared-key cipher Huawei@2014
# Enable automatic detection.
[SwitchA-radius-rd1] radius-server testuser username test1 password cipher abc@123
[SwitchA-radius-rd1] quit
# Configure an authorization server.[SwitchA] radius-server authorization 10.2.1.6 shared-key cipher Huawei@2014
# Create an AAA authentication scheme named abc and set the authentication mode to RADIUS.[SwitchA] aaa [SwitchA-aaa] authentication-scheme abc [SwitchA-aaa-authen-abc] authentication-mode radius [SwitchA-aaa-authen-abc] quit
# Configure an accounting scheme named acco1.[SwitchA-aaa] accounting-scheme acco1 [SwitchA-aaa-accounting-acco1] accounting-mode radius [SwitchA-aaa-accounting-acco1] accounting start-fail online [SwitchA-aaa-accounting-acco1] quit
# Create an authentication domain named adser.com, and bind the AAA authentication scheme abc, accounting scheme acco1, and RADIUS server template rd1 to the domain.[SwitchA-aaa] domain adser.com [SwitchA-aaa-domain-adser.com] authentication-scheme abc [SwitchA-aaa-domain-adser.com] accounting-scheme acco1 [SwitchA-aaa-domain-adser.com] radius-server rd1 [SwitchA-aaa-domain-adser.com] quit [SwitchA-aaa] quit
- Configure 802.1X authentication on SwitchA.# Change the NAC mode to unified.
[SwitchA] authentication unified-mode
By default, the unified mode is enabled. After you change the NAT mode between common and unified, the device automatically restarts.
# Configure an 802.1X access profile and set the client authentication timeout interval to 30 seconds.[SwitchA] dot1x-access-profile name d1 [SwitchA-dot1x-access-profile-d1] dot1x authentication-method eap [SwitchA-dot1x-access-profile-d1] dot1x timer client-timeout 30 [SwitchA-dot1x-access-profile-d1] quit
# Bind the 802.1X access profile to the authentication profile p1.[SwitchA] authentication-profile name p1 [SwitchA-authen-profile-p1] dot1x-access-profile d1 [SwitchA-authen-profile-p1] access-domain adser.com force [SwitchA-authen-profile-p1] quit
# Bind the authentication profile to an interface.[SwitchA] interface gigabitethernet 0/0/2 [SwitchA-GigabitEthernet0/0/2] authentication-profile p1 [SwitchA-GigabitEthernet0/0/2] quit
- Configure Agile Controller-Campus.
- Log in to Agile Controller-Campus.
- Configure authentication and authorization parameters. For details, see "Example for Configuring Wired 802.1X Authentication" in Agile Controller-Campus Product Documentation.
- Synchronize the account information on the AD server to Agile Controller-Campus. For details, see "AD/LDAP Synchronization" in Agile Controller-Campus Product Documentation.
- (Optional) Import certificates. For details, see "Example for Configuring 802.1X + Certificate Authentication" in Agile Controller-Campus Product Documentation.
This step is required if the 802.1X client uses PEAP authentication and Validate server certificate in the Protected EAP Properties dialog box is selected.
- Configure the Windows 802.1X client. The following uses Windows 7 as an example.
An 802.1X client can use EAP-TLS or PEAP authentication. For details, see "Configuring the Standard 802.1X Client Provided by the Operating System" in Agile Controller-Campus Product Documentation.
- EAP-TLS authentication
Click the local connection and choose Properties. Then click the Authentication tab.
Select Enable IEEE 802.1X authentication, set the network authentication method to Microsoft: Smart Card or other certificate, and click Settings.
- Click Use a certificate on this computer and select Use simple certificate selection. Use default settings of other parameters and click OK.
- Click Additional Settings. Select Specify authentication mode and choose User authentication from the drop-down list box. Use default settings of other parameters and click OK.
- PEAP authentication
Click the local connection and choose Properties. Then click the Authentication tab.
Select Enable IEEE 802.1X authentication, set the network authentication method to Microsoft: Protected EAP (PEAP), and click Settings.
- Select Secured password (EAP-MSCHAP v2) from the Select Authentication Method drop-down list box, and select Enable Fast Reconnect. Use default settings of other parameters and click OK.
If Validate Server Certificate under When connecting: is selected, you need to import certificates to Agile Controller-Campus in advance.
- Click Additional Settings. Select Specify authentication mode and choose User authentication from the drop-down list box. Use default settings of other parameters and click OK.
- EAP-TLS authentication
- Verify the configuration.
- A user starts the 802.1X client on a terminal, and enters the user name and password for authentication.
- If the user name and password are correct, an authentication success message is displayed on the client page. The user then can access the network.
- After the user goes online, you can run the display access-user access-type dot1x command on the device to check the online 802.1X user information.