Configuring a DCI Scenario with VXLAN EVPN Accessing MPLS EVPN IRB
In a DCI scenario with VXLAN EVPN accessing MPLS EVPN IRB, different cloud platforms are used for management. VXLAN tunnels are established for access to the DCI backbone network, over which EVPN MPLS is used to carry Layer 3 services.
Context
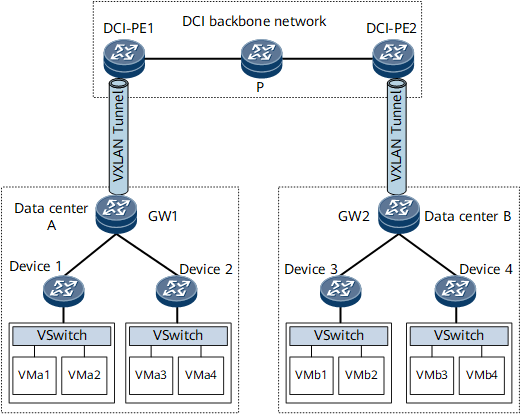
Gateways and DCI-PEs are separately deployed. EVPN is used as a control plane protocol to dynamically establish VXLAN tunnels. A DCI-PE runs EVPN to learn a VM's IP route from a DC and sends the learned host IP route to the peer DCI-PE through a BGP EVPN peer relationship to implement Layer 3 service forwarding between VMs.
On the network shown in Figure 1, the DC gateways GW1 and GW2 connect to the DCI backbone network where BGP EVPN is deployed. After BGP EVPN peer relationships and VXLAN tunnels are established between the DC gateways and DCI-PEs, host IP routes can be exchanged between different DCs, implementing communication between VMs in different DCs.
Pre-configuration Tasks
Before configuring a DCI scenario with VXLAN EVPN accessing MPLS EVPN IRB, complete the following tasks:
Configure Layer 3 route reachability on the IPv4 network.
Procedure
- Configure an IGP on the DCI backbone network to ensure IP connectivity.
- Configure a VXLAN tunnel between each DCI-PE and the corresponding gateway. For configuration details, see VXLAN Configuration.
- Configure a VPN instance that can exchange routes with an EVPN instance.
For IPv4 services, configure an IPv4 L3VPN instance.
Run ip vpn-instance vpn-instance-name
A VPN instance is created, and its view is displayed.
Run ipv4-family
The VPN instance IPv4 address family is enabled, and its view is displayed.
Run route-distinguisher route-distinguisher
An RD is configured for the VPN instance IPv4 address family.
Run vpn-target vpn-target &<1-8> [ both | export-extcommunity | import-extcommunity ]
The VPN targets used by the current VPN instance IPv4 address family to exchange routes with the L3VPN instance on the remote PE are configured.
Run vpn-target vpn-target &<1-8> [ both | export-extcommunity | import-extcommunity ] evpn
The VPN targets used by the current VPN instance IPv4 address family to exchange routes with the EVPN instance are configured.
-
The function to generate and advertise EVPN IP prefix routes and IRB routes is enabled.
(Optional) Run tnl-policy policy-name evpn
The specified tunnel policy is associated with EVPN routes leaked into the VPN instance IPv4 address family.
(Optional) Run import route-policy policy-name evpn
The VPN instance IPv4 address family is associated with an import route-policy that is used to filter routes imported from the EVPN instance into the VPN instance IPv4 address family. To control route import from an EVPN instance into the VPN instance IPv4 address family more precisely, perform this step to specify an import route-policy to filter routes and set attributes for eligible routes.
(Optional) Run export route-policy policy-name evpn
The VPN instance IPv4 address family is associated with an export route-policy that is used to filter routes advertised from the VPN instance IPv4 address family to the EVPN instance. To control route advertisement from the VPN instance IPv4 address family to an EVPN instance more precisely, perform this step to specify an export route-policy and set attributes for eligible routes.
Run quit
Exit the VPN instance IPv4 address family view.
Run quit
Exit the VPN instance view.
For IPv6 services, configure an IPv6 L3VPN instance.
Run ip vpn-instance vpn-instance-name
A VPN instance is created, and its view is displayed.
Run ipv6-family
The VPN instance IPv6 address family is enabled, and its view is displayed.
Run route-distinguisher route-distinguisher
An RD is configured for the VPN instance IPv6 address family.
Run vpn-target vpn-target &<1-8> [ both | export-extcommunity | import-extcommunity ]
The VPN targets used by the current VPN instance IPv6 address family to exchange routes with the L3VPN instance on the remote PE are configured.
Run vpn-target vpn-target &<1-8> [ both | export-extcommunity | import-extcommunity ] evpn
The VPN targets used by the current VPN instance IPv6 address family to exchange routes with the EVPN instance are configured.
-
The function to generate and advertise EVPN IP prefix routes and IRB routes is enabled.
(Optional) Run tnl-policy policy-name evpn
The specified tunnel policy is associated with EVPN routes leaked to the VPN instance IPv6 address family.
(Optional) Run import route-policy policy-name evpn
The VPN instance IPv6 address family is associated with an import route-policy that is used to filter routes imported from the EVPN instance into the VPN instance IPv6 address family. To control route import from an EVPN instance into the VPN instance IPv6 address family more precisely, perform this step to specify an import route-policy to filter routes and set route attributes for eligible routes.
(Optional) Run export route-policy policy-name evpn
The VPN instance IPv6 address family is associated with an export route-policy that is used to filter routes advertised from the VPN instance IPv6 address family to the EVPN instance. To control route advertisement from the VPN instance IPv6 address family to an EVPN instance more precisely, perform this step to specify an export route-policy to filter routes and set route attributes for eligible routes.
Run quit
Exit the VPN instance IPv6 address family view.
Run quit
Exit the VPN instance view.
- Establish on the local DCI-PE a BGP EVPN peer relationship with the remote DCI-PE, and enable the local DCI-PE to advertise routes re-originated by the EVPN address family to the BGP EVPN peer.
- (Optional) Run peer ipv4-address connect-interface interface-type interface-number [ ipv4-source-address ]
A source interface and a source address are specified for the setup of a TCP connection with the BGP peer.

If loopback interfaces are used to establish a BGP connection, you are advised to run the peer connect-interface command on both ends to ensure the connectivity. If this command is run on only one end, the BGP connection may not be established.
- (Optional) Run peer ipv4-address connect-interface interface-type interface-number [ ipv4-source-address ]
- (Optional) Configure AC access to the DCI backbone network on the DCI-PE. This enables flexible device deployment on the network.
- Run commit
The configuration is committed.