Replacing an Optical Cable
Context
Before replacing an optical cable, you need to note the flowing points:
During the process of replacing an optical cable, the services are interrupted temporarily.
Be careful when you remove or insert an optical cable in case that the connector of the optical cable is damaged.
When installing or maintaining an optical interface board or an optical cable, do not observe an optical interface or connectors of an optical cable.
The bending radius of a single-mode G.657A2 optical fiber is greater than or equal to 10 mm, and the bending radius of a multi-mode A1b optical fiber is greater than or equal to 30 mm.
Connectors of optical cables are divided into the LC type and the SC type. You must select an optical cable according to the interface type.
Tool
Before replacing an optical cable, you need the following tools:
Cutter
Binding strap
ESD wrist strap or ESD glove
Procedure
- Record the location of both ends of the optical cable to be replaced and the cabling mode.
- Take out the new optical cable and check whether the type of the new optical cable is consistent with that of the old one. The multi-mode optical cable is orange and the single-mode optical cable is yellow.
- Make a new label according to the contents of the label on the old optical cable.
- Lay out the new optical cable in the original place.
- Remove the old optical cable.
- Put on the ESD gloves or wrist strap and connect the grounding terminal to the ESD jack on the rack.
- Hold the connectors and remove them. Then, cover the connectors with dust caps.

If a connector is dusty, clean it with dust-free cloth or fiber cleaning paper.
- Remove the old optical cable from the corrugated pipe.
- Insert the new optical cable.
Before inserting the new optical cable, remove the dust caps and keep them properly for future use. Then, connect both ends of the new optical cable to the optical interfaces and secure the optical cables.
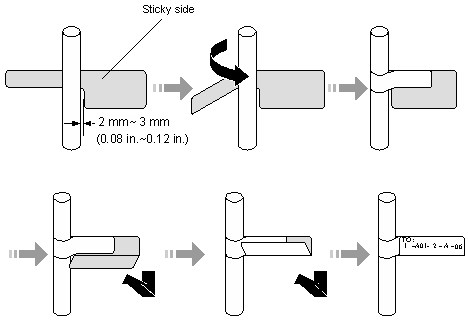
- Attach a label to the new optical cable, as shown in Figure 1.
- Lay out the new optical cable in a tidy manner in the cabinet and bind the optical cable with a binding strap. Note that the optical cable should be bound with proper strength and with even space in between. Bind the redundancies of the optical cable at the ODF side.
- Check whether the new optical cable works normally.
- Check the LINK indicator at the optical interface. If the indicator is steady on and green, it indicates that the link is Up.
- Check whether the service on the board where the new optical cable connects is normal. If the services are normal, it indicates that the optical cable is replaced successfully.
- Check whether there is any new alarm or performance event.
Follow-up Procedure
After replacing an optical cable, collect the tools and the replaced optical cable. Do not place the old and the new optical cables together to avoid confusions.
